

pin stitched Madeira pillowcase hem
Just a few days ago, Lindsay wrote, “ Would you post or share you technique for pin stitching. Needles, setting, fabric and lace prep, thread, machine, etc.?” So this post is dedicated to Lindsay and her inquiring mind.~~~~~
Some time ago, I promised a tutorial post on pin stitch and now it’s time to address this question. In my humble opinion, few machine-made embellishments for classic clothing have as much aesthetic impact as the most common hemstitches, pin stitch and entredeux. So, for those of us who love to create such garments, it is important to know about these two machine made hem stitches.
Since this is a very broad topic, this post will deal only with pin stitch. As a matter of fact, it will take two posts for pin stitch. Some time later, I will talk about entredeux.
Also known as point de paris and Parisian hem stitch, is a stitch made by both hand and machine. This discussion deals only with machine made hem stitches.

First let me give you a brief overview of this stitch. Much of this information is taken from Carol Ahles’ excellent reference book, Fine Machine Sewing.
DESCRIPTION: Pin stitch is described by Carol as a stitch pattern that resembles the letter “L” (or when mirror imaged, a reversed “L”) repeating the vertical stitches and on some machines, the horizontal stitches.
 It looks like this in the machine stitch menu. On several machines I have used, this requires 8 stitches for each hole, which appears at the left end of the horizontal stitch. A good starting point for settings is W. 2.5 and L. 2.5. Don’t be tricked into using a stitch that has two horizontal stitches. Those are usually for applique’ and will not give the same look as a genuine pin stitch.
It looks like this on fabric, shown here on a lace tape Wedding Ring dress.
The pin stitch is worked around the lace tape, attaching it to the fabric.
CONSIDERATIONS: There are several factors that come in to work a pretty pin stitch. These factors include selection of fabric, needle, thread, trims, preparation and presser foot.
1. Fabric~greatest success is achieved by choosing a 100% natural fiber fabric, though silk is not a good choice. Linen and cotton are most commonly used.
Blends, even lovely Imperial batiste, are just not suitable for most hemstitching. I once was determined to pin stitch lace tape on an Imperial batiste Chery William Lacy Bishop doll dress. Ultimately, it looked pretty good a long as the doll was lying flat. So much starch was required that the dress was as stiff as cardboard. When it was laundered, the puckers looked like one side of puffing. It was a baaaaad choice.
2. Needles: The most common needle choice is a wing, which comes in two sizes, #100 and #120.

Other common choices include #100 sharp or a #90. Keep in mind that the size of the needle determines the size of the hole created with this stitch. I love the big, showy holes of the 120 wing. But on baby items I often choose a #90. On doll dresses, I have used needles as small as #60, though #80 is more common.
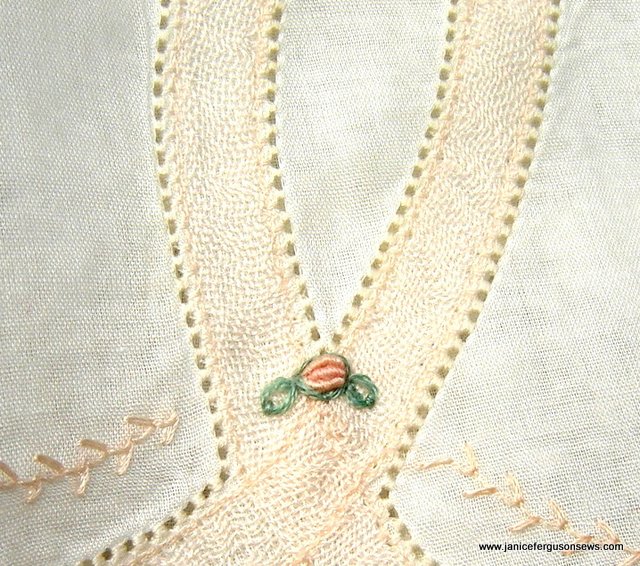
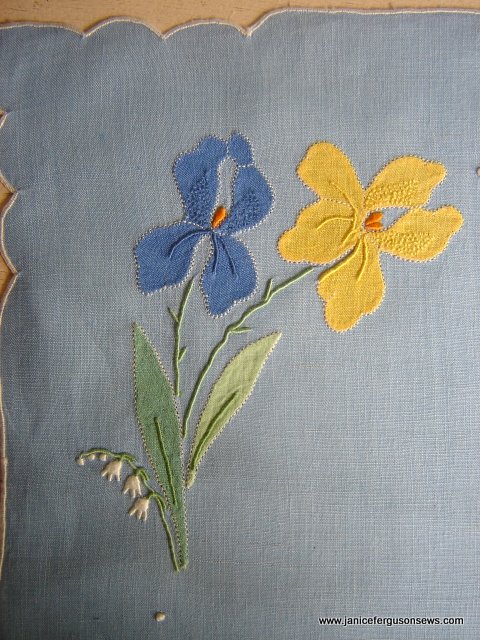
If your goal is to emulate handwork, you should strive for smaller holes. Compare the size of the hand worked pin stitch on the iris placemat and the shadow work collar to the examples of machine pin stitches.
Hand worked pin stitch. Usually with Madeira applique’, the thread color matches either the foundation fabric or the applique’ piece.
3. THREAD: Fine thread needs to be used. Think about the fact that you are punching a hole in fabric and pulling it open with thread. It’s likely that there will be 4 threads in that pretty hole which you want to see. Heavy thread will fill it up. My thread of choice is Maderia Cotona #80.

4. TRIMS: This is where it gets tricky. You sometimes have to select the needle that will suit your trim. Most lace is fine with a wing, but some dense or delicate laces might be cut by the spade-like shape of the wing needle. In those cases, you would be wise to choose a sharp needle rather than the wing.
Tatting is especially worrisome, because a cut there is very, very hard to mend and reckless to ignore. It will come unraveled. I have found one pattern of tatting that relatively safe from damage when pin stitching.

Notice how the greater part of the pattern is away from the crochet cord to which the tatting is attached.
It was successfully (and carefully) joined to the perimeter of this 20″ table topper. That amounts to 80″ without a cut.

5. PREPARATION: fabric~Heavily starched linen or cotton can usually be pin stitched without stabilizer. Always, always rehearse your settings on the exact fabric, preferably with the same grain line, with the exact amount of starch before you begin. I usually press a scrap from the project and if I am joining lace, I set it up in the same manner as the project. Then I begin, taking care to record the settings with a pen next to each trial on the scrap.
6. PRESSER FOOT: All my sewing machines have told me to use a foot which helps control a forward & backward stitch pattern. On my Brother machines it is the “N” foot which has a clear plastic window so you can see fabric as it approaches the needle. But still I have much better results when using an open toe foot. None of the control the “N” foot gives me is worth the visibility I get from the open toe foot. Try the recommended foot and then try an open toe. Choose the one that works best for you.
To be continued: What now? Actual nitty gritty needle/thread to fabric how-to and applications.

Pingback: Tutorial – How to Do Pin Stitching on a Sewing Machine | DIY Supplies