Новые и опытные SEO-копирайтеры настоятельно рекомендуют загрузить Yoast SEO в качестве плагина WordPress, чтобы помочь оптимизировать текст SEO. Как только вы научитесь SEO-копирайтингу, вы сможете писать контент, который будет высоко ранжироваться на страницах результатов Google, а также привлекать клики от потенциальных клиентов или клиентов. Примечание. Если вы хотите, чтобы весь заголовок отображался в результатах поиска, не превышайте 72 символа. Это также повысит рейтинг кликов. Сам контент является жизненно важным элементом SEO-копирайтинга. Основная причина, по которой люди выполняют поиск в Google и других поисковых системах, заключается в том, что они ищут полезный контент. Поисковые системы также питаются свежим SEO-контентом, поэтому вы должны постоянно обновлять свой сайт. Маркус Шеридан увеличил свою компанию по плаванию с менее чем 10 000 до 80 000 посетителей в месяц; в течение 6 месяцев, и он увеличил свой органический трафик, ведя блог 2-3 раза в неделю.
В этом посте показано, как использовать группы контента и настраиваемые параметры, чтобы получить максимум информации. В Китае самое большое интернет-население в мире, но это место, где все знакомые социальные платформы и устоявшиеся мантры контента просто не применимы. Этот веб-семинар посвящен разбивке ключевых платформ социальных сетей Китая и типов контента, который работает. На этом вебинаре обсуждается зарабатывание ссылок с помощью сегментации аудитории, что позволяет вам создавать правильный контент для ваших пользователей. На этом вебинаре мы покажем вам, как сделать контент больше, лучше, громче и выделиться на фоне современной конкурентной среды контент-маркетинга. Мы расскажем, как планировать создание большого контента, управлять его производством и продвигать его во всех нужных местах. Примерно через месяц разработки мой сайт был наконец готов, и я хотел начать думать о том, как привлечь трафик на сайт. Хотя платная реклама и социальные сети были важной частью стратегии, я знал, что появление в поисковых системах широкого набора длинных фраз будет способствовать успеху блога.
Метрика будет бессмысленной, пока индекс не станет стабильным. В конечном счете, я не смог получить все, что хотел, но у меня осталось 9 надежных, четко определенных показателей. В интересах TAGFEE я открыто признаю, что, по моему мнению, в нашем индексе больше удаленных ссылок, чем в других, таких как Ahrefs Live Index. На момент написания статьи у нас было около 30 триллионов ссылок в нашем индексе, из них 25 триллионов мы считаем активными, но мы знаем, что некоторые из них, скорее всего, обратные ссылки нет. Хотя я считаю, что у нас больше всего активных ссылок, я не думаю, что у нас самый высокий процент активных ссылок в индексе. Эта честь, вероятно, достается не Мозу. Я не могу быть уверен, потому что мы не можем тестировать его полностью и регулярно, но в интересах прозрачности и справедливости я чувствовал себя обязанным упомянуть об этом. Я мог бы, однако, посвятить более позднюю публикацию просто тестированию этой метрики в течение месяца и описать правильную методологию, чтобы сделать это честно, поскольку это обманчиво сложная метрика для измерения.
Google постоянно меняет свой алгоритм, чтобы предоставлять лучшие результаты поисковикам. Но год за годом обратные ссылки продолжают оставаться важным сигналом ранжирования. Ссылки с других сайтов передают авторитет вашему сайту. Они остаются ярчайшим показателем того, что вы являетесь хорошим источником информации и заслуживаете ранжирования на первой странице. Тем не менее, благодаря таким обновлениям, как Google Penguin (в котором основное внимание уделяется качеству ссылок), вы не можете просто завалить свой сайт некачественными ссылками и ожидать, more information что за одну ночь он займет первое место. Количество сейчас не является конечной целью. Качество есть. Белая шляпа заработала ссылки. Но не верьте нам на слово. Качественные обратные ссылки цифровые PR-обратные ссылки (ссылки в контенте, который действительно читают ваши идеальные клиенты, на сайты, которые вы действительно узнаете) продвигают иглу и улучшают ваш EAT. Так что же работает, когда дело доходит до линкбилдинга? Какие инструменты и стратегии используют профессионалы отрасли для достижения результатов? Чтобы выяснить это, мы опросили 800 человек в индустрии SEO, чтобы узнать их мнение о важности, стратегиях и влиянии линкбилдинга.
Обязательно не спамьте на форумах, просто разместив свои ссылки везде! Вы должны быть хитрыми и хитрыми в размещении ссылок на форумах, иначе их просто удалят. Лучший (и самый безопасный) способ создать обратные ссылки на форум — добавить свою ссылку в свою подпись и опубликовать отличный контент / ответы, и вы увидите, что получаете хороший объем реферального трафика. Один из менее известных способов получить высококачественные обратные ссылки — создать вакансию для вашего бизнеса по продаже марихуаны и отправить ее на доски объявлений, каталоги и каналы. Существуют даже специальные доски объявлений о вакансиях, связанных с марихуаной, где вы можете бесплатно добавить свою работу (и обратную ссылку). 420 Careers и Weed Hire — два отличных примера досок объявлений о вакансиях, на которых вы можете опубликовать свою работу с марихуаной. Просто добавьте свою обратную ссылку в описание вашей работы или в информацию о компании, если это применимо. Пресс-релизы — отличный способ быстро получить мощный поток обратных ссылок для вашей аптеки или бизнеса по производству марихуаны.
Возможно, издатели допустили какую-то ошибку или вы просто внесли какие-то изменения на свой сайт за это время. В любом случае это может вызвать подозрения у читателя относительно надежности внешнего сайта, а также вашего. В обоих случаях это может привести к потере трафика. Поэтому рекомендуется регулярно проверять свои обратные ссылки и связываться с внешними издателями, как только обнаружите неработающую. Вместе вы сможете найти подходящую замену или решение другого типа. Таким образом, вы можете легко превратить неработающие обратные ссылки в высококачественные обратные ссылки. Один из менее прямых способов — сосредоточиться на построении внутренней структуры ссылок. Когда у вас есть большое количество внутренних ссылок на вашем веб-сайте, пользователям легче перемещаться по нему. Создание лучшего общего пользовательского опыта делает внешние сайты более склонными к использованию вашего веб-сайта в качестве потенциального источника ссылок. Ведь они хотят предоставить своим читателям контент, который покажется им максимально интересным.
Что делает контент отличным? 1. Это полезно? 2. Имеет ли он характер или рассказывает историю? 3. Это интересно или уникально? 4. Можно ли поделиться? 5. Можно ли его найти? 6. Является ли оно технически правильным с точки зрения грамматики, правописания и формата? Самореклама, неаккуратное написание и наполнение ключевыми словами — все это способы отключить как читателей, так и поисковые системы. Прежде чем тратить время на создание обратных ссылок, сначала создайте отличный контент. 2. Продвигайте свой контент в нужных местах. Первый шаг к получению обратных ссылок и репостов — сообщить людям о существовании вашего контента. Отправка вашего последнего поста в блоге подписчикам и другим пользователям из ваших списков контактов по электронной почте является очевидным началом для продвижения контента, backlinks как и публикация вашего блога в социальных сетях. Помимо простого обмена ссылкой на запись в блоге в твите или обновлении статуса, вы также можете, с осторожностью, поделиться ею другими способами в социальных сетях, например, используя ссылку в ответе на тему в отраслевой группе на Facebook или LinkedIn.
Это означает, что он очень популярен, имеет тысячи обратных ссылок, миллионы посетителей и очень уважаемый бренд. Когда этот веб-сайт будет ссылаться на любой ваш продукт, сообщение, страницу или решение в своем сообщении в блоге в качестве ссылки, источника данных и информации или экспертного решения для своих читателей / посетителей, Web site это называется высококачественной обратной ссылкой. Когда вы добавляете ссылку на связанную тему и решение из своего поста или страниц на чей-то другой веб-сайт, это входящие или обратные ссылки на этот веб-сайт. Насколько важны обратные ссылки для SEO? Входящие (внутри веб-сайта), обратные ссылки (входящие ссылки с другого веб-сайта на ваш веб-сайт) и исходящие (исходящие) представляют собой качество ссылочной структуры вашего веб-сайта. И когда он действительно создан или выглядит естественно, он автоматически повысит авторитетность домена, веб-сайта, сообщений и страниц в поисковых системах. Вот почему обратные ссылки и методы простой для сканирования структуры ссылок важны для повышения вашего SEO и снижения показателя отказов и качества вашего контента и веб-сайта.
Эти же ключевые слова можно добавлять в блоги точно так же, как вы разместили их в своей веб-копии. Они должны появляться по всему блогу, но не переусердствуйте. Заполнение ключевыми словами приведет к штрафу Google, поэтому вам нужно найти тонкий баланс между использованием ключевого слова и предоставлением качественного контента. Например, пользователь, который ищет информацию о лучших добавках для тяжелой атлетики, может быть связан с вашим блогом «Четыре лучших протеиновых коктейля для бодибилдеров». Они могут узнать о вашем продукте и перейти к следующему шагу его покупки. Важно регулярно проверять ключевые слова. SEO не в том, чтобы настроить и забыть. Вместо этого вы захотите увидеть, какой прогресс делает каждое ключевое слово. Эффективность ключевых слов часто зависит от тенденций, и высокоэффективные ключевые слова могут внезапно упасть по мере изменения тенденций. Нужна помощь в оптимизации SEO с использованием ключевых слов? У нас есть два самых продаваемых продукта для SEO: HOTH Web Copy и HOTH Blogger.
Рекомендуемые сниппеты — это поля для ответов, которые появляются в верхней части «SERP» или страницы результатов поисковой системы. 1 место почти в 100% случаев. Это означает, что по мере того, как расширенные сниппеты становятся все более популярными, они трансформируют поисковую выдачу… С точки зрения ранжирования ключевых слов, расширенные сниппеты чаще используются для ключевых слов, основанных на вопросах (как в примере выше). Выберите длинное ключевое слово или ключевое слово, основанное на вопросе, чтобы написать авторитетный ответ, и вы повысите свои шансы на показ. Такие инструменты, как Ubersuggest, обратные ссылки могут помочь вам выбрать правильное ключевое слово. Чтобы получить максимальную отдачу от своего основного или «основного» ключевого слова, используйте его стратегически на своем веб-сайте. Всегда используйте основное ключевое слово в заголовке страницы, чтобы помочь Google понять, о чем ваша страница. Вы также должны попытаться включить свое основное ключевое слово и некоторые варианты ключевых слов в подзаголовки. Также рекомендуется попробовать использовать основное ключевое слово в первом абзаце страницы. Наконец, не злоупотребляйте ключевыми словами; в противном случае это может быть расценено как наполнение ключевыми словами, что может повредить вашему рейтингу Google SEO.
У вашего конкурента есть обратные ссылки во всех местных каталогах по всей Новой Англии. Они перечислены в каталогах Вермонта, Нью-Гемпшира, Мэна и Массачусетса. Они были отмечены в нескольких статьях местных СМИ. Это отличная информация. Вы можете начать с имитации их ссылок — это простой первый шаг. Зарегистрируйтесь в этих каталогах и обратитесь к средствам массовой информации. Затем вы замечаете, что у них нет обратных ссылок в каталогах для пары штатов Новой Англии. Теперь у вас сразу же появится конкурентное преимущество в Коннектикуте и Род-Айленде. Когда вы делаете охват, вам нужно сообщить веб-мастерам, какой конкретный URL вы хотите, чтобы они добавили. Это целевая страница вашей обратной обратные ссылки. И лучше пусть будет хорошо! Да, каждая страница вашего сайта должна быть максимально качественной, чтобы выделяться в поисковых системах и завоевывать доверие пользователей. Но целевые страницы для ваших кампаний по созданию ссылок должны быть максимально высокого качества и тщательно оптимизированы, чтобы максимизировать вовлеченность и коэффициент конверсии.
Полное руководство — это не совсем то же самое, что создание страницы ресурса на вашем сайте. Страницы ресурсов часто бывают полезны, но они отличаются от полных руководств тем, что не содержат много информации; скорее, они перечисляют другие места, где люди могут найти информацию. Напротив, Ultimate Guide — это универсальный магазин для всего, что связано с определенной темой. Несмотря на распространенное мнение, каталоги не вымерли. На самом деле, они, возможно, являются одним из лучших способов улучшить локальное SEO и упростить поиск потенциальных клиентов. Конечно, не говоря о спам-каталогах, которые существуют только для создания ссылок. Это с большей вероятностью, чем что-либо еще, ухудшит вашу эффективность SEO. Люди используют такие каталоги, как Google My Business, Yelp и TripAdvisor, поэтому убедитесь, что вы указаны в них. Помимо этих известных каталогов, существует множество других общих и специализированных каталогов, которые могут помочь вам улучшить ваш рейтинг и трафик. Локальное SEO для малого бизнеса важнее, чем когда-либо, сейчас, когда Google стал намного более конкурентоспособным в своем стремлении доминировать в индустрии поисковых систем.
Блоггеры делятся контентом, который они бы создали сами, если бы у них была возможность или было время. Например, предположим, что блоггер пишет обзор видеоигры. У них нет времени/не могут делать собственные скриншоты. Поэтому вместо этого они используют вашу и сбрасывают обратную ссылку. Вы экономите их время в обмен на обратную ссылку. Каждый раз, когда вы облегчаете жизнь другому блоггеру или ускоряете его работу, вы, вероятно, будете получать качественные обратные ссылки для SEO. Все в мире пытаются улучшить свою репутацию, свой авторитет и свой бренд. Когда мы помогаем им достичь этого, мы, вероятно, получим высококачественную обратную ссылку для SEO. Например, предположим, что блоггер пытается заявить о себе как об авторитете в этой самой теме (получение обратных ссылок). Лучше всего для этого человека было бы, если бы другие блоггеры относились к нему как к авторитету.
Если вам понравилась эта короткая статья, и вы наверняка захотите получить дополнительную информацию о Additional Information добро пожаловать на наш собственный сайт.
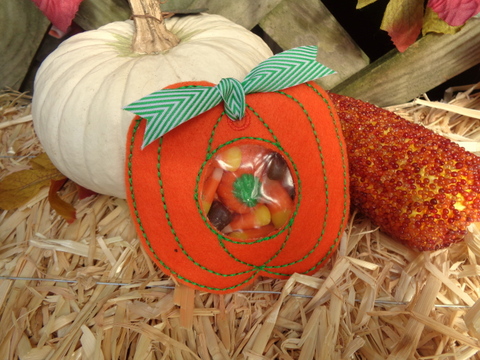
This is from a post at Brother’s blog Stitching Sewcial https://www.brother-usa.com/blogs/stitching-sewcial/a-pumpkin-patch-of-pumpkin-goodies. All instructions with detailed photos are located there. The links for the machine embroidered peekaboo pumpkins 4×4.pes and 5×7.pes are no longer active, so if you would like them, just email me at janicegferg0616@gmail.com and I will send them. I love this project and think you will too.
It’s a pumpkin patch of goodies and so much fun to make! With your Brother Embroidery machine, you can quickly stitch enough to fill a basket of these cuties. Delight visiting children or any young friends at church or community gatherings. Mail a few to your grandchildren or deliver some to nursing home friends or children at a homeless shelter. Because pumpkin season runs long, from fall to Thanksgiving, a wagon load would not be too many. You will have a good time making and giving these away. The possible variations are unlimited. You will have a hard time stopping with one. I could not! Individual pumpkins are mixed in with the directions. WARNING: These can be addictive.
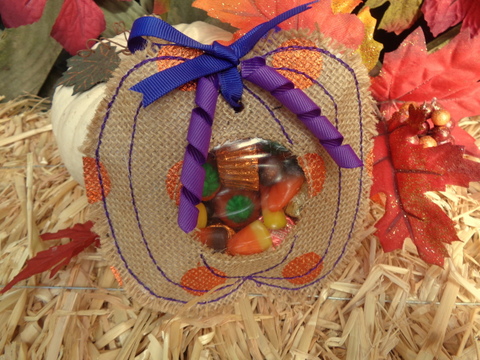
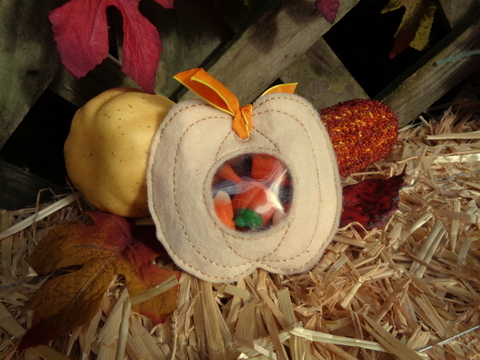
Here are a few variations.
orange felt, green stripe ribbon
There are so many interesting printed burlaps that would make cute pumpkins. I like to cut a wider distance from the stitching to create fringe. Adding curly ribbon makes it more festive. like the way the burlap fringes.
polka dot burlap with curly ribbon
This would have looked nice with gold metallic thread. I always get these ideas too late. Maybe I’ll make another one!
This project was designed for Brother machines some time ago, but I am certain you clever readers with other machines can adapt the relatively simple directions and have fun with this. I apologize for the late posting so close to Halloween, but my home in central Florida was in the path of Hurricane Ian. This caused a significant delay. We were blessed to have suffered very minimal damage-a great deal of debris and a downed 60′ palm tree. This graceful palm had Confederate jasmine climbing to its very top before it fell conveniently away from our pool. We continue to pray for those less fortunate whose losses were devastating.
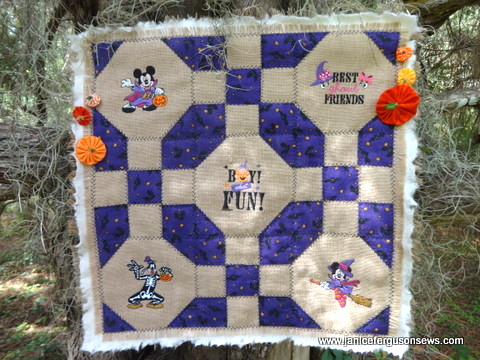
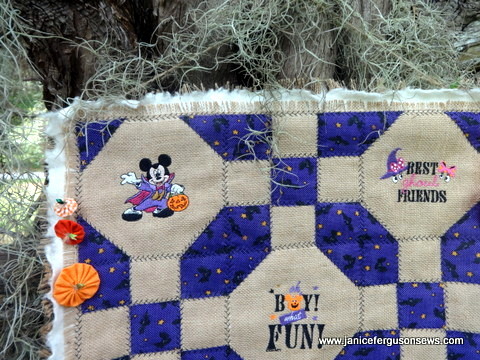
For the fortunate ones, life goes on. Children helped to pick up the fallen branches and asked about their Halloween costumes. Did you know that Halloween is the most popular secular holiday? Celebrate with this kid-pleasing Halloween wallhanging and learn a quick and easy technique. This can be used with other themes and holidays.
With some burlap, Brother’s wholesome Disney Halloween machine embroidery collection from ibroidery.com and some seasonal fabric you will be on your way. Discover and master a unique, easy and fun faux quilting technique. Children will be delighted when they see Goofy’s skeleton glow in the dark.
Requirements
Fabric:
*Halloween print—four 4” squares, eight 2 x 4” rectangles, eight 2” squares, 19 x 3 ½” for sleeve
burlap 19 1/2” square for front, 25” square for backing. This is extra large to account for the many ravels as the piece is handled. Later it will be trimmed to size.
*orange scraps for yo-yo’s
Cotton batting 22” square
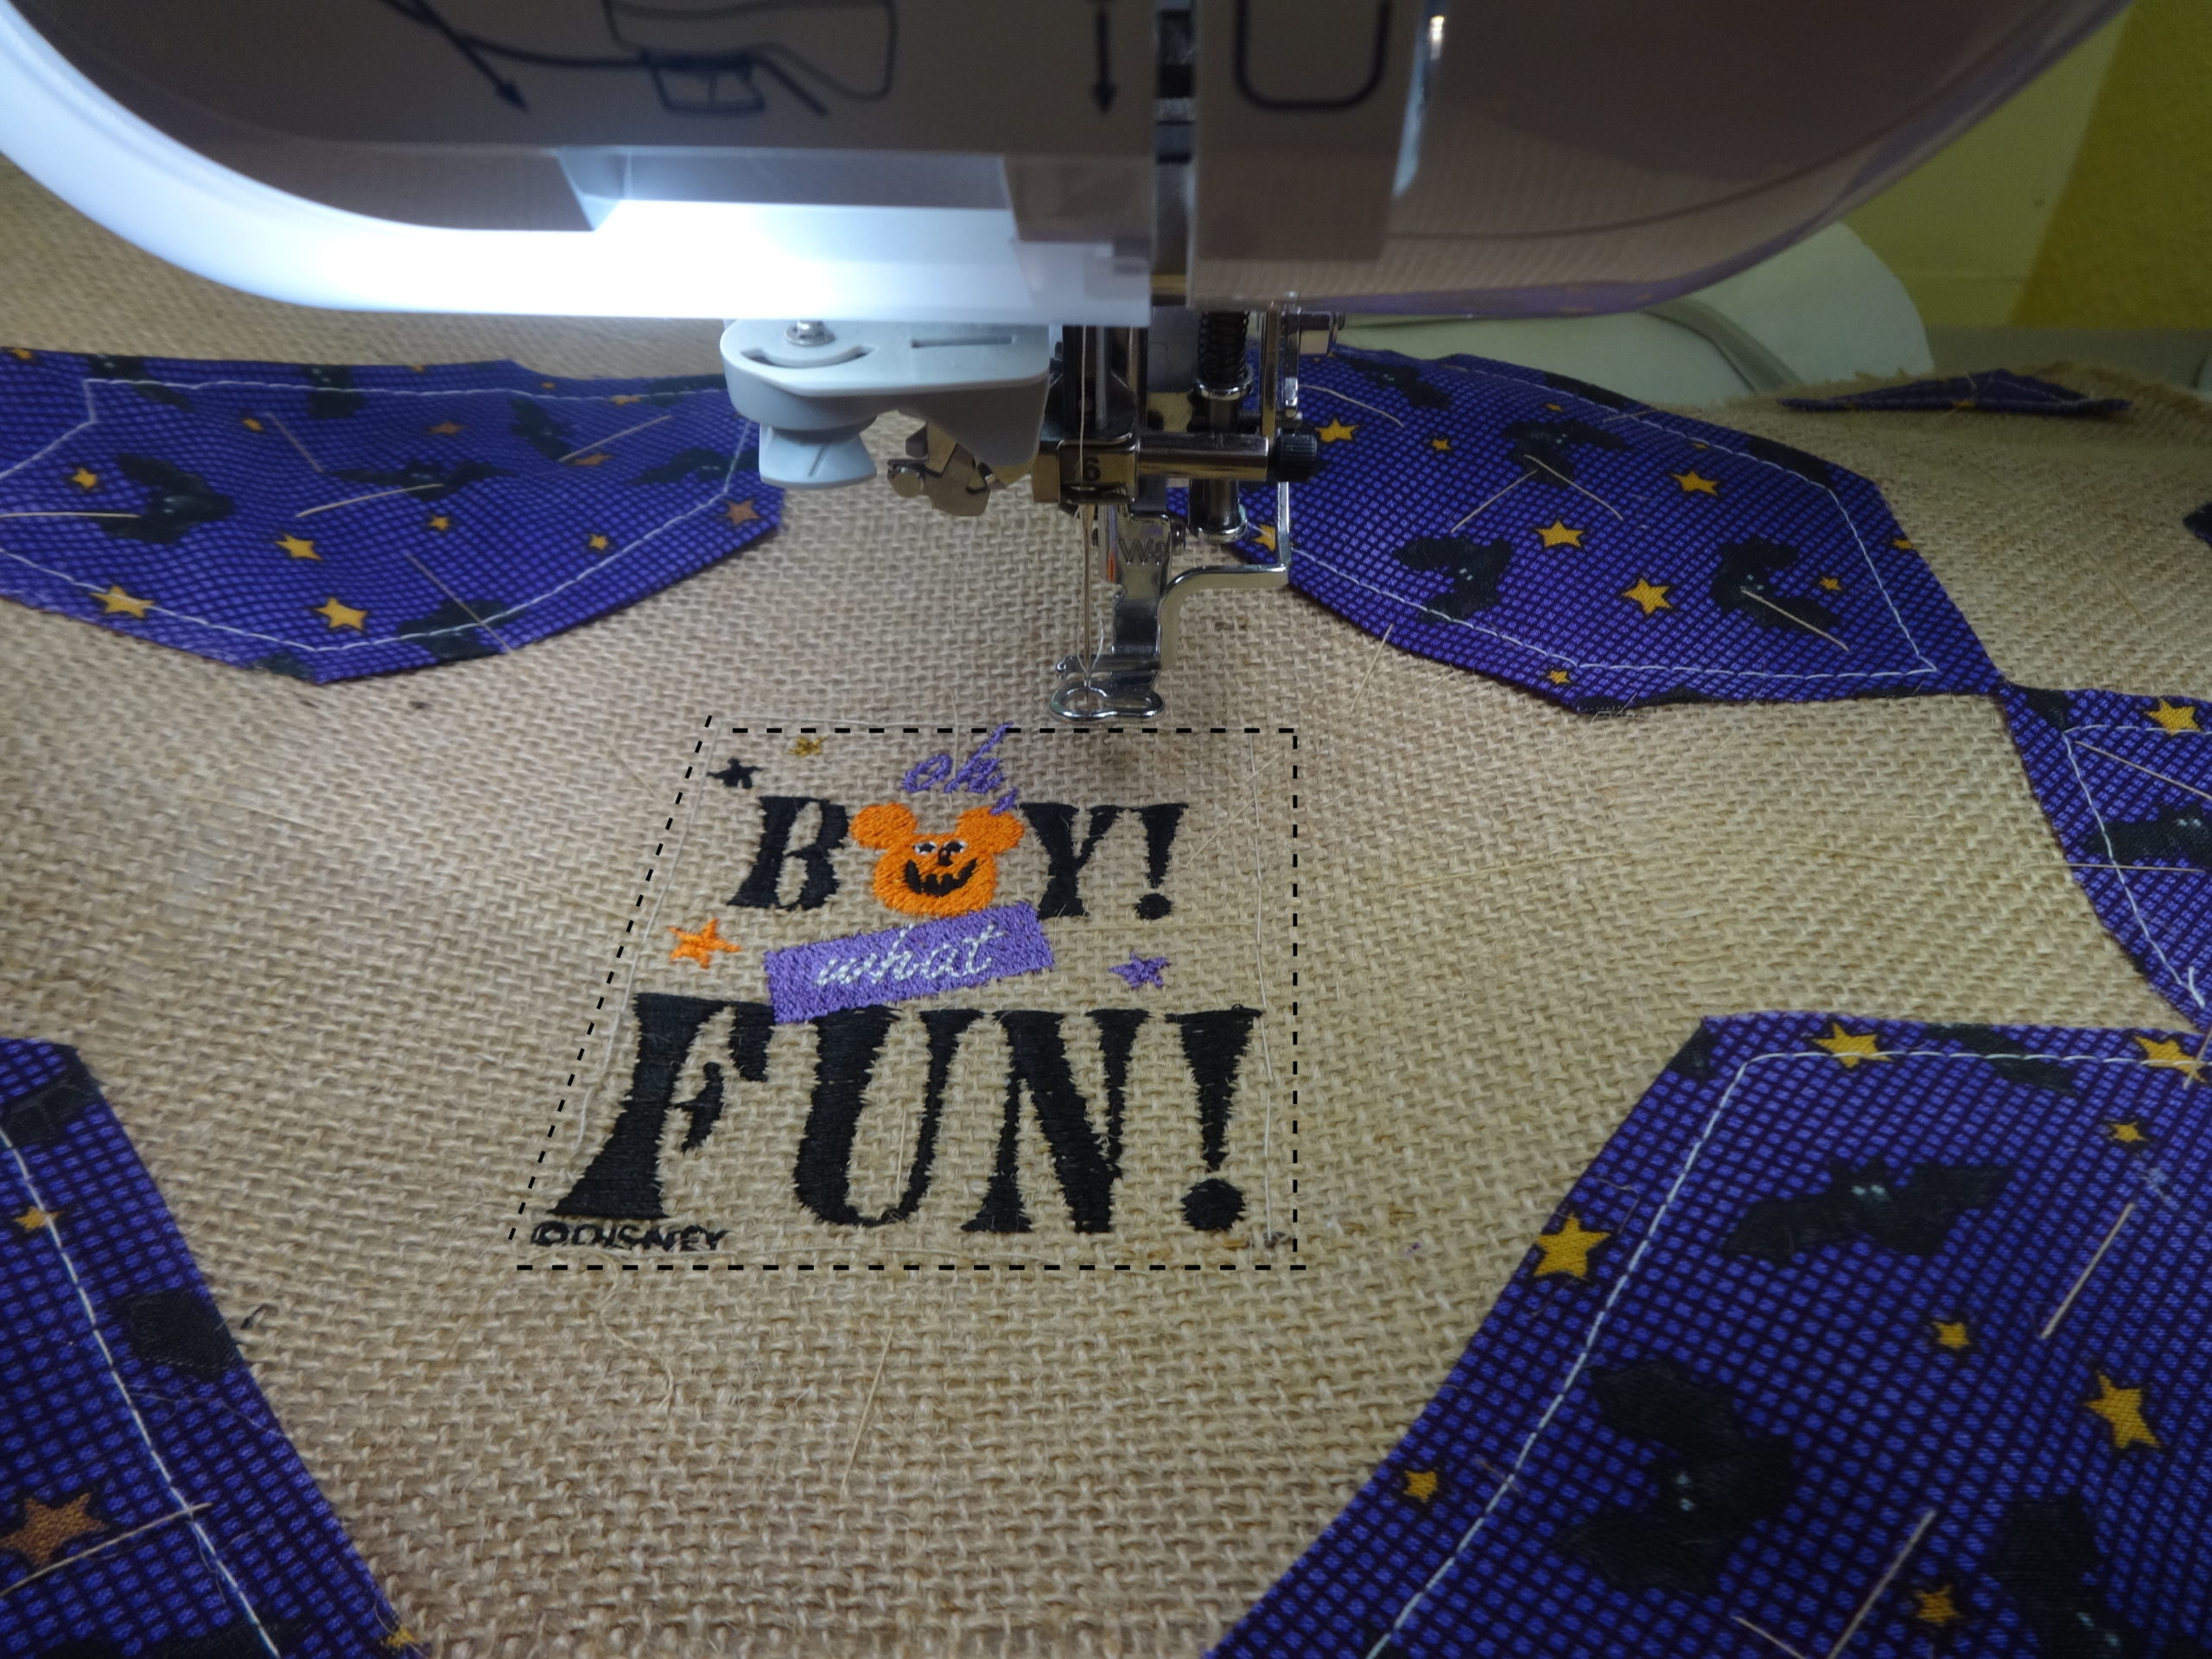
Ibroidery.com Disney Halloween designs: DMHLW01–Mickey with pumpkin, DMHLW02–Minnie with broom
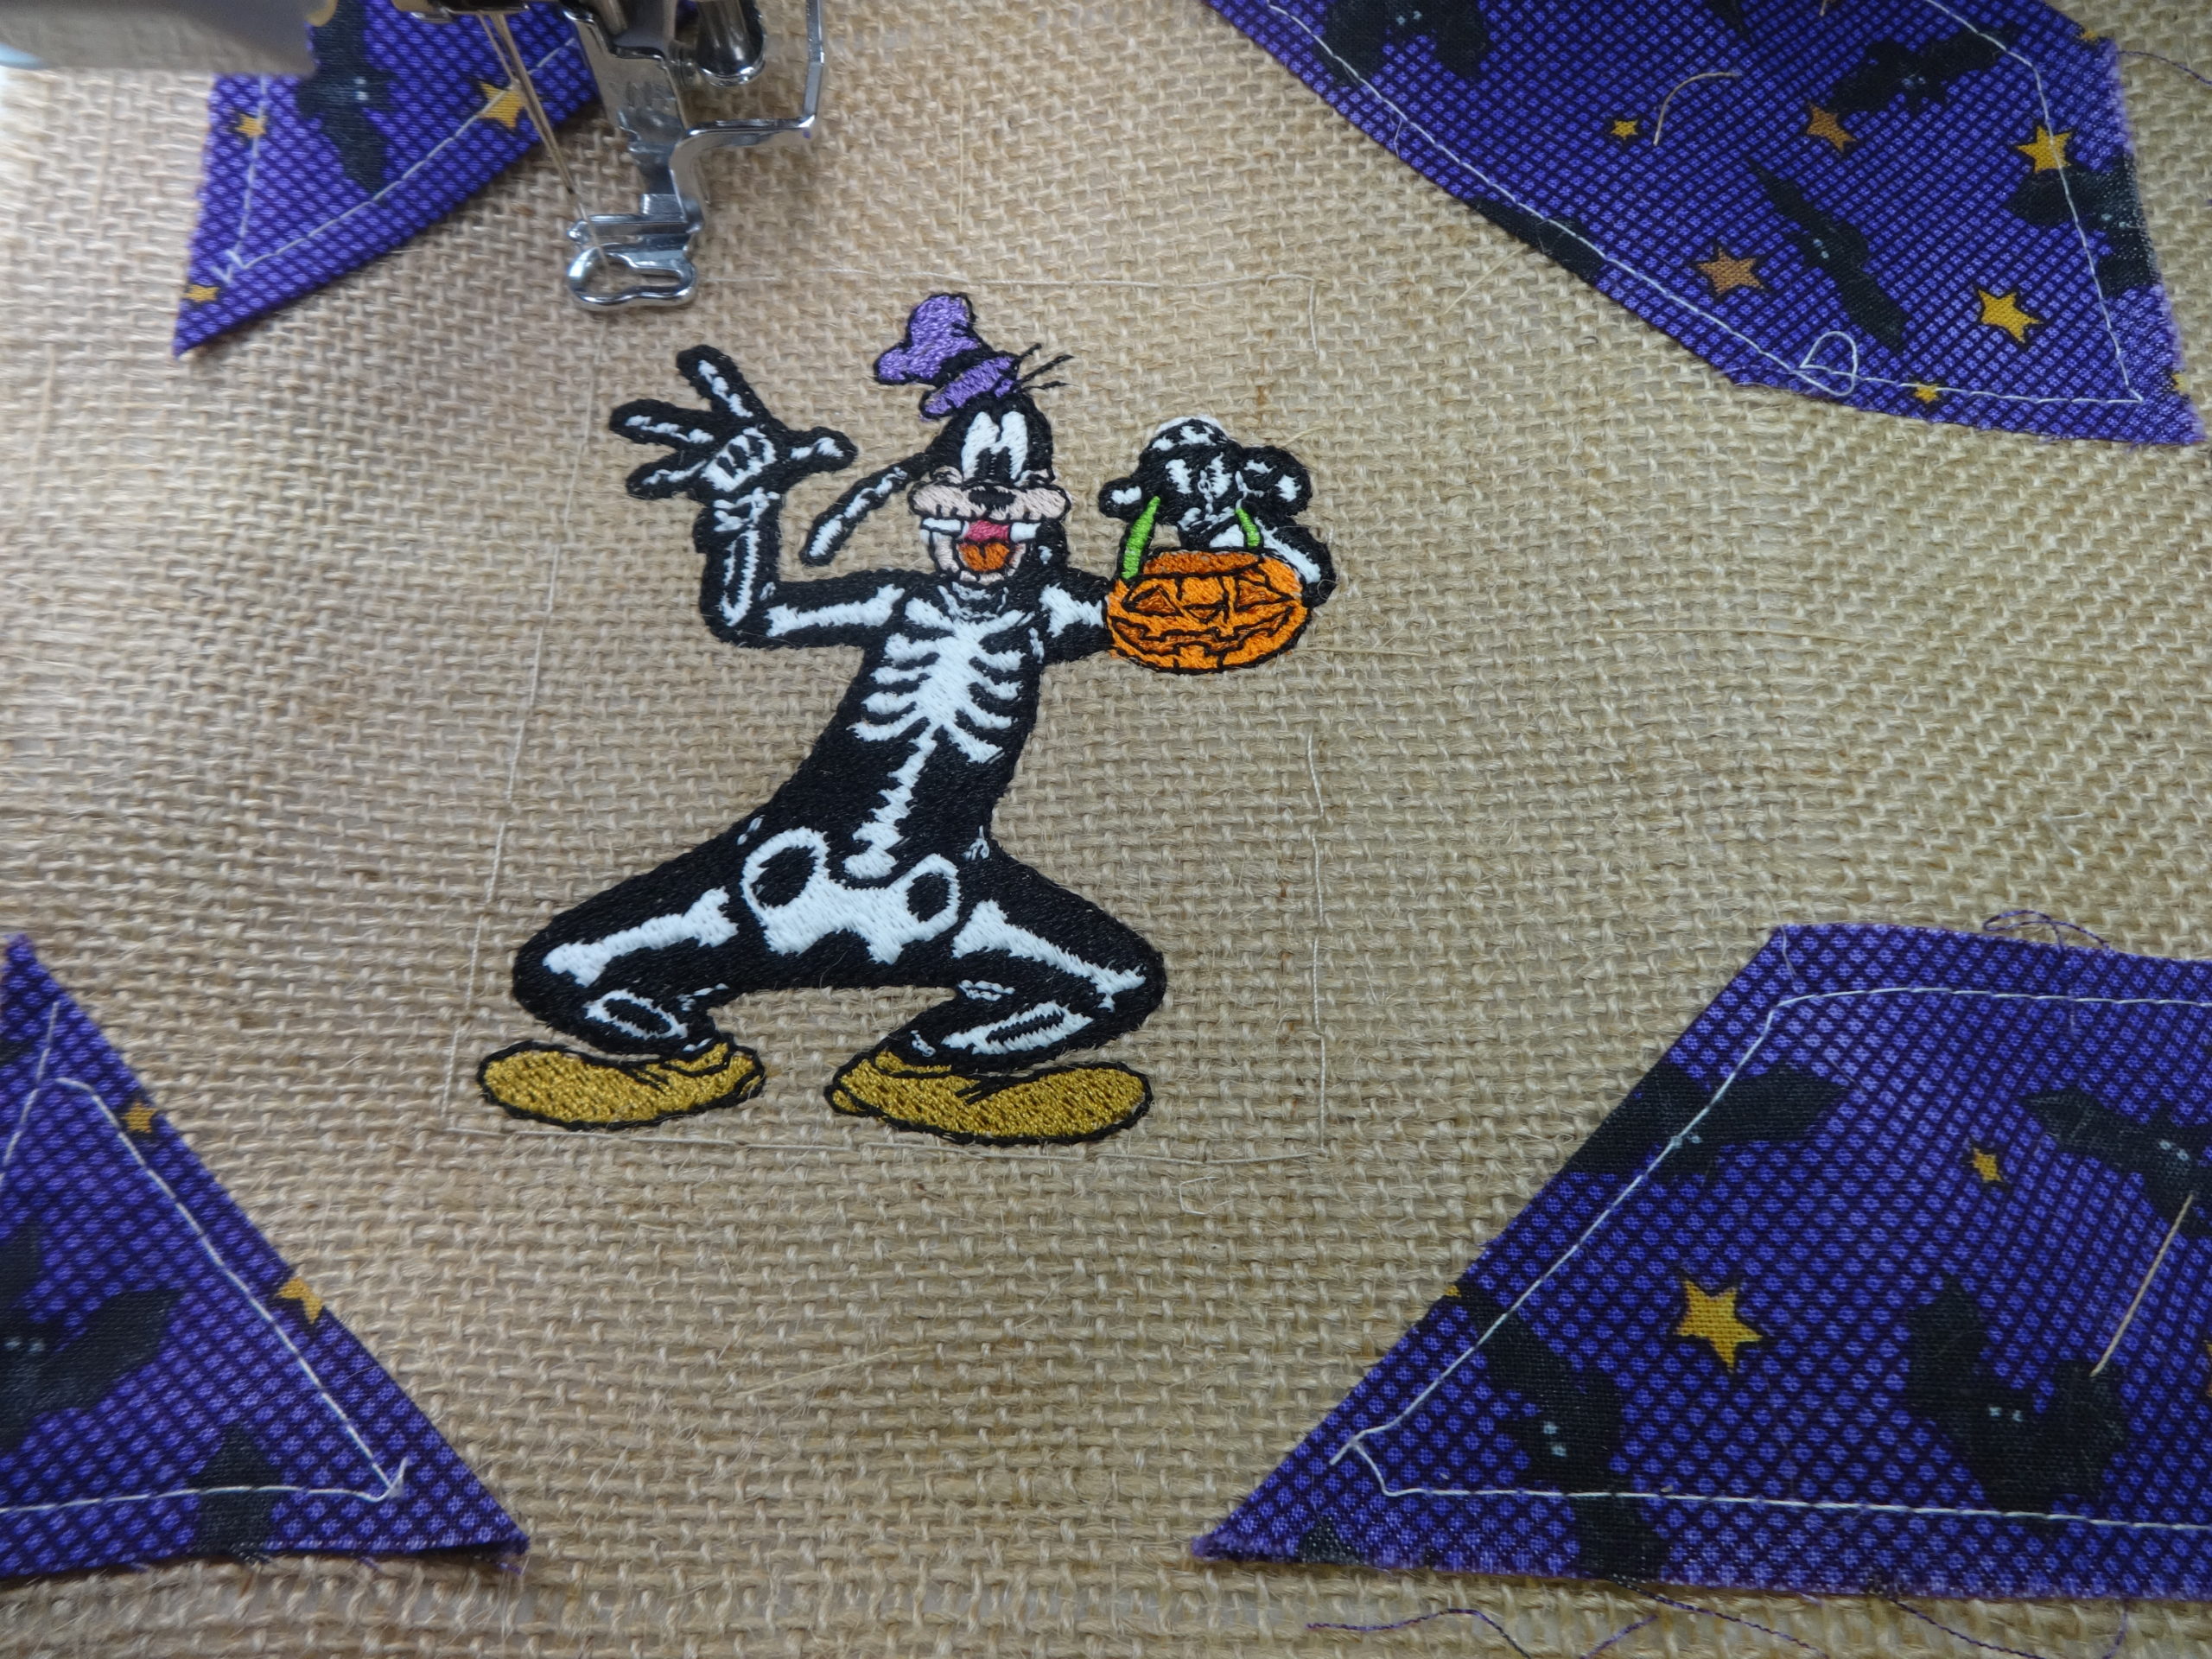
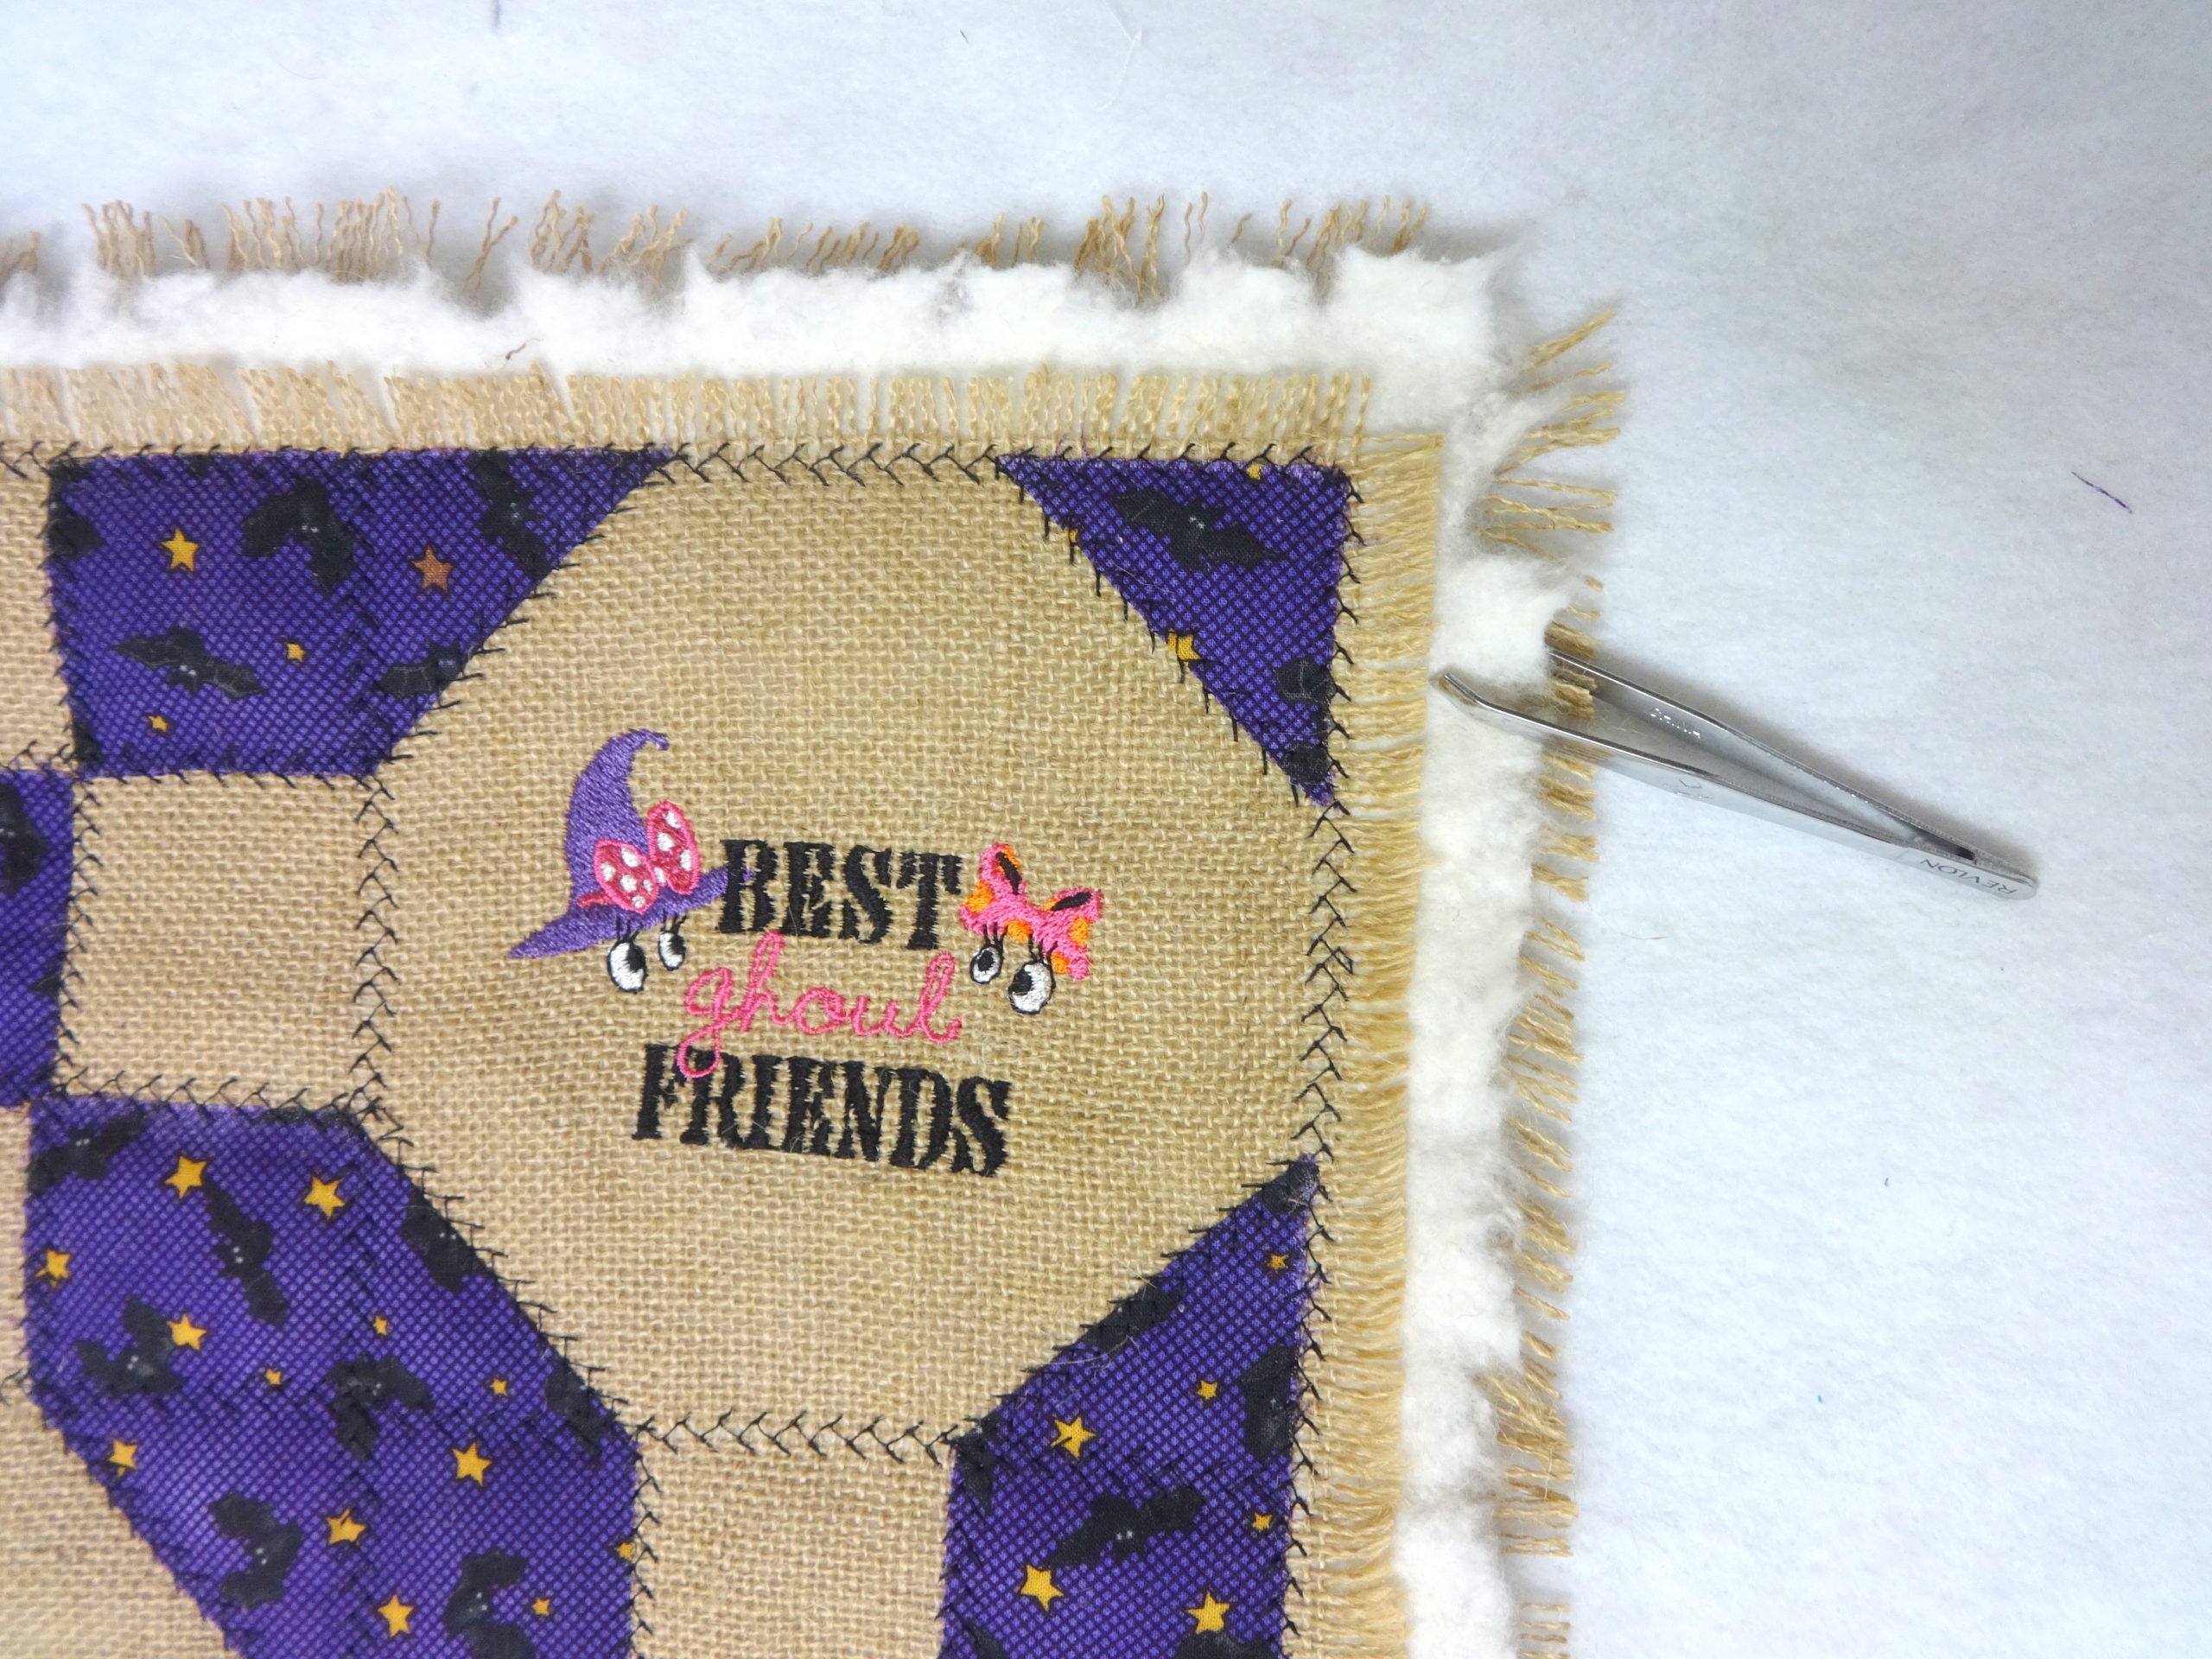
DMHLW03—Goofy skeleton costume, DMHLW04—Best Ghoul friends, DMHLW05—Oh boy what fun
Notions: tearaway stabilizer, spray adhesive, chalk marker, glow-in-the-dark thread, embroidery threads, black cotton sewing thread for decorative stitching, bits of green ribbon for pumpkin stems OPTIONAL: glow-in-the-dark thread, chalk marker, spray adhesive
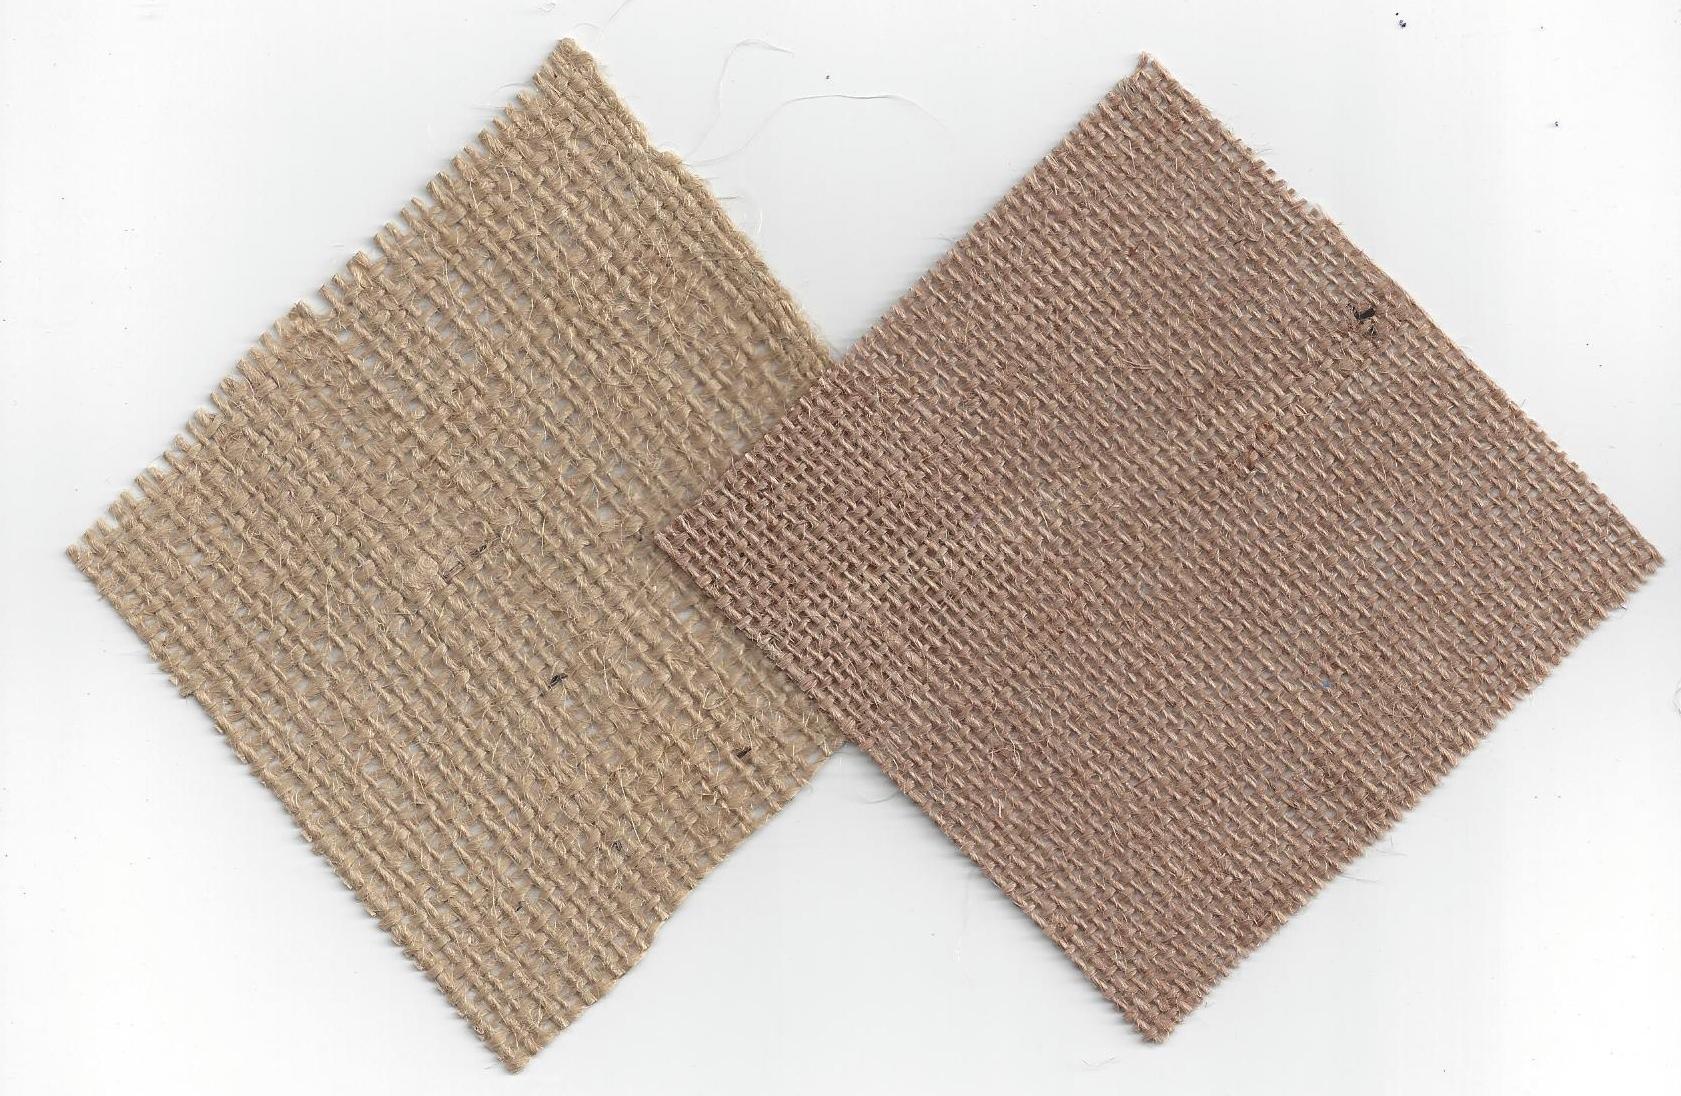
TIP: While any burlap can be used, a better quality makes it much easier to create the necessarily accurate grid. Note the difference in the two qualities of burlap.
The burlap on the left has threads or strands of varying widths. The one on the right has strands of a more regular size.
PREPARATION
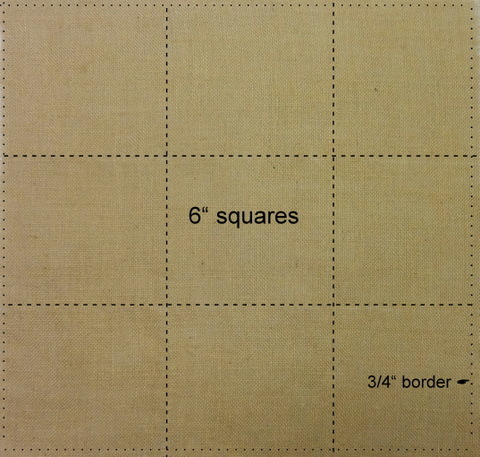
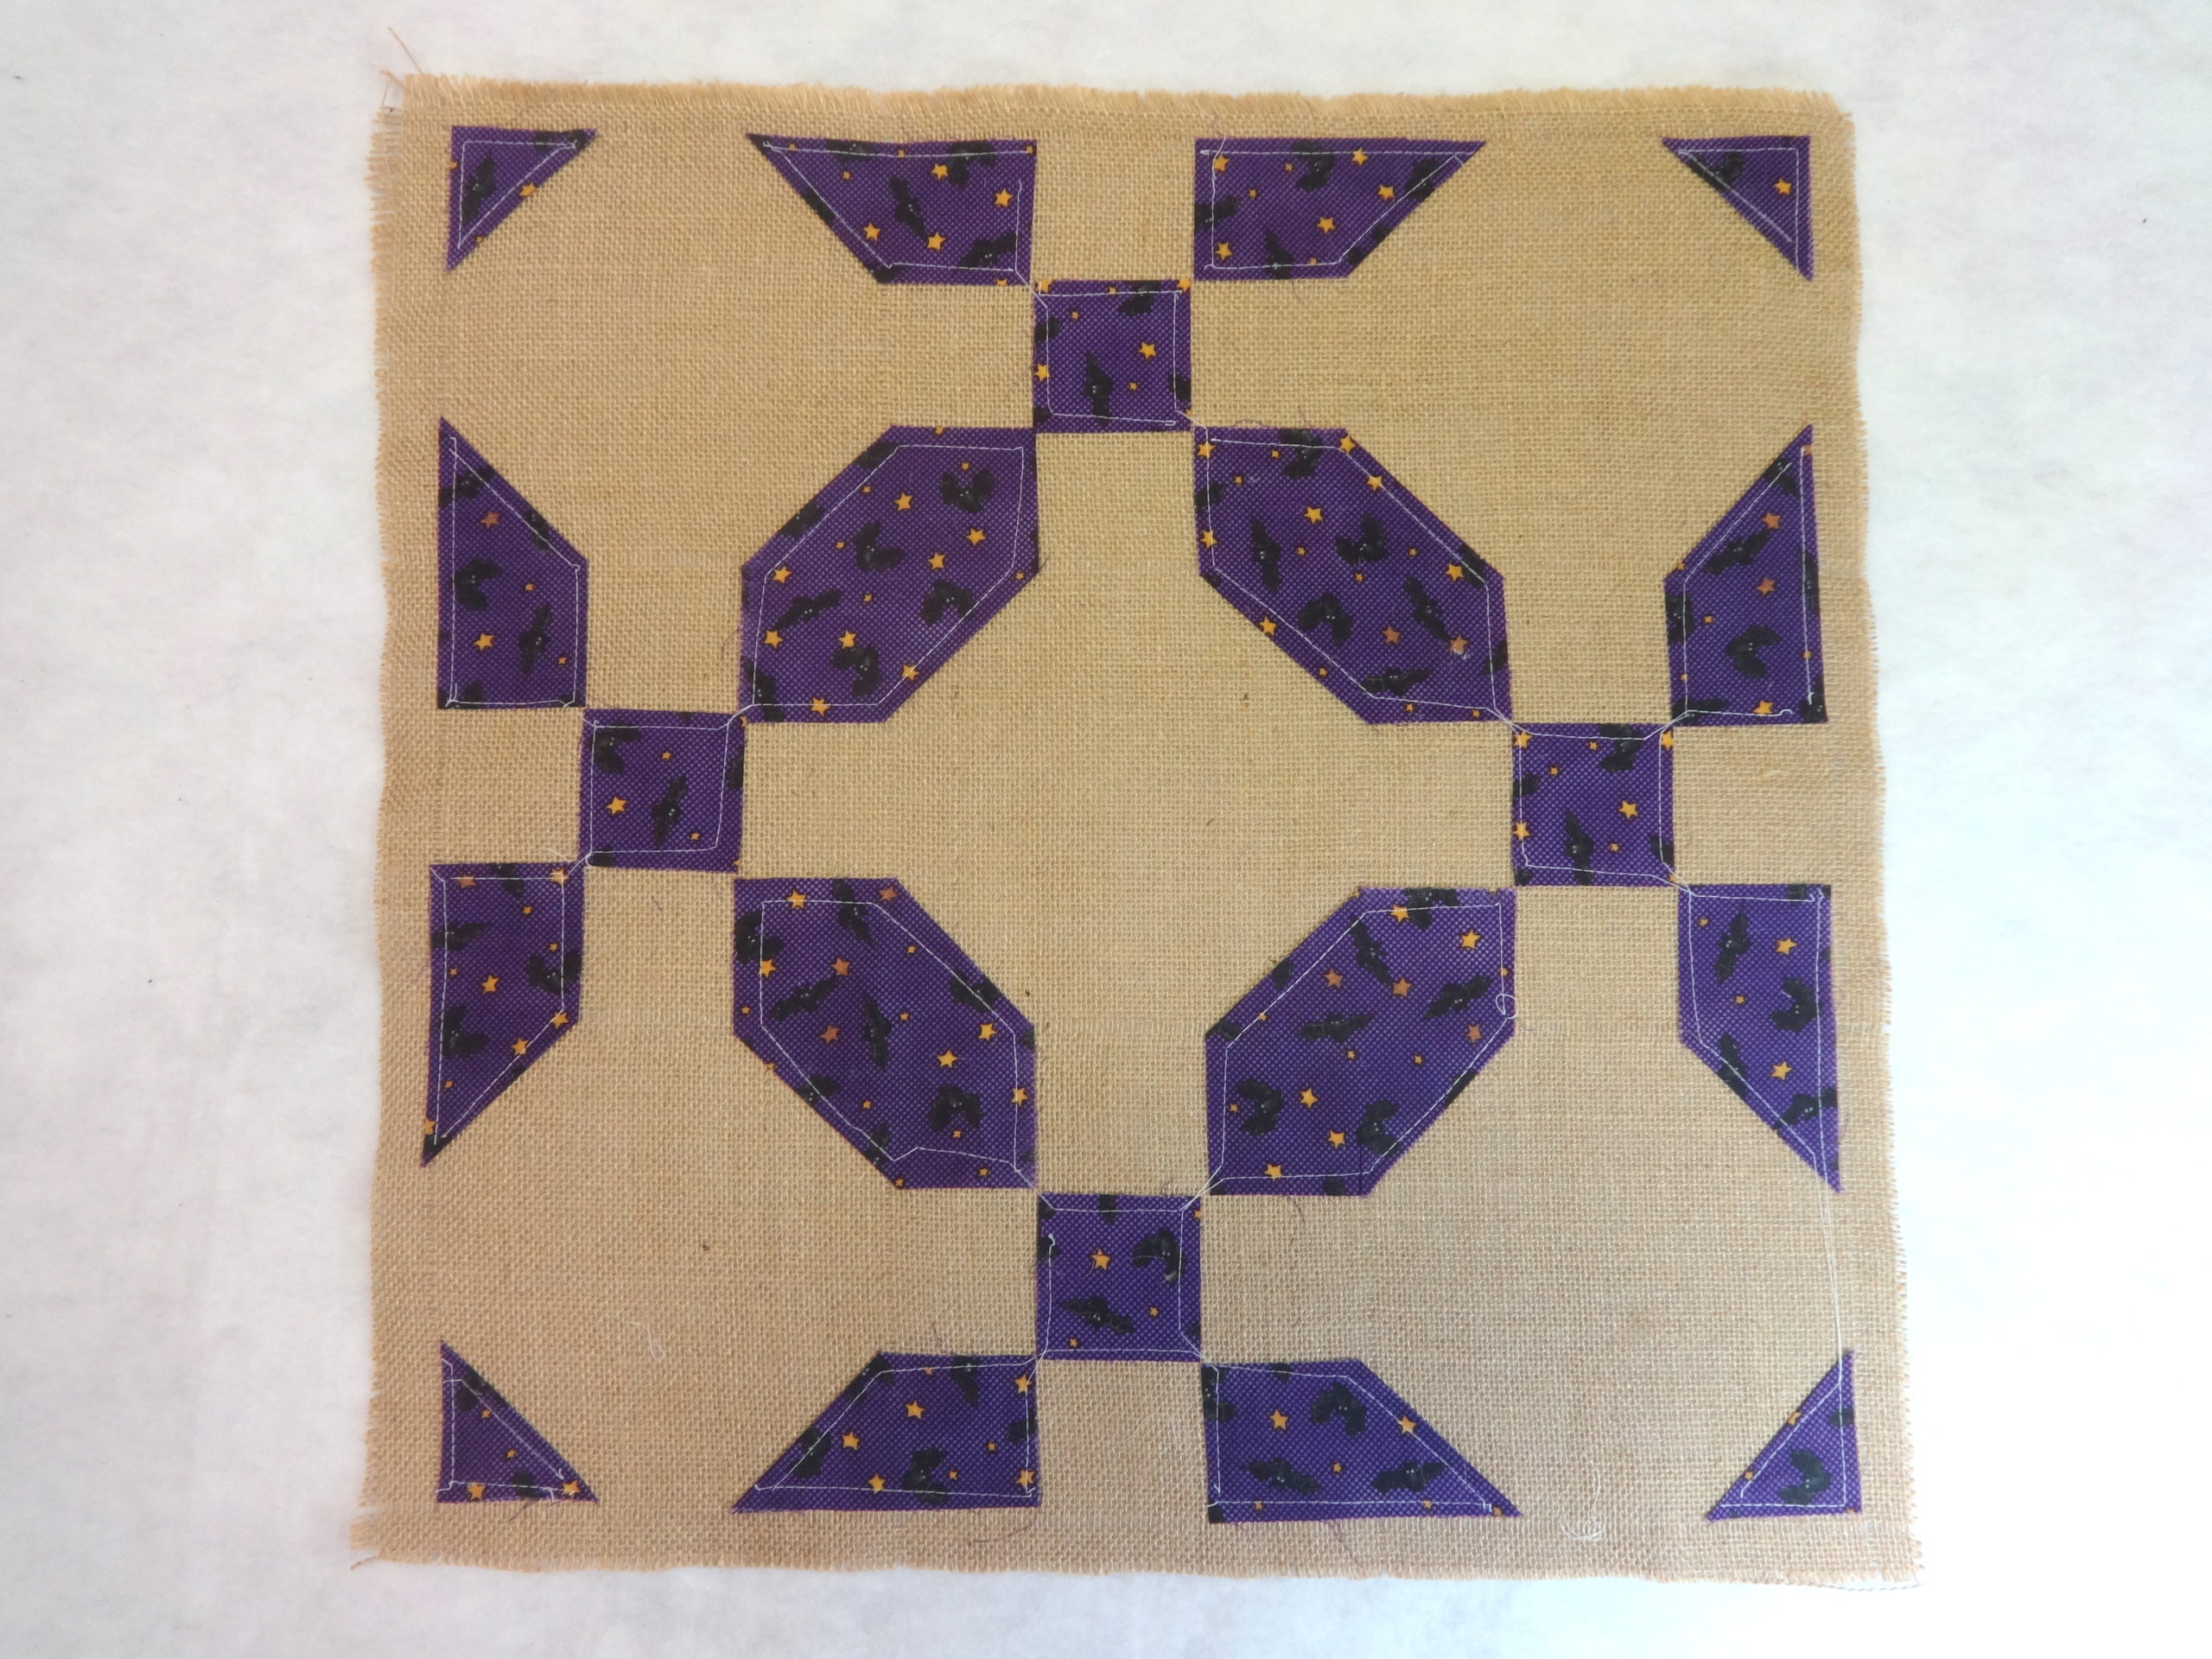
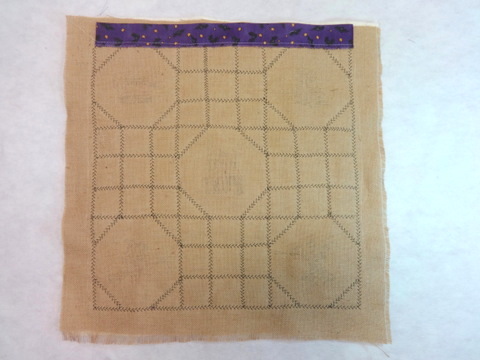
Pull threads on burlap creating a 6” grid with ¾” border.
2. Starch and press the Halloween print until very stiff and crisp.
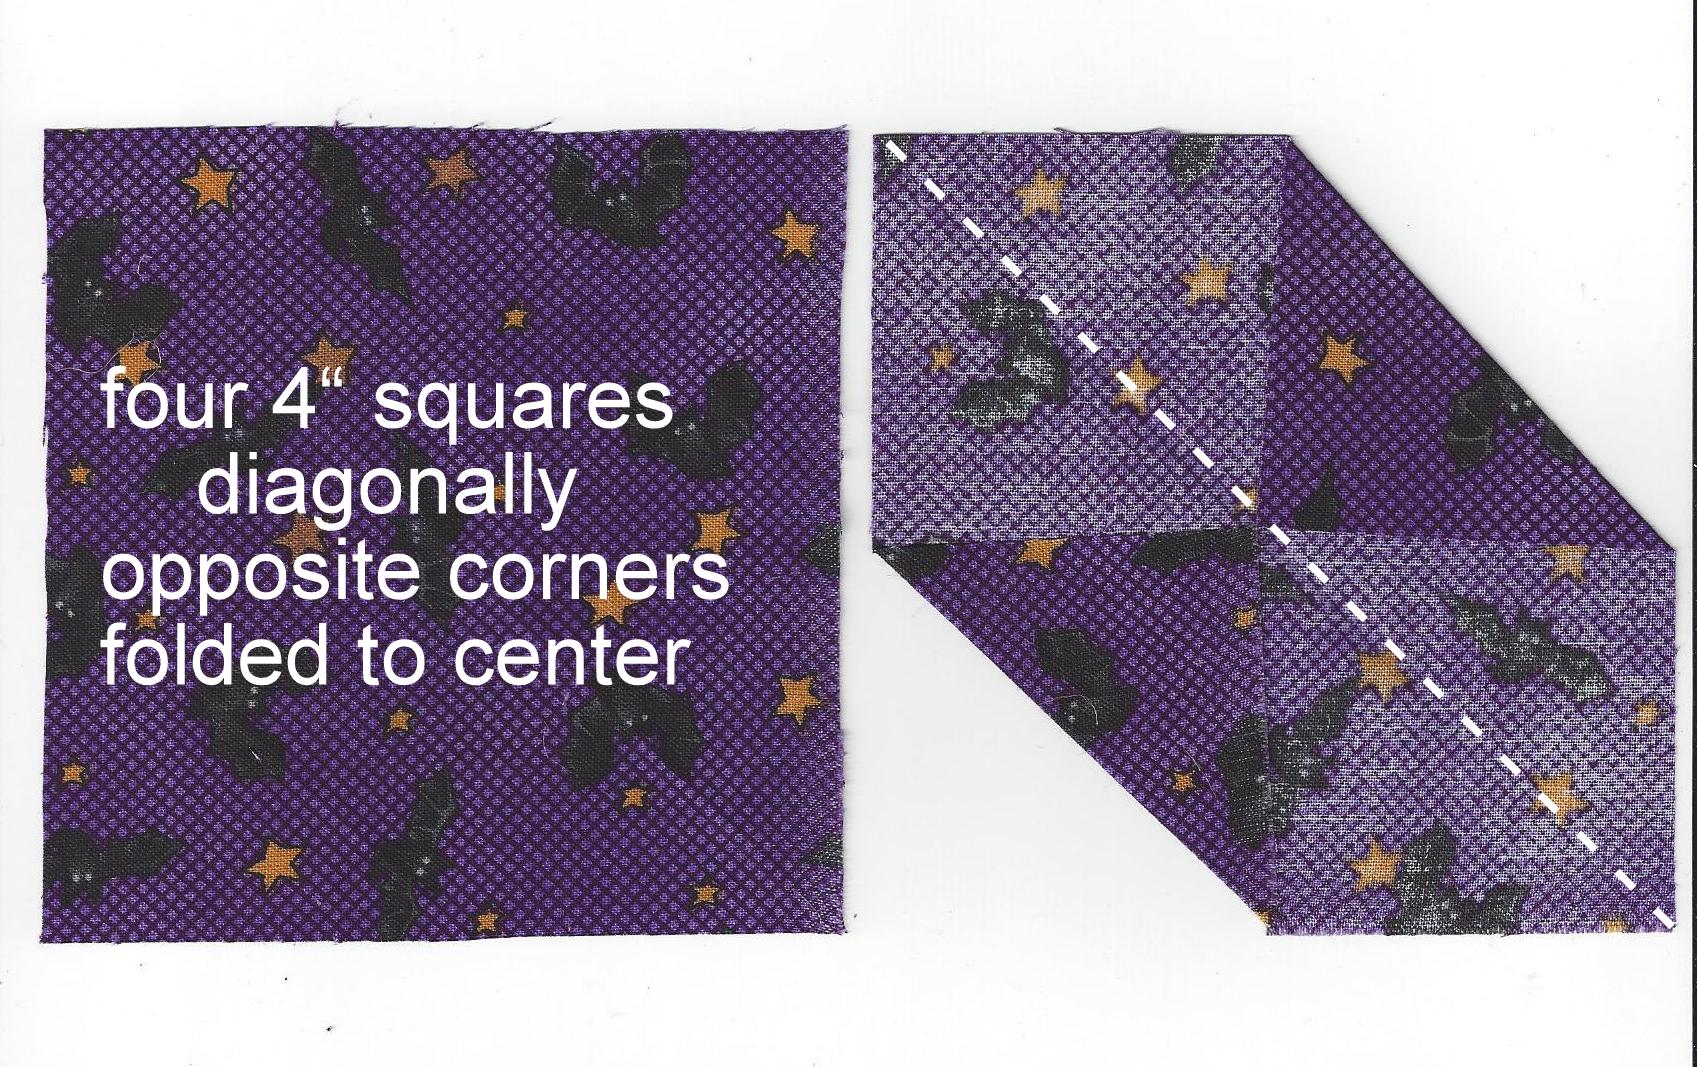
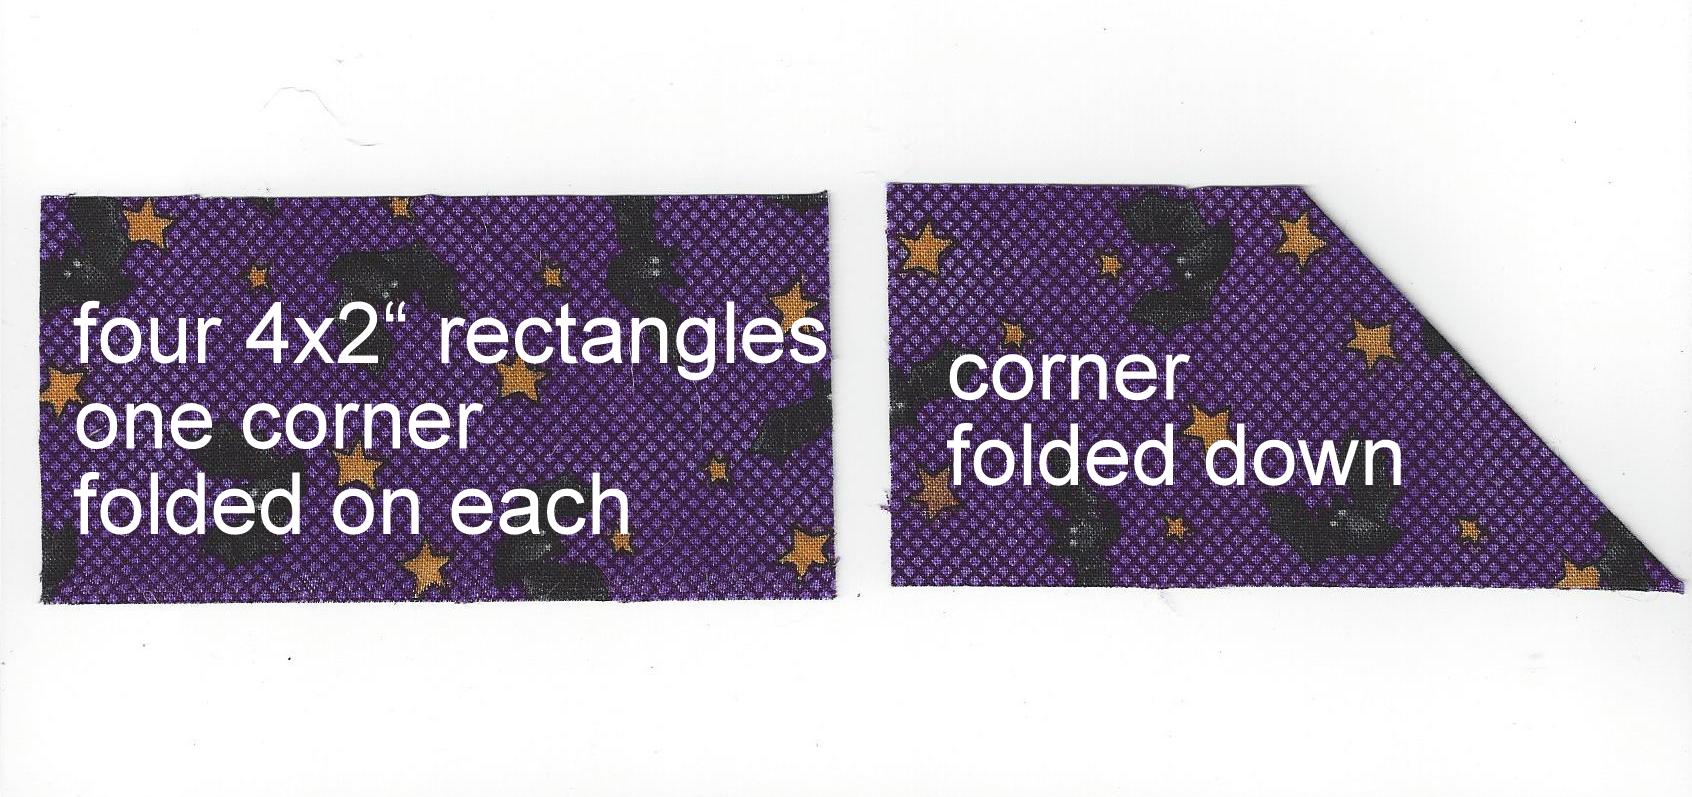
3. Press four 4” squares as shown, with diagonally opposite corners folded to center.
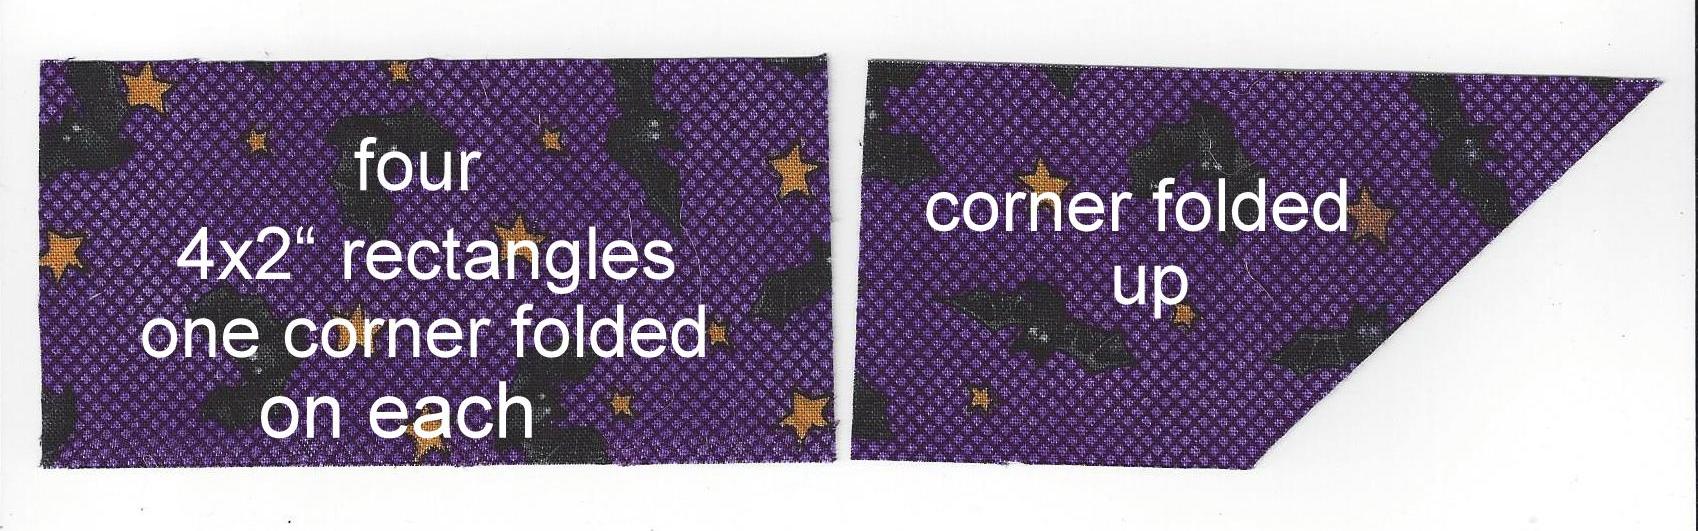
4. Press four 2 x 4” rectangles with one corner folded up as shown.
5. Press four 4” x 2” rectangles with one corner folded down as shown.
6. Press four 2” squares in half diagonally.
7. Press four 2” squares flat.
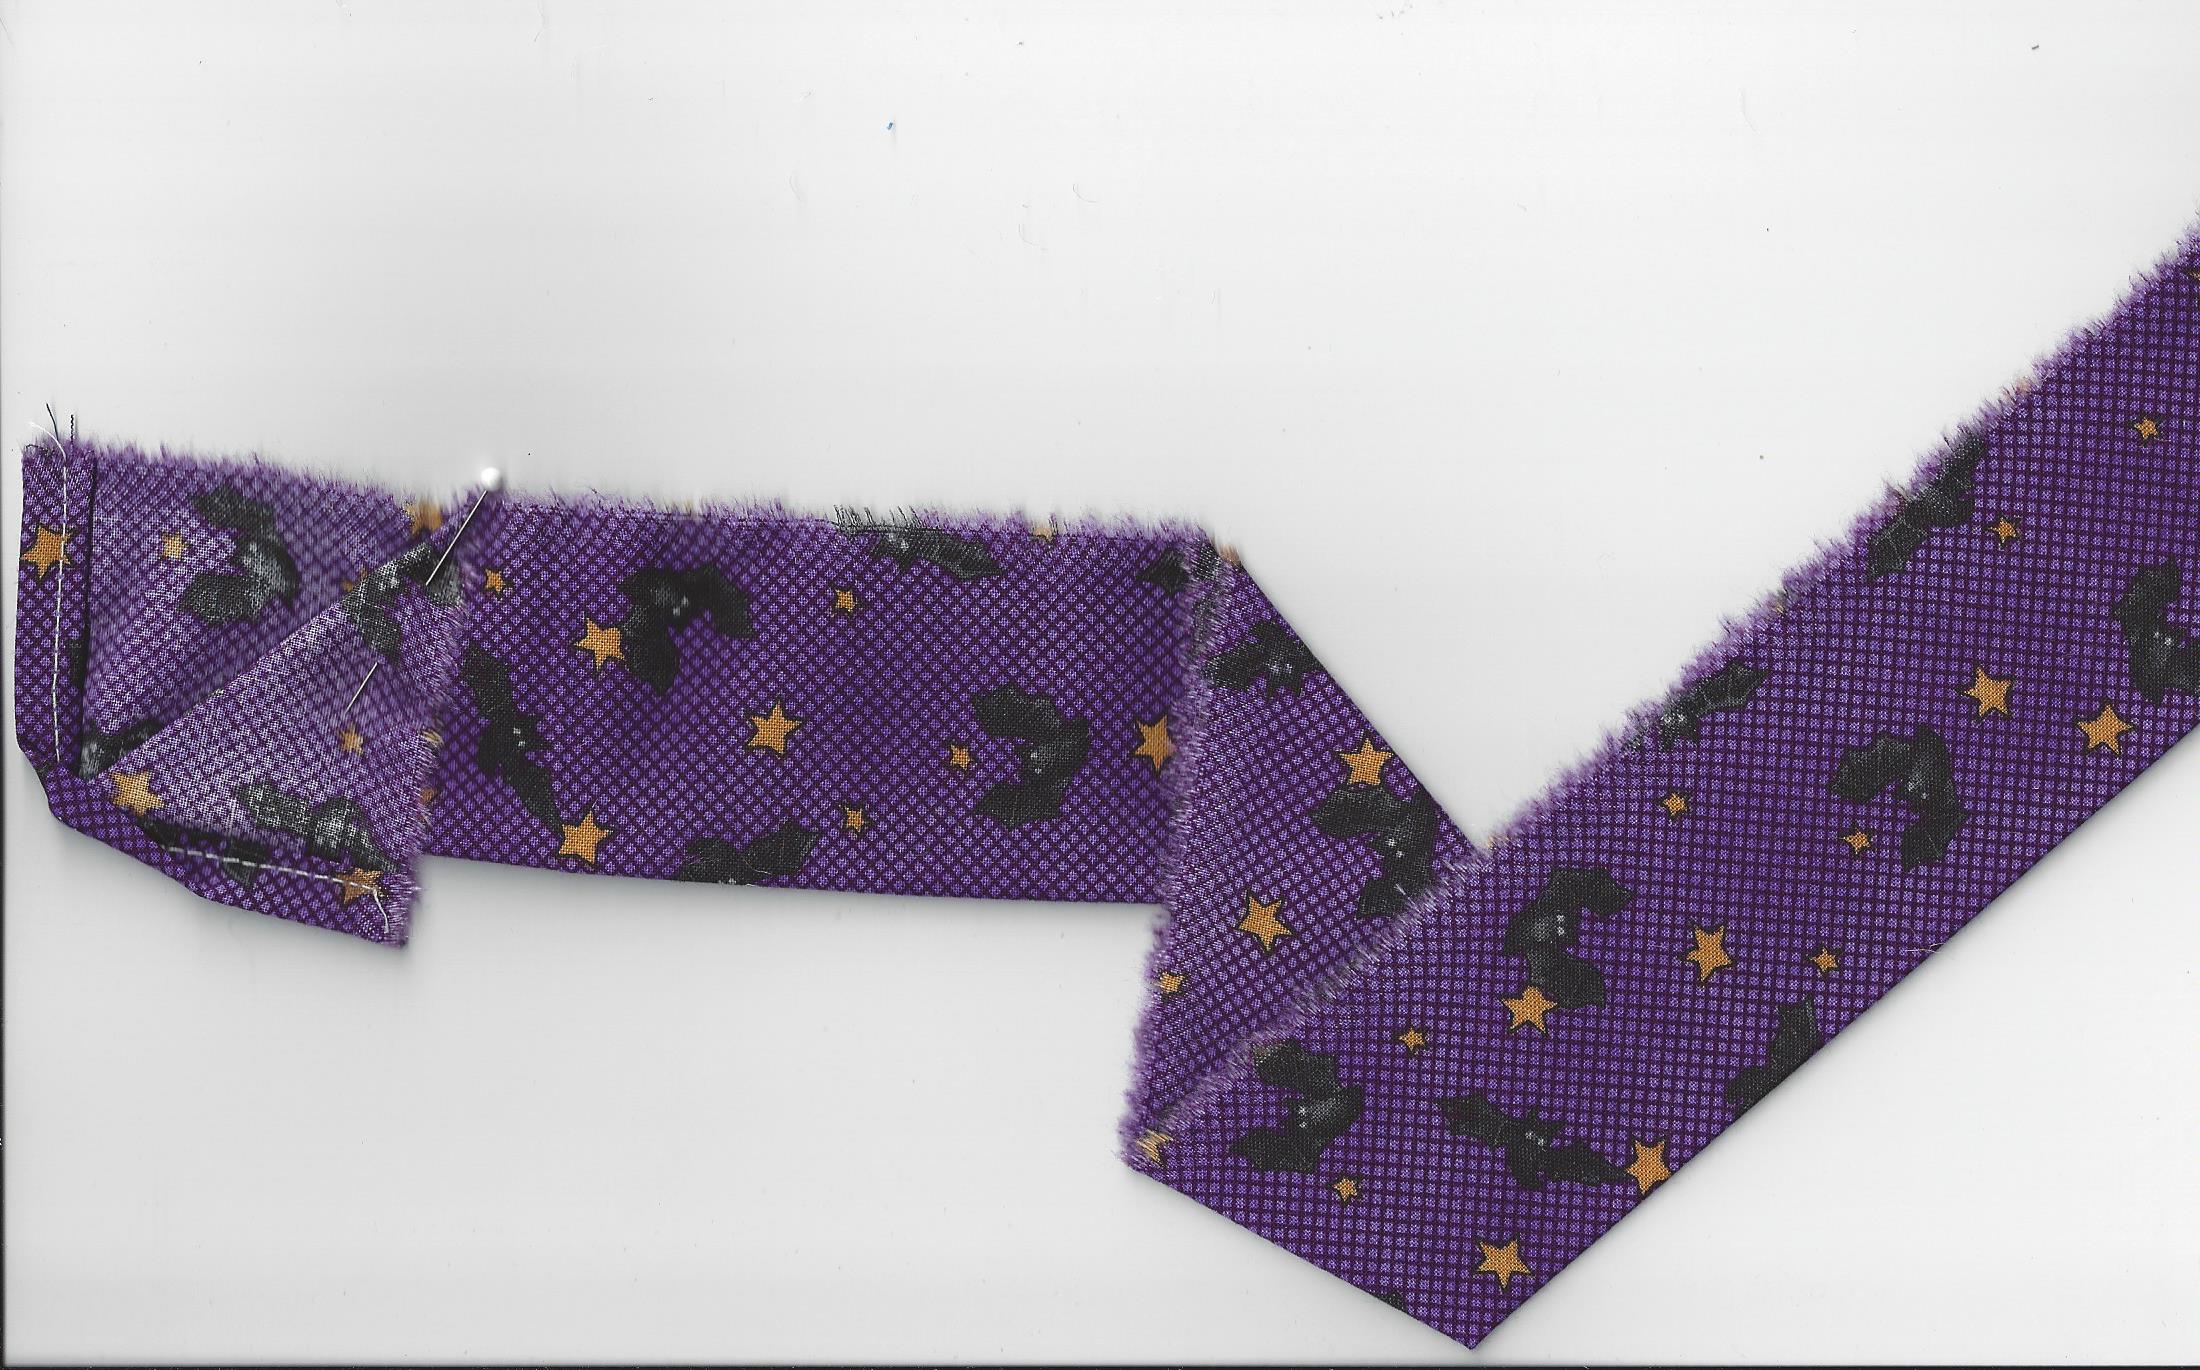
By combining the shapes into larger pieces, then stitching over where seams would have been, it gives the illusion of many pieces being joined quite perfectly to create this pattern. Folding many of the edges under, particularly the bias edges, gives a very neat appearance. The decorative stitching covers the raw edges and makes short work of what could be a very time consuming project.
8. Press under ½” on each short end of sleeve piece and stitch in place. Fold in half lengthwise, wrong sides together. Set aside.
9. Baste Halloween pieces in place on burlap. Use of the knee lift leaves both hands free for frequent pivoting.
10. Spray batting with adhesive. Place burlap on top of batting.
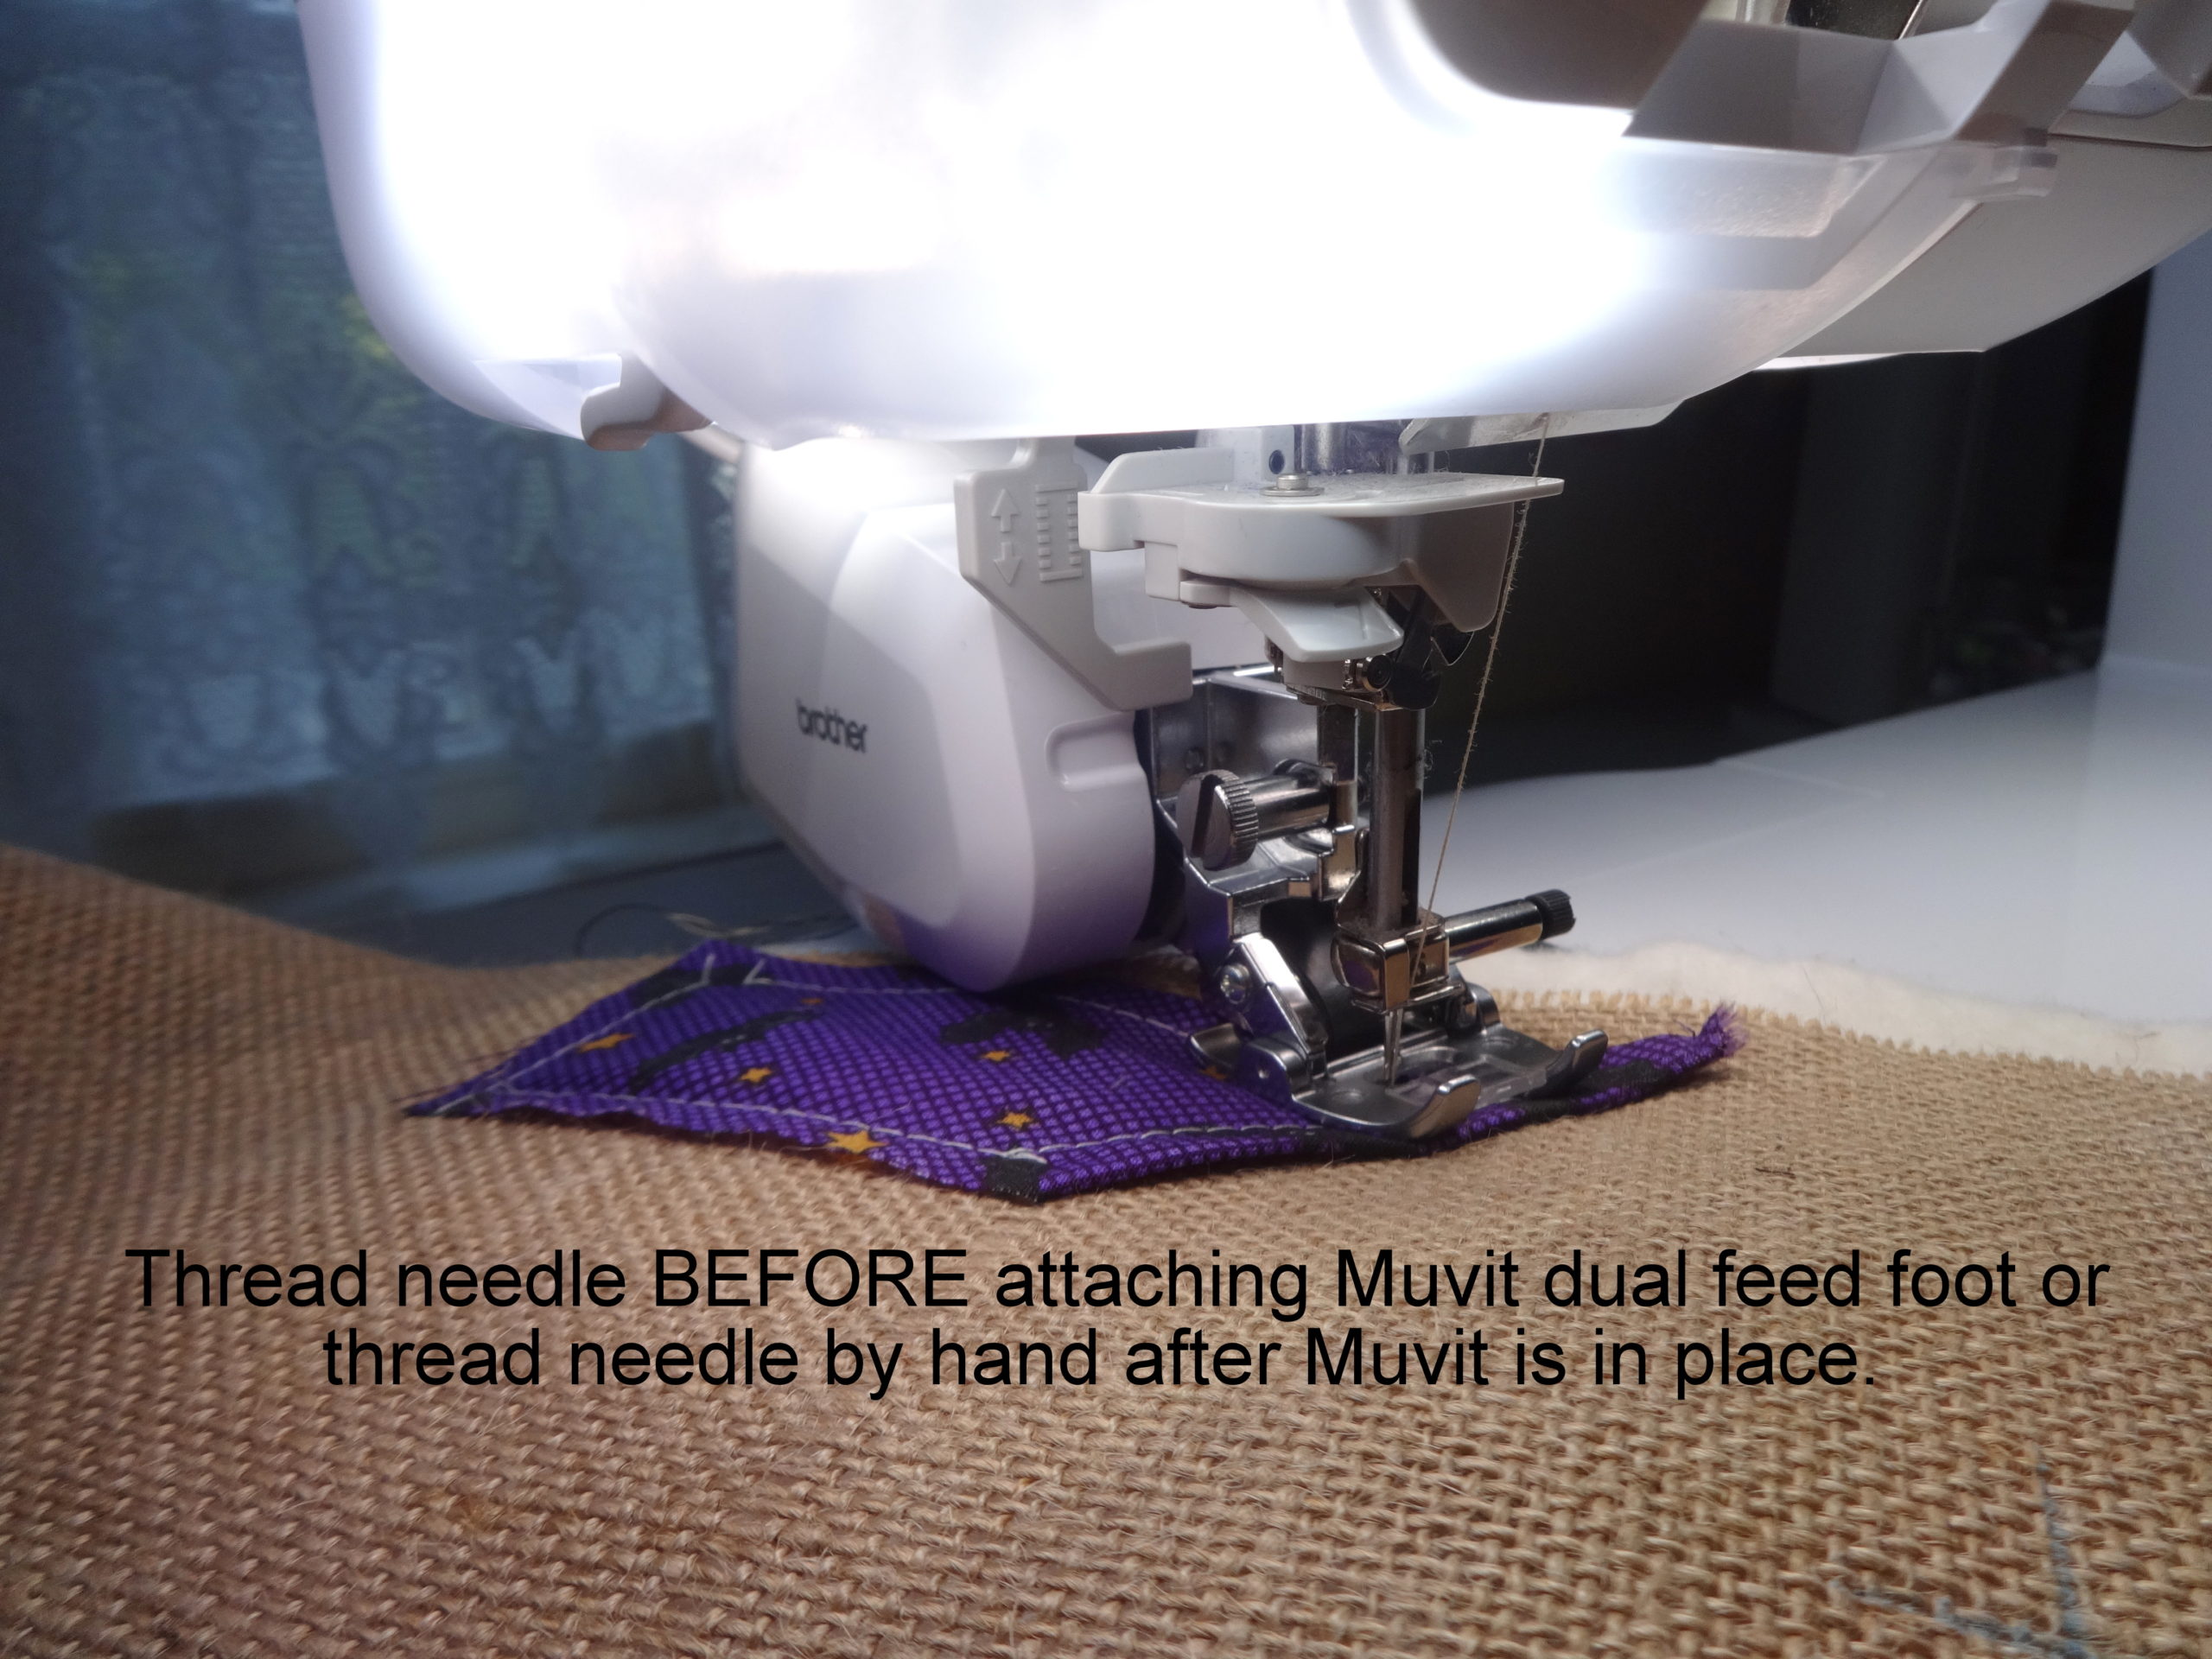
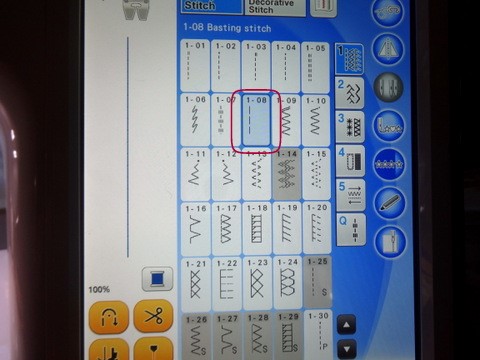
11. Select stitch # 108 in the utility menu. Baste through all three layers.
TIP: The Muvit dual feed foot makes quick work of this process. The walking foot is also effective.
ANOTHER TIP: Use thread color to match Halloween fabric. If basting threads become trapped in the embroidery, they will not show.
AND ONE MORE—CAUTION: Be alert when embroidery foot approaches the lengthy basting stitches. It helps to remove nearby basting threads when embroidering.
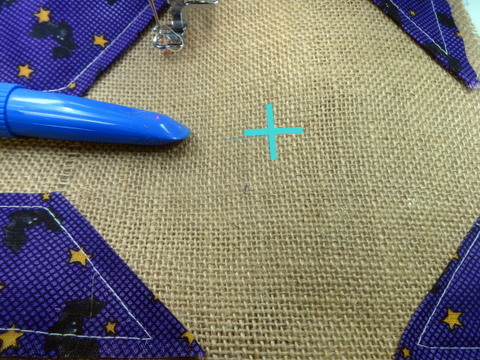
12. Mark centers of ”snowballs” for placement of embroidery designs.
TIP: A chalk device works best. A small crosshair can be brushed away if the embroidery does not cover .the mark.
13. Hoop tearaway stabilizer in 4×4 frame.
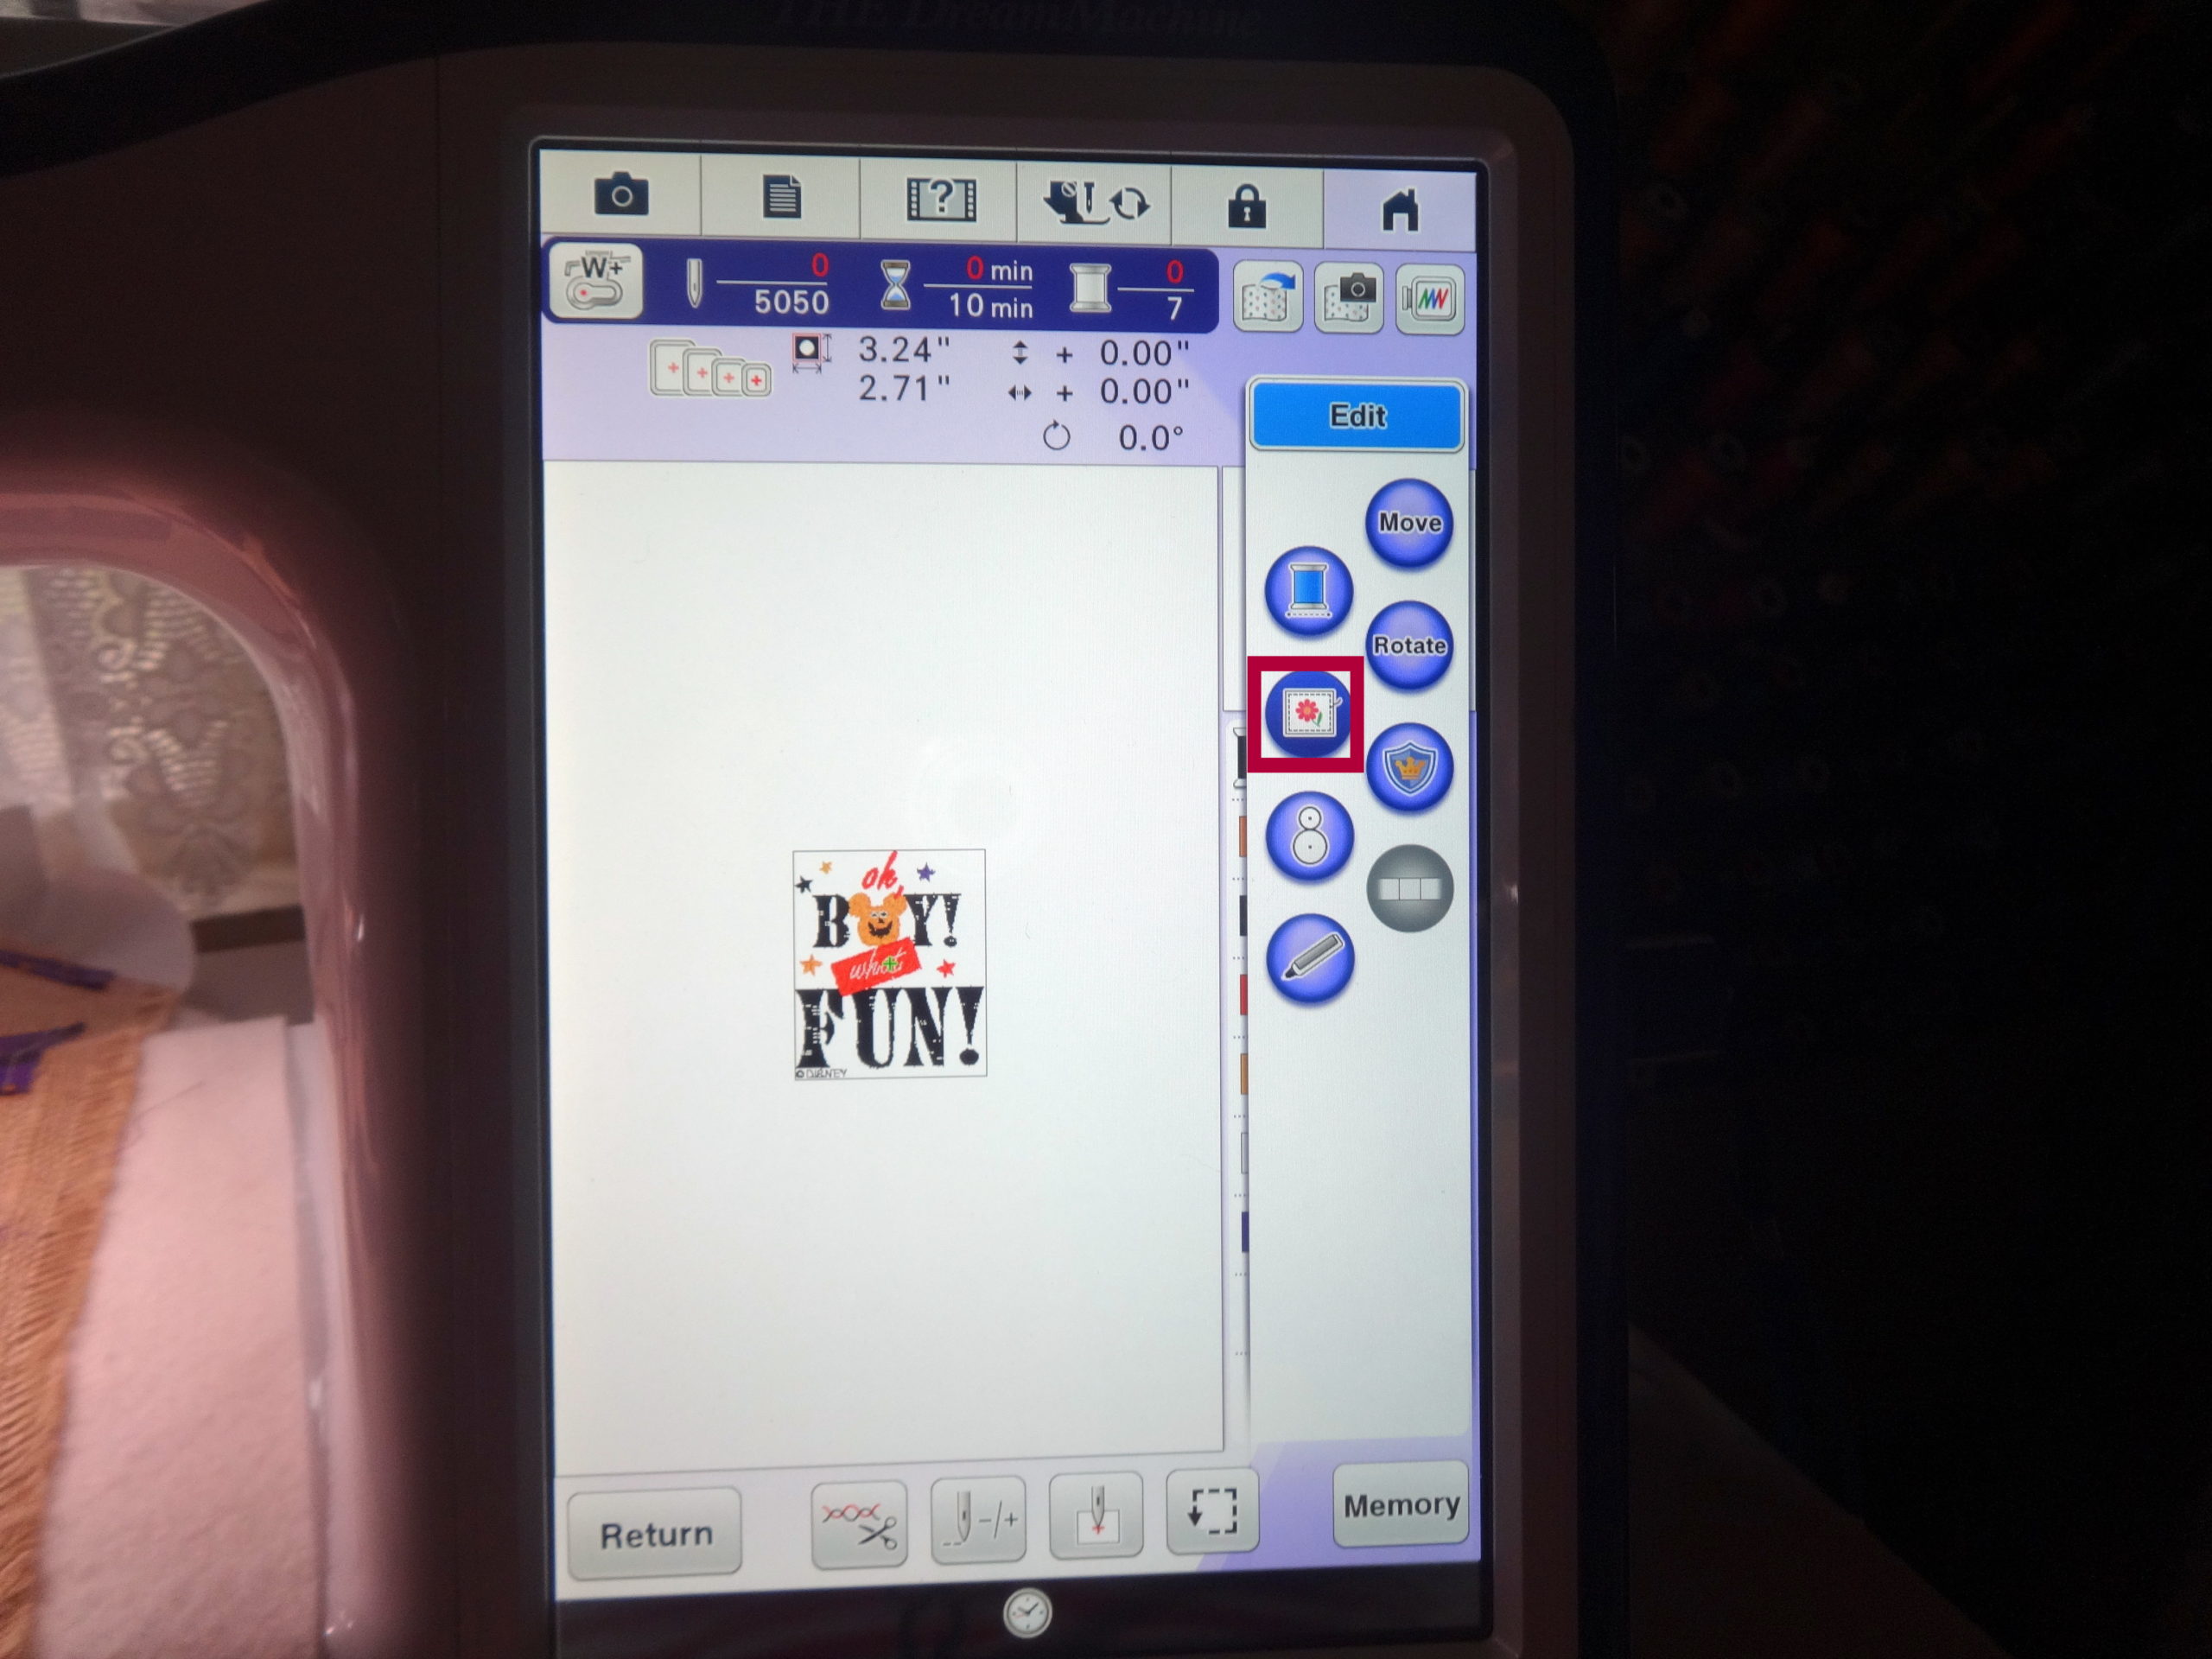
14. Open “Oh Boy” design and edit to add basting frame. This will secure the quilt top to the frame without leaving hoop burn (an imprint of the hoop on the burlap and batting).
Boy oh Boy baste frame key
NOTE: Remember that the basting frame option does not appear until the Embroidery screen appears, after SET and EDIT screens.
15. Position the center square over the frame.
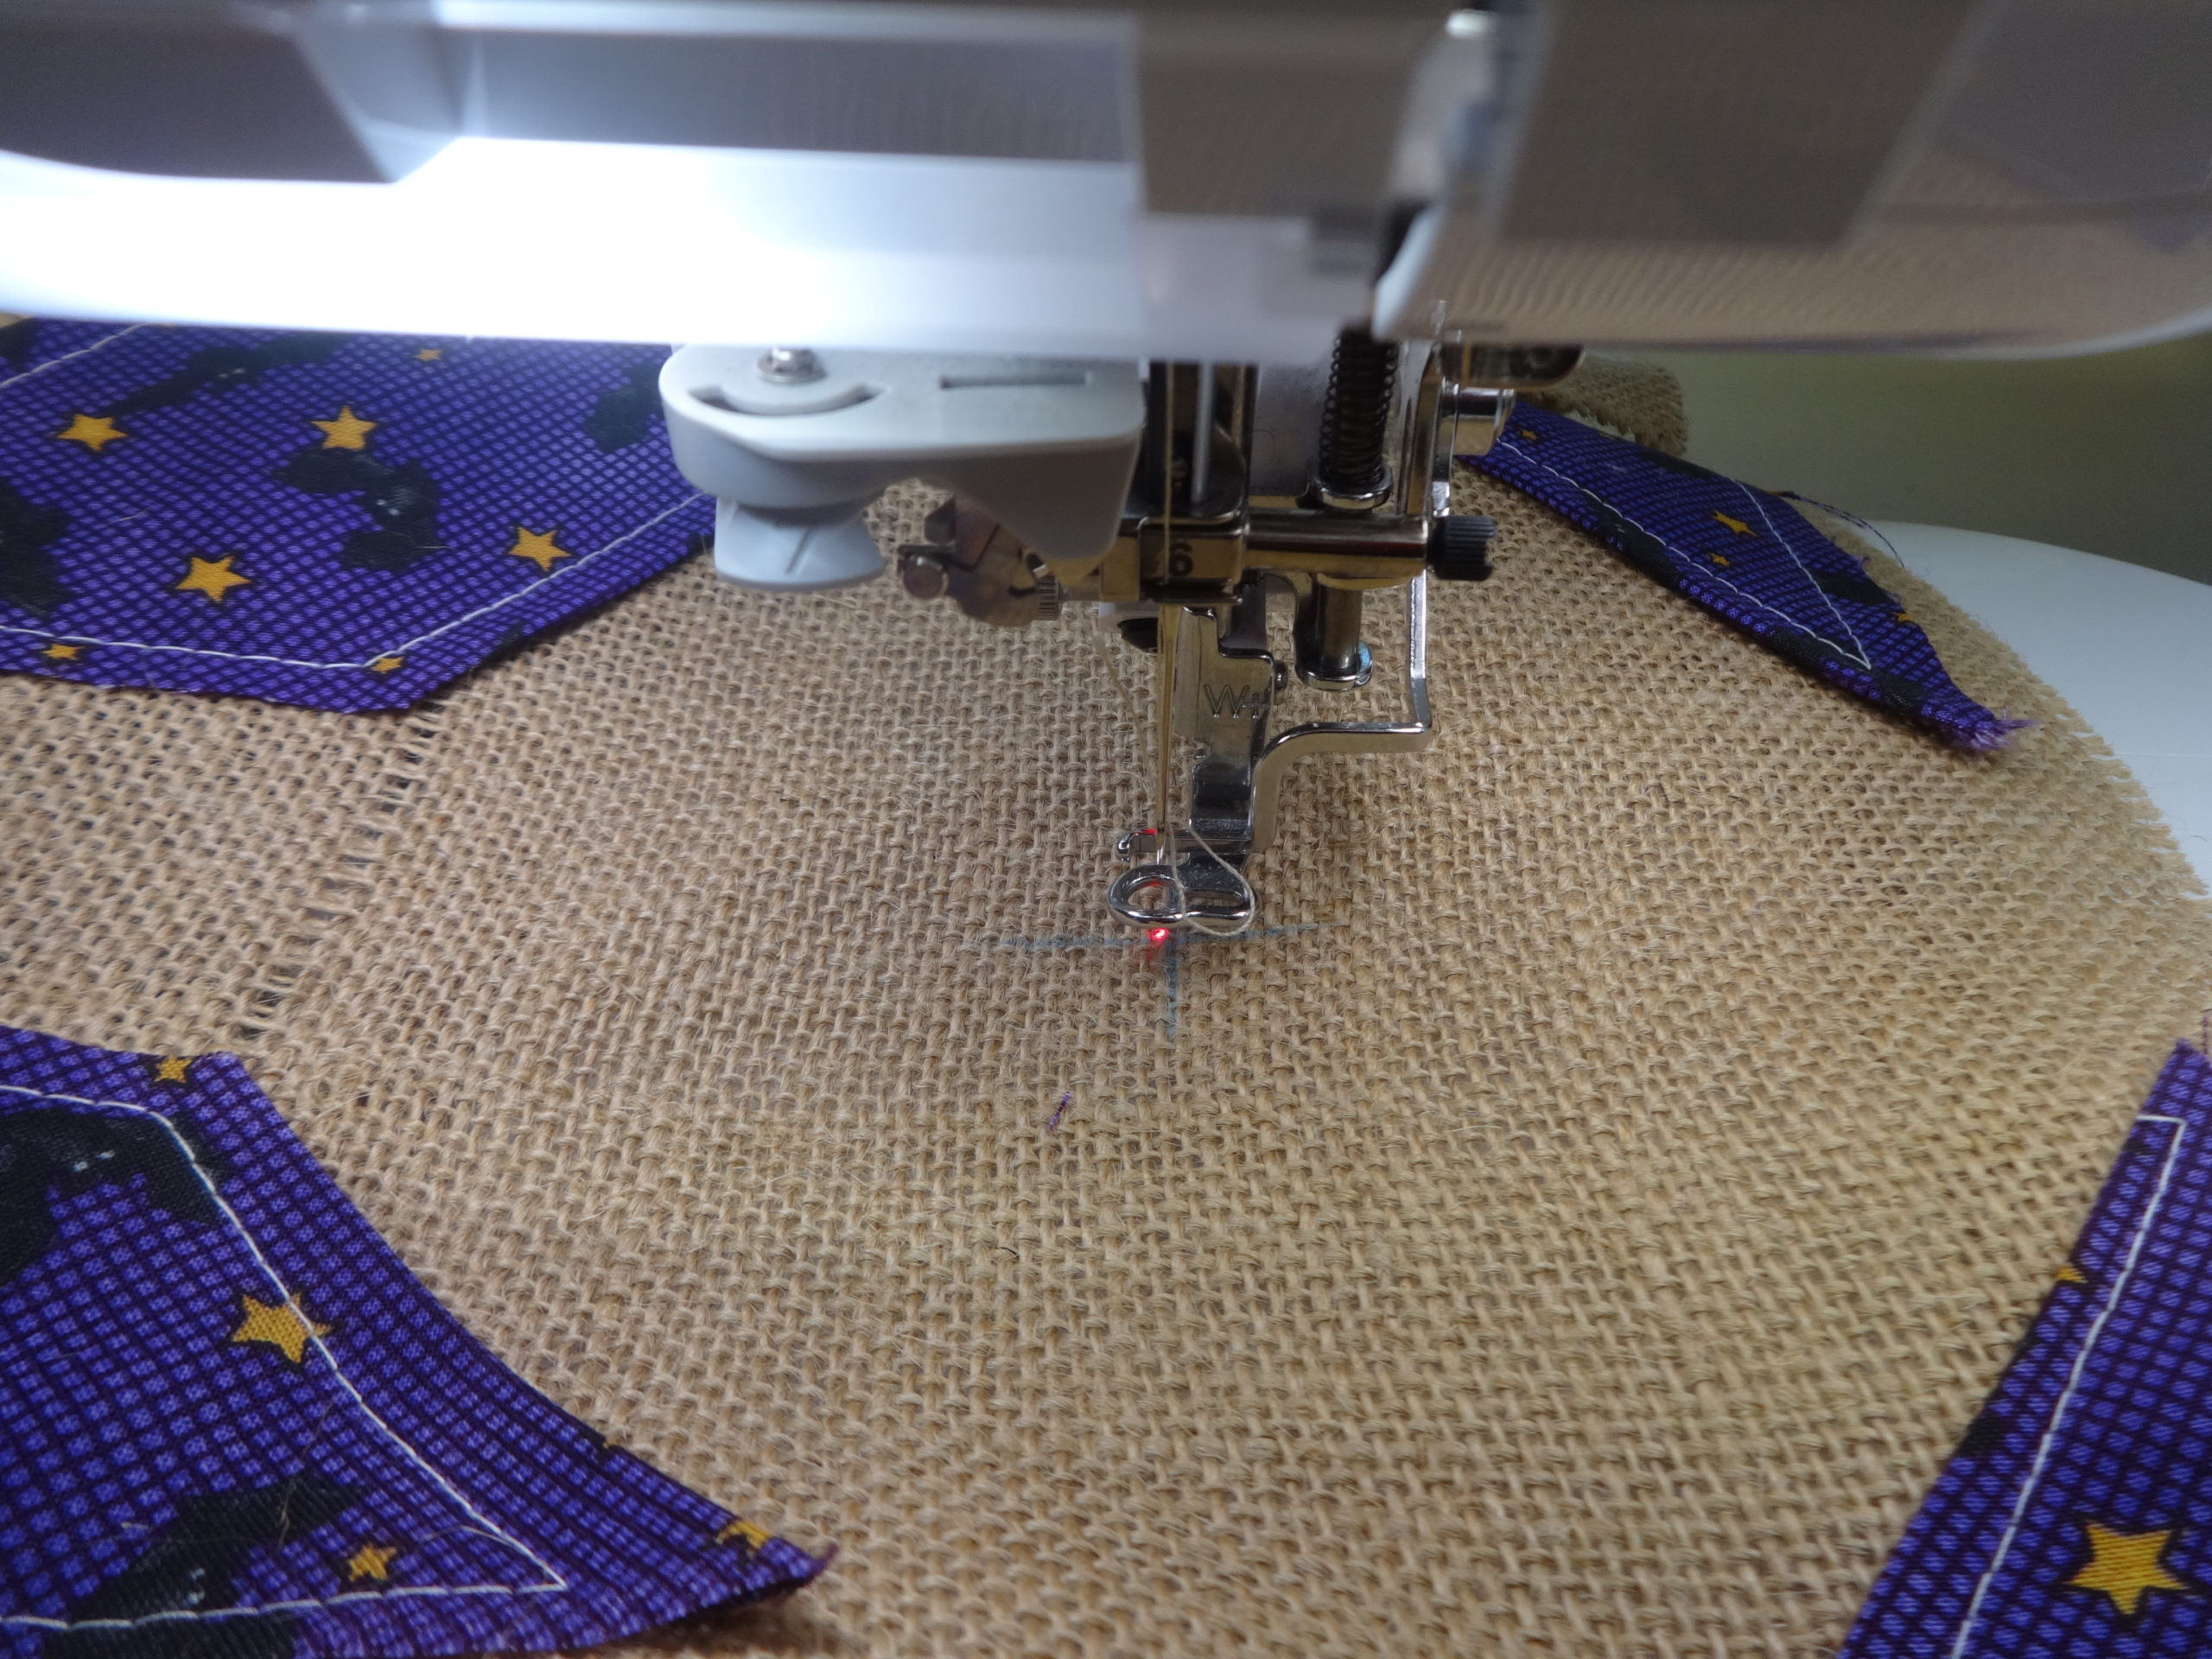
16. Engage the needle placement laser feature.
17. A red dot will appear in the middle of the frame. Move the burlap so the red dot sits precisely on the crosshairs.
red dot centered
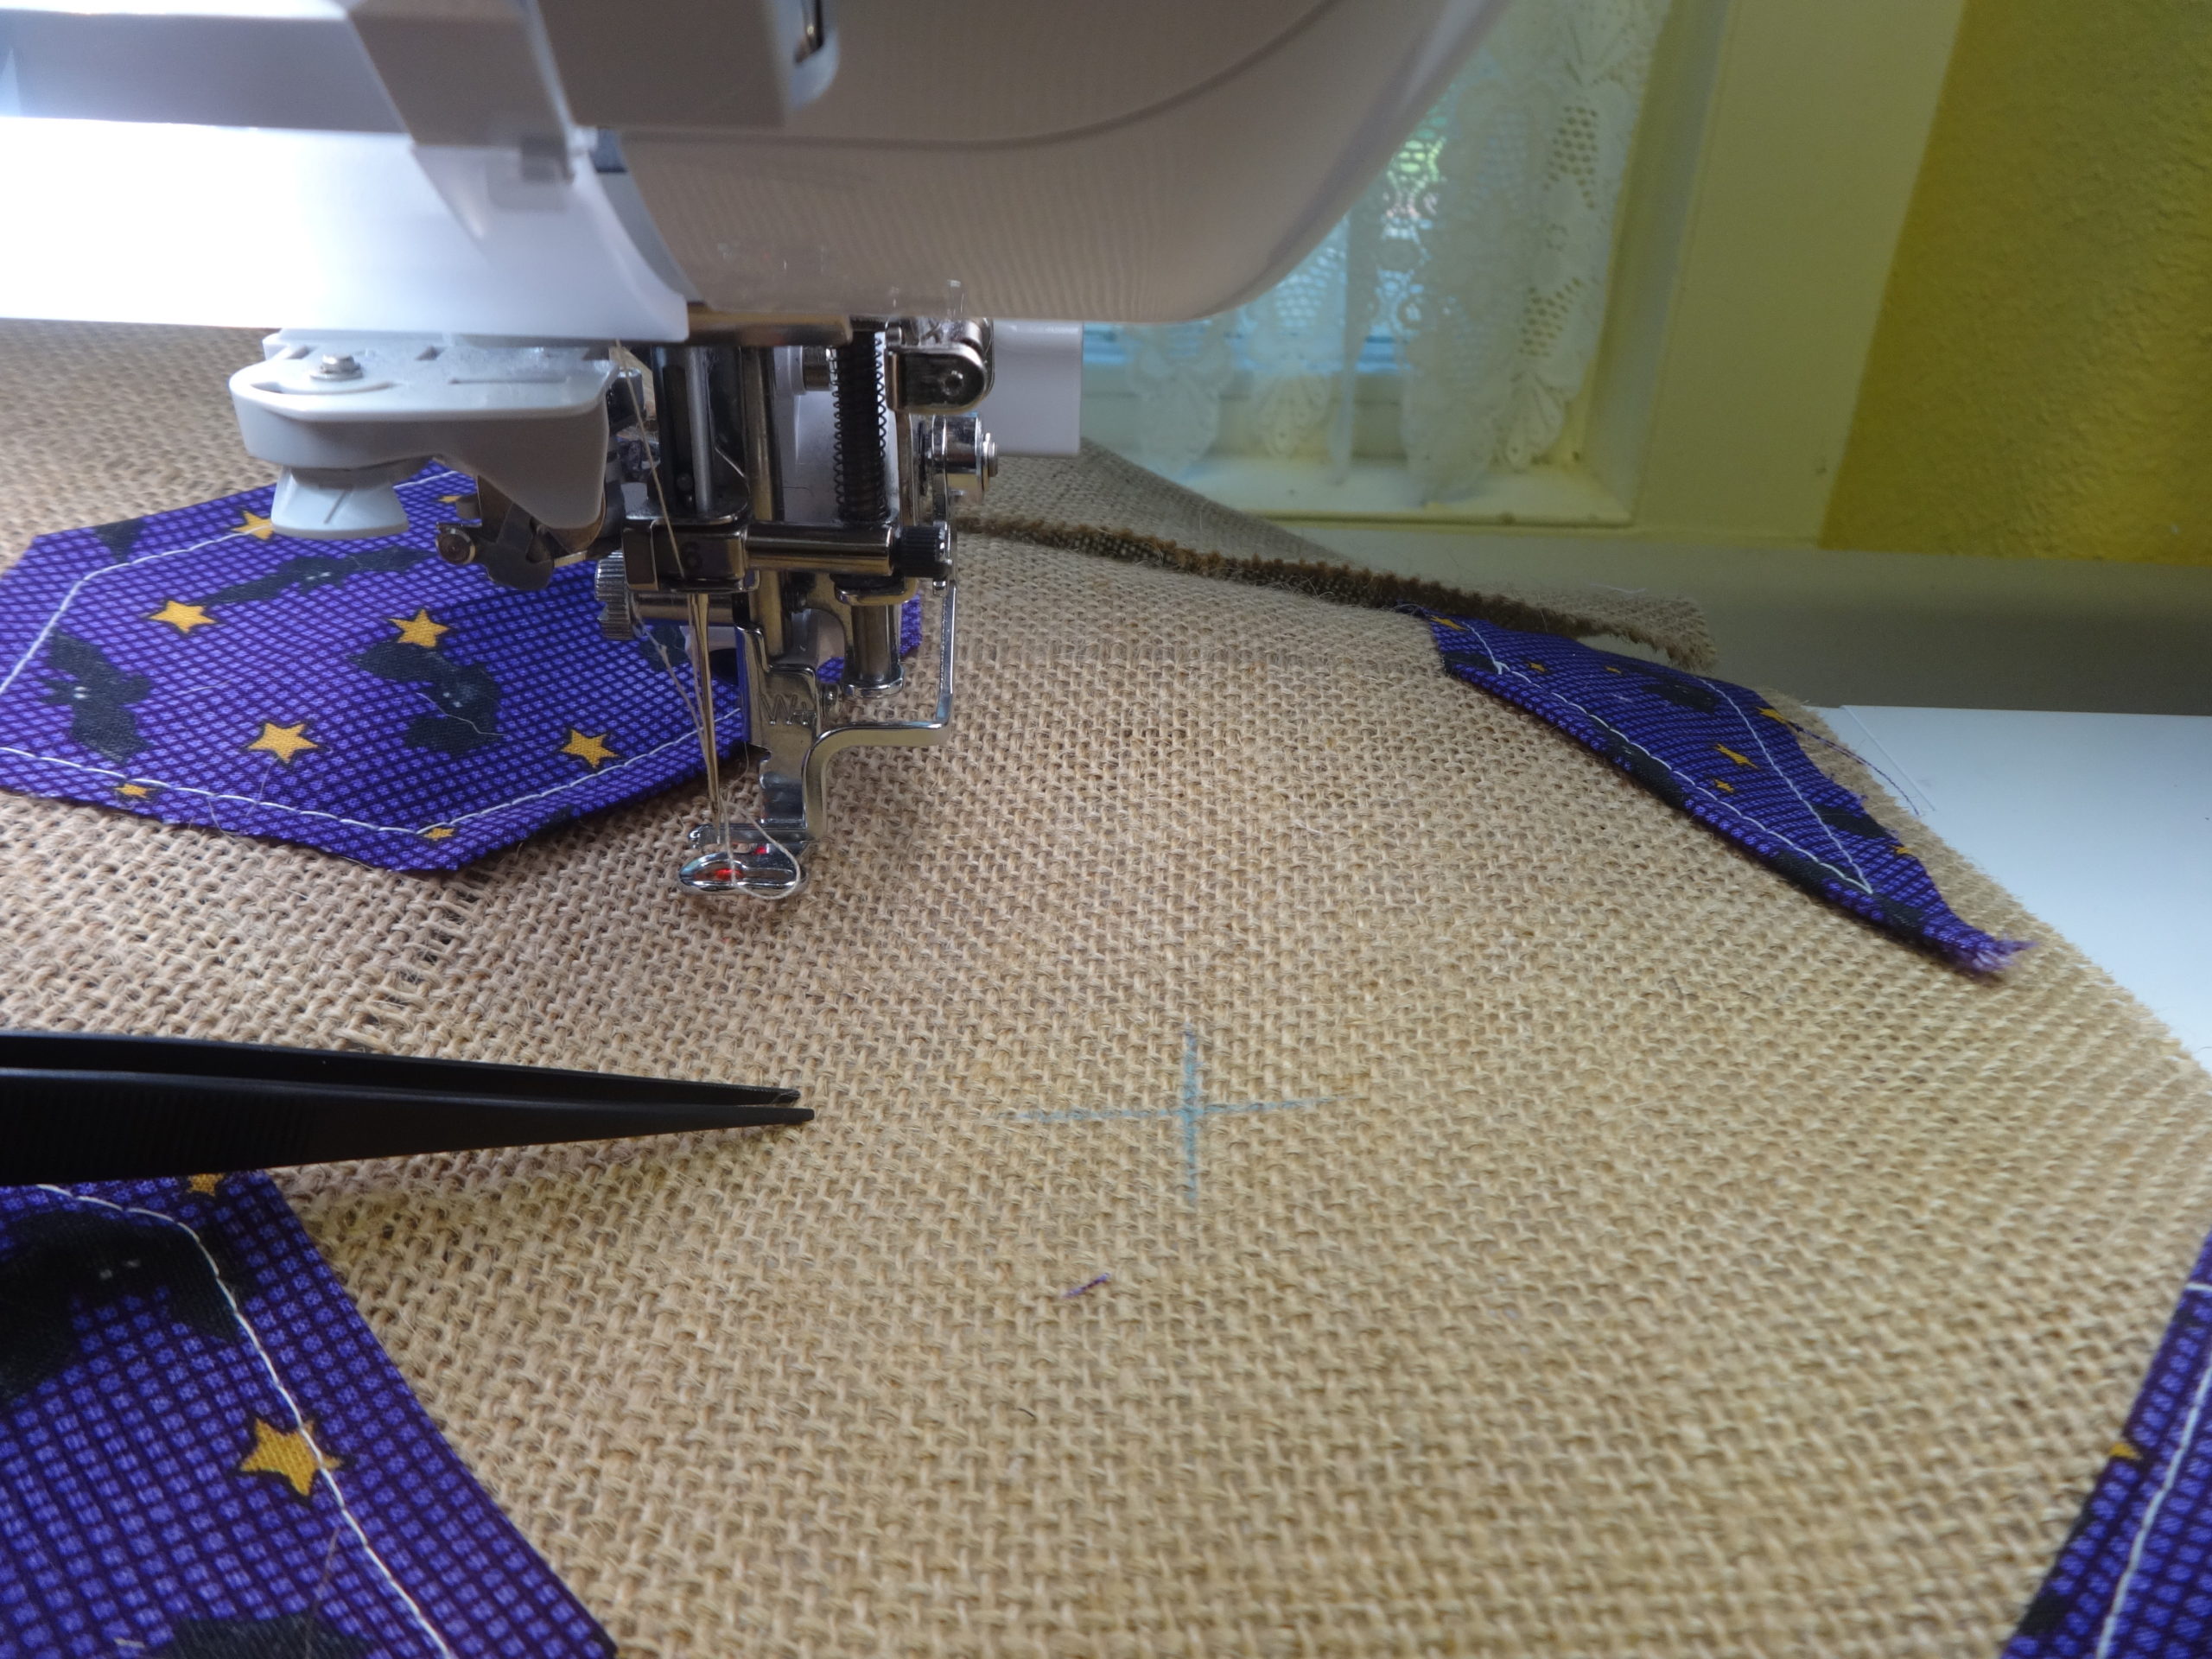
18. Hold the burlap in place securely with tweezers or your stylus. Advance to the first stitch in the basting frame. When you are certain that the burlap is still in its proper place continue with basting.
use of tweezers
19. Embrooider “Oh Boy Fun.”
20. Remove stabilizer and remove burlap from frame. Repeat this process for the remaining 4 snowballs.
TIP: Stitch Goofy’s skeleton with glow-in-the-dark thread for extra fun.
Goofy by day
Goofy by night
Spooky!!! Children will love it!
TIP: When stitching with glow-in-the-dark-thread, use a #90 needle and reduce speed.
21. Center embroidered burlap and batting on second piece of burlap, creating a true “quit sandwich.” This backing is extra large to account for the inevitable ravels which result from handling. Later it will be trimmed to its proper size.
22. Baste through all three layers. Again, use the Muvit dual feed foot to baste with stitch #108 on the utility menu.
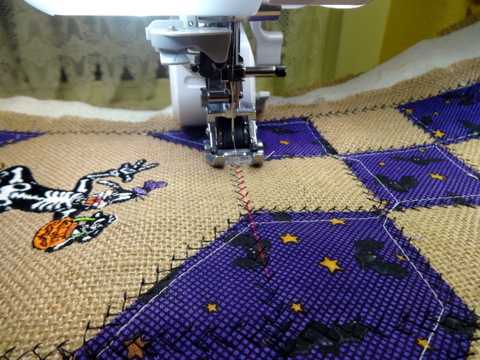
23. Keep Muvit foot attached. Select a decorative stitch with a width of no less than 6. The stitch shown is #211 on The Dream Machine, Quattro and Duetta, W 7, L 3. 5.
#108 basting stitch
laser guide screen with decorative stitch
25. Engage the laser guide, shown in the orange rectangle above.
laser guide in use
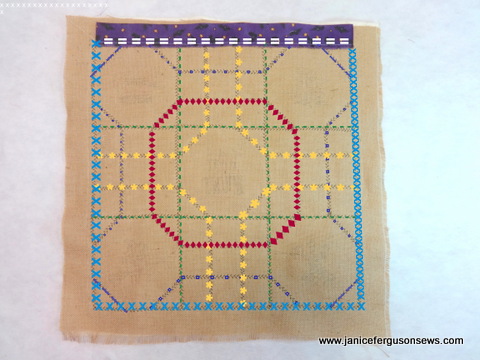
26. Work decorative stitching in whatever sequence you prefer, but this route is efficient. NOTE: This is shown on the back of the quilt top for clarity. Stitching is actually done on the right side.
suggested stitch routes
NOTE: The purple sleeve at the top is to be sewn in place AFTER all the decorative stitching is done except the white along the top. Somehow, the photo without the sleeve was corrupted, so just imagine the sleeve is not yet there.
a.Green (grid which creates 6” squares)
b.Dark blue (trapezoid shapes at center of each side)
c.Red (center shape-I should have paid more attention in high school geometry. There must be a name for this.)
d.Yellow (whatever)
e.Purple (corner triangles)
f .Blue (perimeter on three sides)
g.Purple (corner triangles)
h.Light blue (perimeter on three sides)
i.White—top edge stitched AFTER sleeve is sewn in place.
This stitch will enclose the raw edges of the pieces. Its design prevents loose threads breaking free to create an untidy appearance.
It is best to start each run of decorative stitching at the beginning of the pattern. Save the stitch and its settings in memory. After finishing a section of stitching, tie off thread tails. Then select #211 again and it will come up with your saved settings. Stitching will start at the beginning of the pattern.
27.Remove all basting threads.
28. Position sleeve with raw edge toward bottom of quilt piece. Place ¼” below the top of the snowballs. Baste in place.
sleeve basted in place
29. Work decorative stitch along top edge of quilt on right side. This will secure the top of the sleeve.
30. Remove basting threads on sleeve and press down. Hand whip folded edge to burlap.
FINISHING
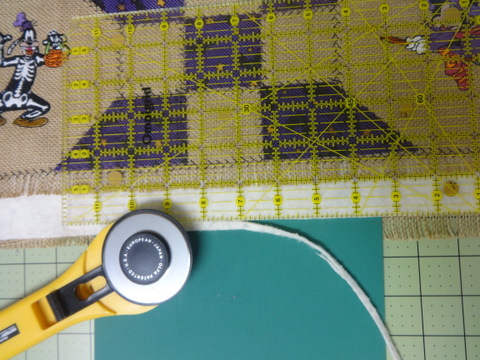
31. Remove burlap threads up to stitching line to create fringe.
32. Trim away any fringe that exceeds ½” beyond the center of the decorative stitching.
trim fringe
33. Trim batting to 1” beyond the fringe. Measure from center of decorative stitching.
trim batting
34. Pull batting to create the ragged look shown. Use of tweezers works well.
make batting fringe
35. Remove burlap threads to create fringe.
36. Insert a 22 x 1” flat wooden piece into the sleeve.
37. Braid three threads (pull from full width of burlap) to create a 26” cord. As the threads become frayed simply add another in its place and continue braiding. After approximately ½”, simply cut away the frayed piece and continue with the new thread.
38.Tie braided cord to each end of the wood rod.
39. Make 6 orange yo-yo’s. Instructions for easy creation of these faux pumpkins are included in the Finding Dory blog post.
40. Tuck a piece of green ribbon in the center of each yo-yo and hand stitch in place.
41. Retrieve six 18” threads removed from the burlap. Tie to the wood rod.
42. Attach a yo-yo to each thread in staggering lengths.
yo-yo pumpkins on right side
yo-yo pumpkins on left side
43. Hang this little quilt, call the children and turn out the lights. Happy Halloween!
Required disclosure: I am a paid Brother Ambassador. Not required: I LOVE my Brother sewing machines!
Not exactly a Griswold house, but it was enough to please us. And there is more in the back around the pool. Bob really wanted to please the children with all the lights. Lighted reindeer are perched on the garage roof, 4 snowflakes hang in front of the breakfast porch, candles are in the windows and my sewing room on the right is lighted up like an airport runway. Should have turned that off before Bob snapped this shot.
This is our 46th Christmas in this house and it seems each one gets better as all of our dreams have come true.
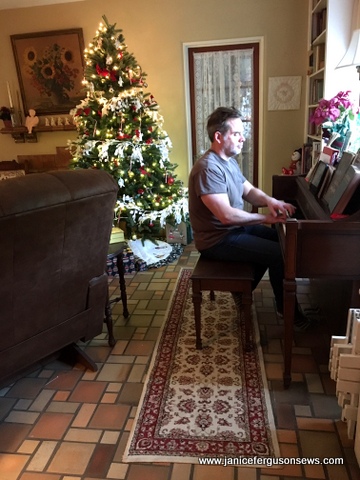
Well, the Most Wonderful Time of the Year has come and gone and it was a glorious time. For at least a few days of the week both of our children and their families were with us and the house was filled with laughter, music, good food, dogs, and chaos.
Since our son was about 10, the Noel proclamation has been mysteriously rearranged on the mantel with our boy neither pleading nor looking guilty, offering only an innocent smile. Now his son Robert has taken up the gauntlet and another Noel has fallen victim to the prank.
We never know what the mantel or the mirror will proclaim. Some days it’s NOLE or OLEO, though LEON seems to be favored–you just never know. Some speculate that it’s the work of the Elf on the Shelf.
Meanwhile, the piano seems to be playing non-stop, whether it be Ryan, Laurel or Robert at the keyboard, with only cookie breaks in the music. When Ryan was a child, his job was to play after dinner as Rebecca and I cleaned the kitchen. It made her want piano lessons.
My boy loves music as do his children.
Sweet, sweet memories.
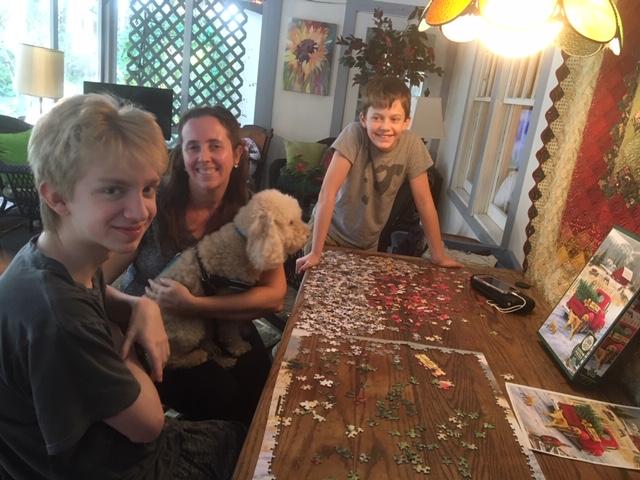
It was to be a great puzzle. 11 yo Alastair grins at his success, while mama Rebecca holds well-behaved Mendel and Robert FINALLY gave in to have his picture taken.
We worked on a Christmas puzzle on the back porch in 80 degree weather. Then in one brief, unsupervised moment, Sebastian, our 1 year old Pyrenees pup, nicknamed The White Devil, pulled the unfinished puzzle off the table and chewed up several pieces. Oh well.
Gingerbread houses were built and decorated, basketball was played in the driveway, football games were watched, driving lessons were given to 15 yo Robert, eggnog was chugged, stories were told, cats and dogs were played with and loved on, church was zoomed and life was merry at the Ferguson home.
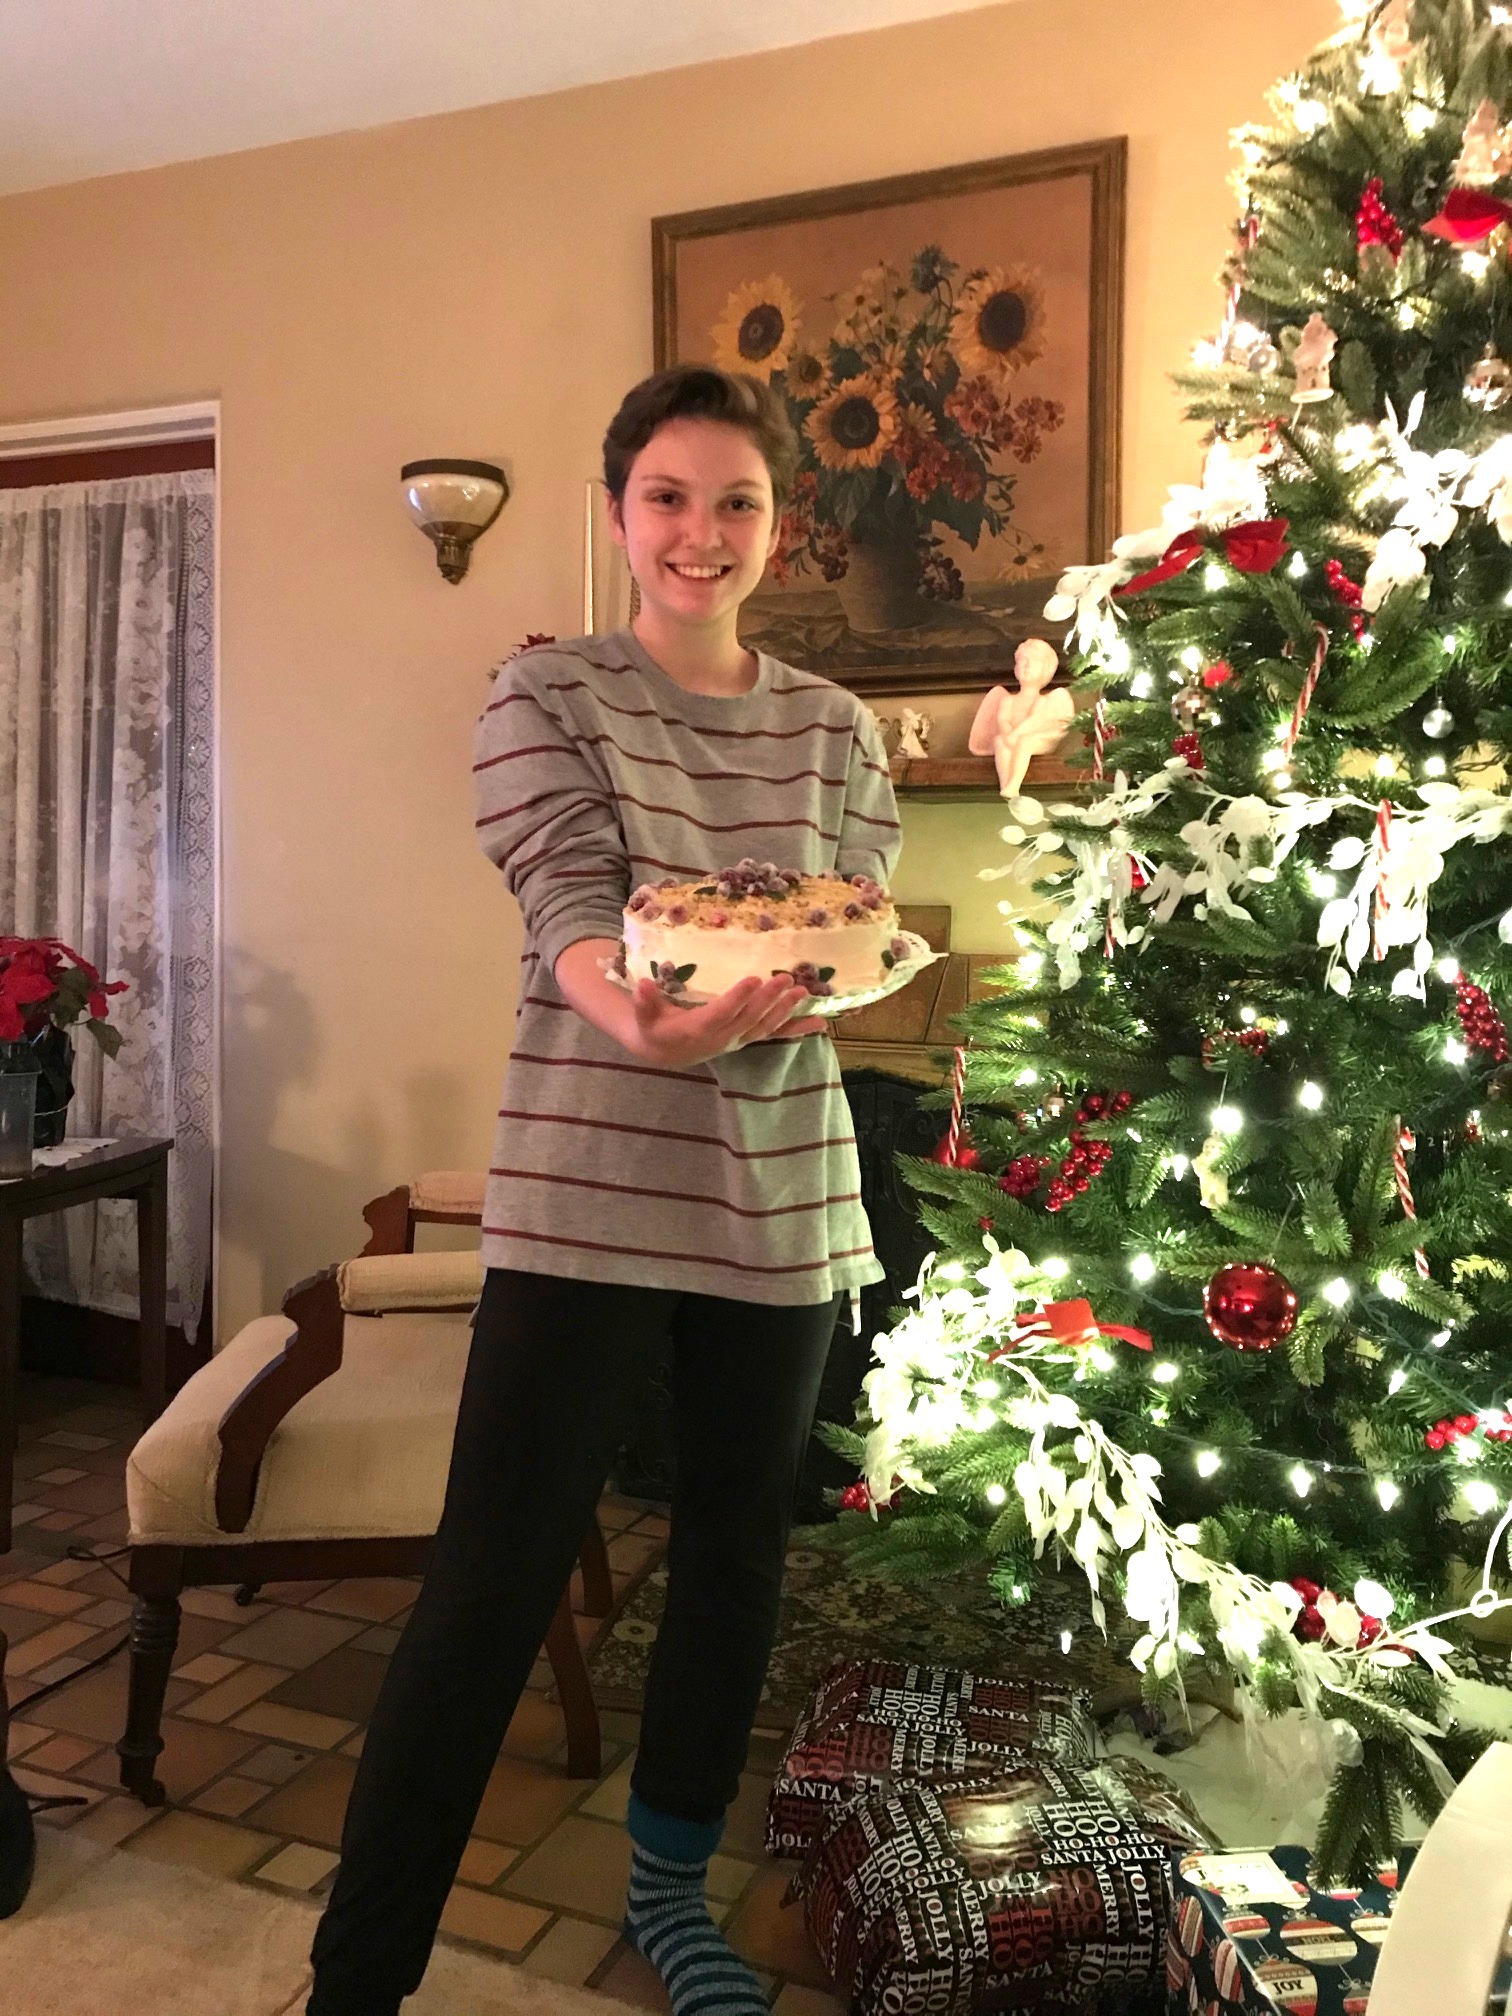
Our dinner table was festive, set with the traditional Christmas menu. Along with pumpkin pie, Laurel made a divine cranberry cake, with cream cheese frosting sprinkled with chopped walnuts, decorated with candied cranberries.
As expected, Vivian’s white lace Christmas dress was too big, so she wore cousin Laurel’s 10 yo black velveteen Sugar Plum Fairy Christmas dress which had been hanging in the nursery closet waiting for her to grow into it. Finally she did. Brother Alastair was dashing, as usual, in his holiday finery.
I wish I had taken more pictures, but I got so wrapped up in the wonder of it all. My wish is that you all had a joyous Christmas and celebrated the reason of the season.
From our house to yours, I wish you a happy and healthy 2021.
Laughter is the shock absorber that eases the blows of life. Anon.
I just came across this old post and thought it bears repeating. My life is great, rich and full of joy, and I hope yours is as well.But laughter is good for everyone. I hope this gives you a good chuckle.
~~~~~~~~~~~~~~~~~~~~~~~~~~~~~~~~
This post has only the most tenuous link to sewing. But some days tenuous is all I’ve got.
There has been a lot of illness among my elderly relatives. Sadly, since this was first posted, we have lost both Aunt Aileen and Uncle Richard. But life goes on. We accept as God’s blessing the merciful death of one and peaceful death of the other.
~~~~~~~~~~~~~~~~
When my Uncle Richard, 92, healthy and fit, stopped by my home after visiting his hospitalized sister, my sweet Aunt Aileen, his sadness and depression were palpable. I steered the conversation to the past, leading him to talk about his career as a restaurateur. He and his long-departed wife spent many years as owners, managers and sometimes cooks for this restaurant.
Ahhhhhhh, I thought. A true, funny restaurant story should give him some distraction and a good laugh.
So I told Uncle Richard……..
After teaching for seven full days at Martha Pullen’s school in Huntsville, Alabama, I was tired and eager to get home to Florida. I’m like a long distance trucker on these road trips. With 650 miles to travel alone, I make every infrequent stop count–1) gas, 2) bathroom and 3) food —then back on the road.
Somewhere near the Florida state line, I stopped at one of those huge truck stops that could pass as a mini-mall. On one side was a sub shop and a sit down restaurant. A turkey sub sounded good to me.
Directly inside the door was a sub sandwich counter and a few small tables. To the left was the large dining room of the restaurant. I waited at the unattended sub counter for a few minutes then went into the restaurant to see if I could get some help. Two or three tables were occupied with diners, but no wait staff or attendants were visible.
Tick tock tick tock…….I don’t wait well. But I called up all my patience and gave it a little longer, a total of 6 minutes from my arrival. I had my gas and bathroom break but no lunch. I needed to get on the road!
So stepped behind the counter, washed my hands, put on a pair of plastic gloves and started on my sandwich. I had the roll sliced, the condiments slathered on and had just plopped the meat, cheese and veggies on the bread when a lady came out of the restaurant shrieking, “What do you think you are doing?!?!?!”
Very calmly, I replied, “I’m making a sandwich, of course. Since no one was here to do it for me, I assumed this was a self-service shop.” Continue reading →
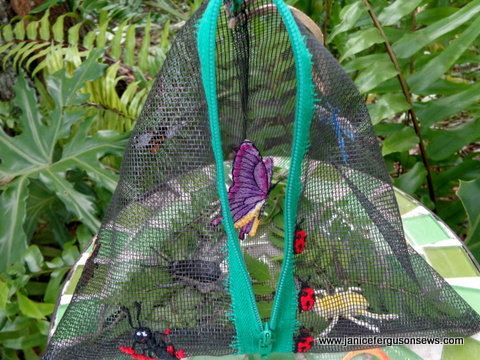
You can’t beat bug hunting for kids’ summer fun. Make this bag with or without embroidery and they will be kept busy prowling the bushes and grass. Whether the prey be creepy crawlies or fireflies, the adventure is a child’s version of an African jungle safari.
But where to put the catch? This fiberglass screen wire teepee bag (the name is suggested by its shape) is a perfect accessory and holding pen. Use insect designs from iBroidery.com and your personal design library to embellish the outside.
Most machines handle the screen wire effortlessly. The stand-alone butterfly swaying inside the bag will intrigue the children and send them racing out the door away from their screens and into nature. Without embroidery, print a butterfly on cardstock and dangle it with monofilament, just like the embroidered one. You could even include a few plastic bugs in the bag, as shown in the photo, to get the children in the mood.
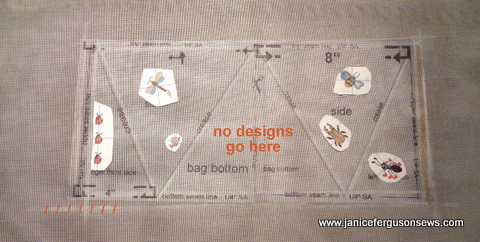
This was my latest project featured on Brother’s blog at Stitching Sewcial. It includes detailed instructions for the basic bag as well as a downloadable template. This template shows the sections and sides of the bag, making embroidery placement easy.
The basic bag is my standard, favorite teepee bag, used dozens of times. But the zipper insertion varies and frankly is easier with less opportunity for error.
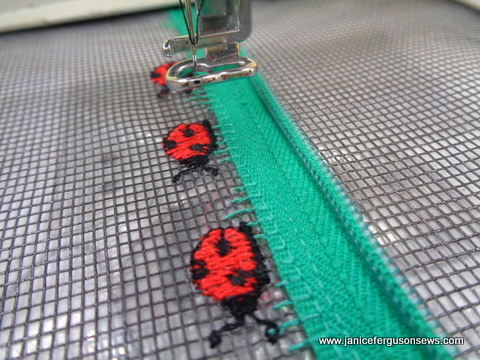
See that the zipper is simply placed on top of the screenwire and held in place with a decorative stitch that mimics grass.The embroidered ladybugs could easily be replaced with ladybug buttons.
There is still plenty of summer left. Why not give the children a last adventure before the start of school with this fun bag and activity? Check out the Stitching Sewcial blog post for particulars. Enjoy these last lazy, hazy, crazy days of summer with your kids.
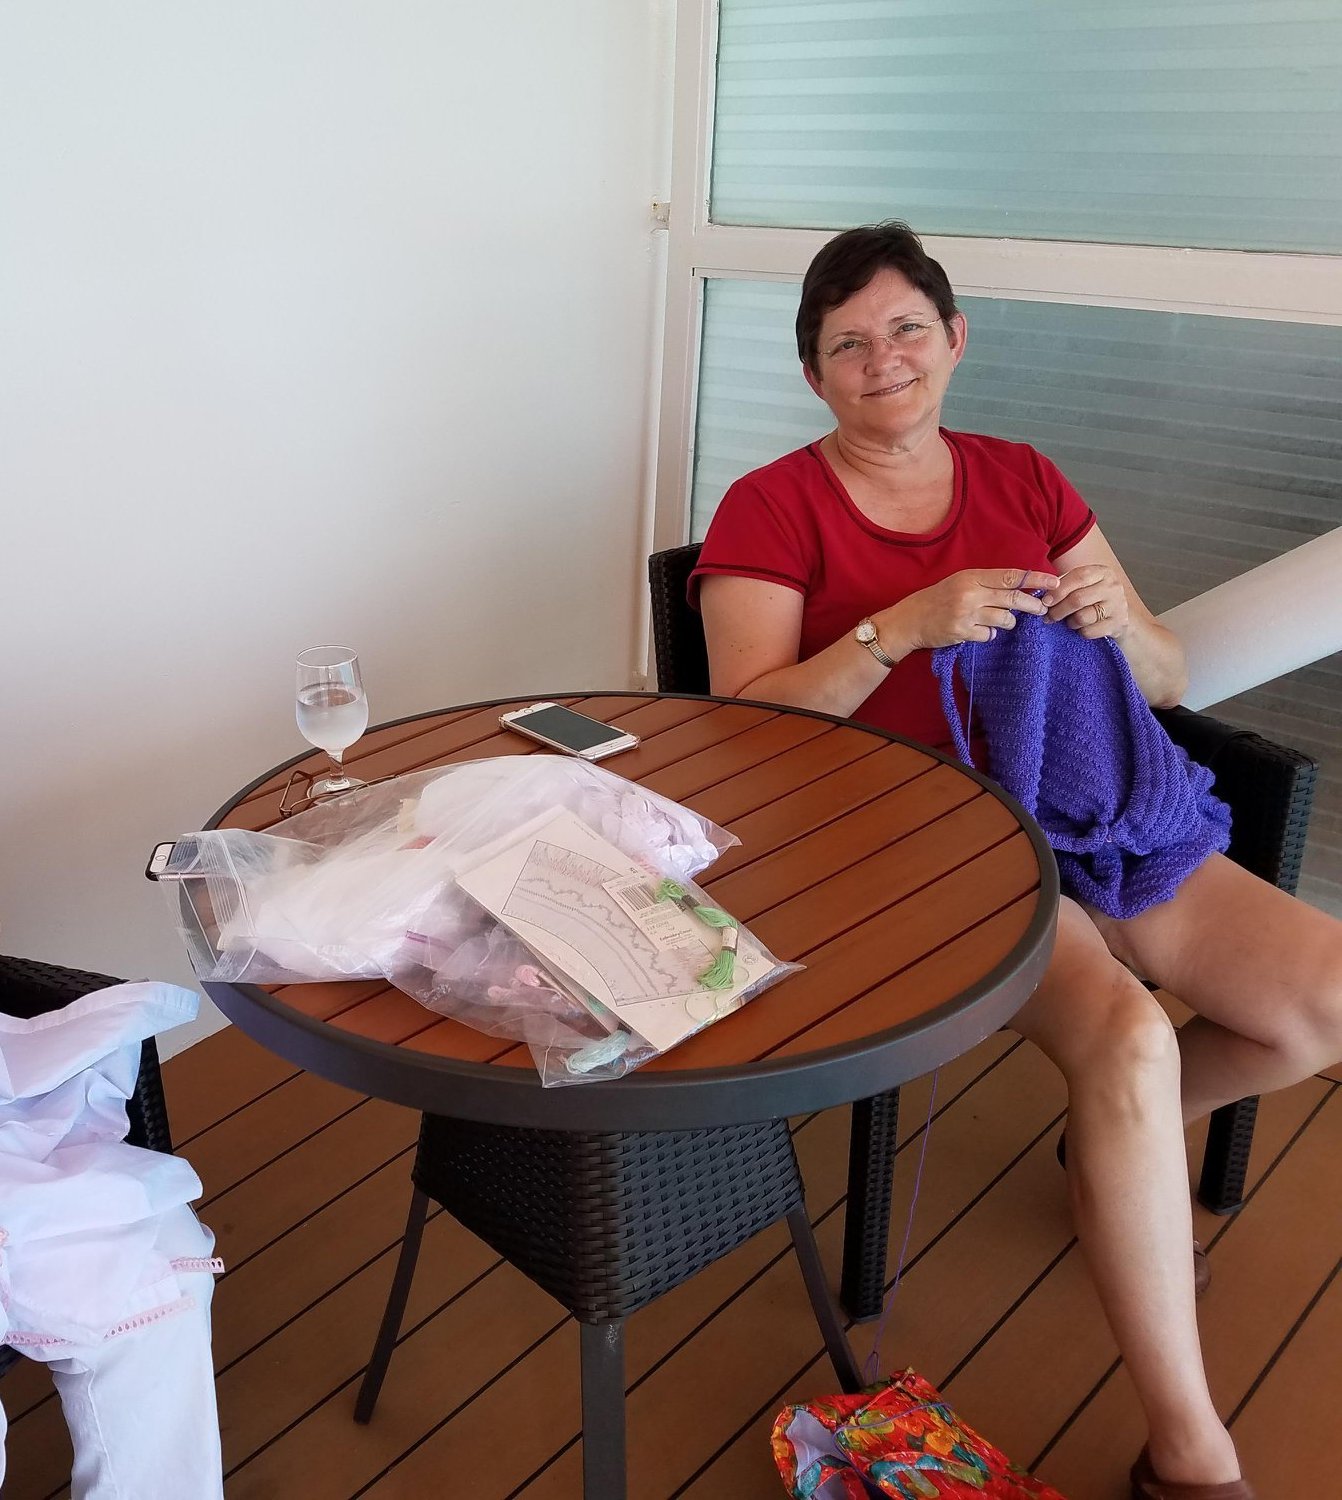
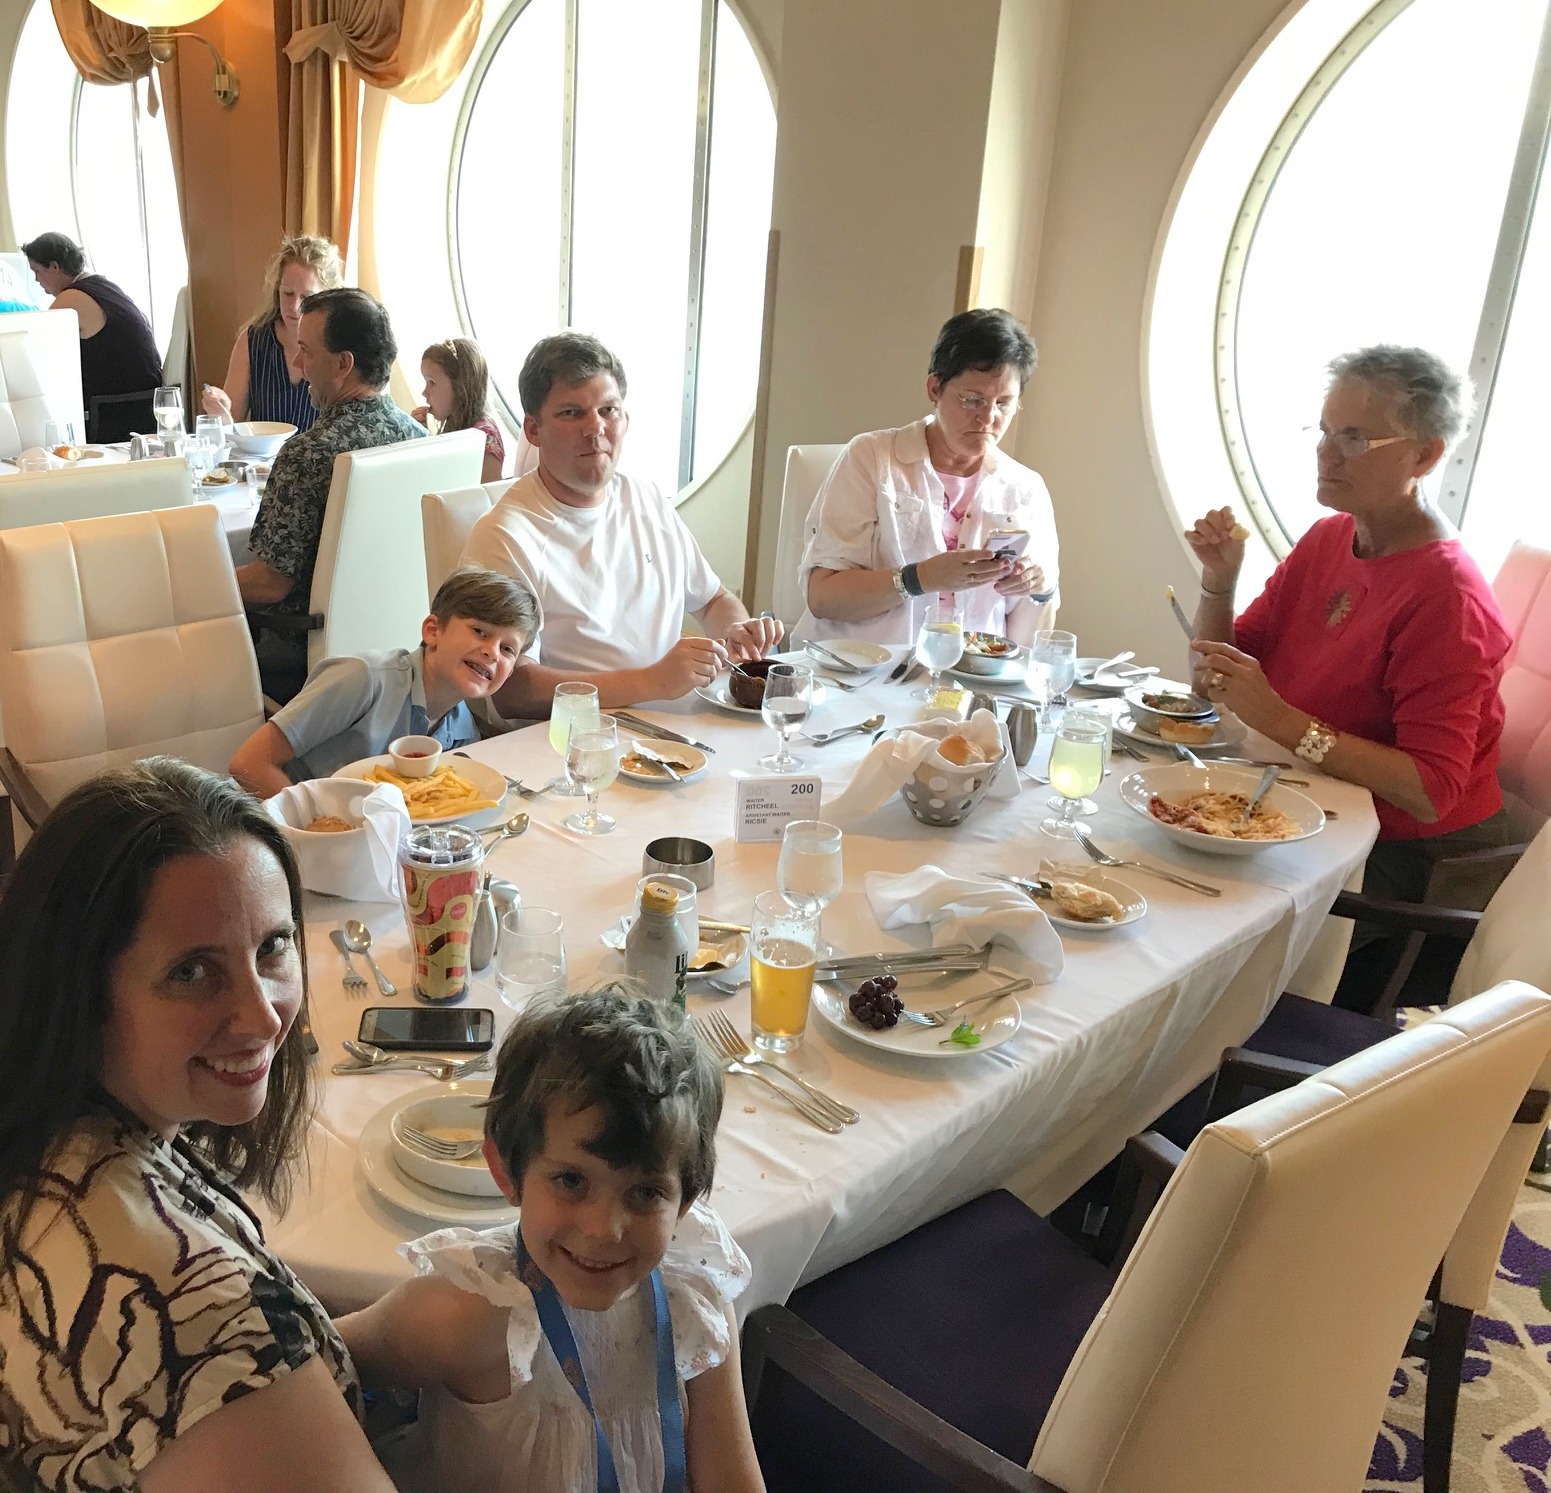
It’s been way too long since a new blog has been posted but I’m trying to catch up. To say we have been busy is a gross understatement. But let me tell you one of the many events that have kept us running– our wonderful Royal Caribbean cruise with our daughter and family. There are some sewing projects to see but lots of fun to report.
I had packed a bag of smocking projects which I expected to complete while enjoying the view and sea breeze from our balcony. Some smocking was done but I packed way too many projects with way too many great expectations.
My good friend Carol, our daughter’s fabulous mother-in-law, was with us and had the same idea. She knitted and I smocked. So we sat and stitched, but only for short periods of time.
There were so many activities. Vivian Rose wore “Nana clothes” every day. Here she is leaving an activity wearing a bishop Easter dress from a few years ago.
The dress was generously sized for her two years ago and desperately needed a tuck under the arm. It still needs the tuck and the only other fitting problem its short length. Regardless, she loves the dress. I really need to make those tucks. Why she is wearing her backpack under the dress is a mystery to me. She wore this dress to dinner one night.
For dinner each night she was dressed in smocking. This dress was made for her mother 30 years ago and was worn by cousin Laurel before Vivi for a few years. Now it’s another one of Vivian’s favorites. It’s still in perfect condition, another hurrah for Spechler-Vogel’s Imperial batiste Continue reading →