

The Old Fashioned Baby bubble set for Vivian Rose, my 5 week old granddaughter, is finished and I am pleased. The bubble is made of Liberty of London tanna lawn and trimmed with tatted edging.

Hand embroidered in classic blue on white, the cotton diaper shirt was purchased in Old San Juan. It has been modified slightly to coordinate with the bubble.

After seeking the advice of you, dear readers, as well as Martha Pullen Forum and SewForum, I was amazed at the number of creative, thoughtful suggestions.
While I could think of nothing but finding a way to incorporate tatting into the diaper shirt, the answer that suited me best was in totally different component of the set–the buttons. The simple addition of embroidered flowers on the 4-hole mother-of-pearl buttons (replacements for diaper shirt plastic utility buttons) in the colors of the Liberty print seemed to solve my problem of making two unrelated pieces into a set.

CONSTRUCTION DETAILS
upper edges—One of the things I like most about the Old Fashioned Baby patterns is that they are very simple, with only a touch of embroidery for embellishment. For someone like me, who prefers MY way without having to plow through extensive how-to directions, this little 3 piece pattern–front, back and crotch extension–was perfect. But…
It calls for a sweet hand stitched shell hem around the neckline and armholes. Because I preferred a tatted against this busy print, I had to find a method that would not destroy the simplicity and delicacy of the pattern.
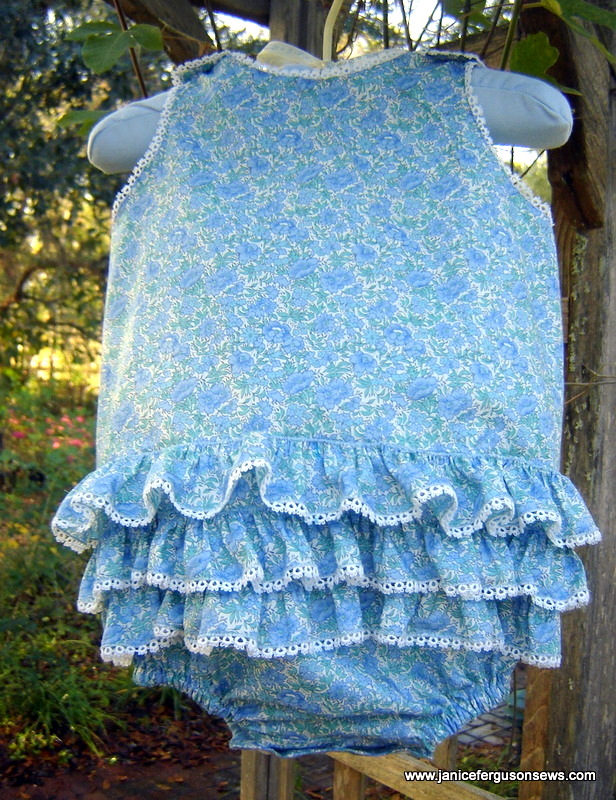
I rejected adding entredeux between the body and the edge because it seemed like it would be heavy against the tiny garment and the light weight of the Liberty. Ultimately, I did a machine roll and whip on all the upper raw edges. Then I folded it over a scant 1/8″ and machine basted that in place. The tatting would butt up to that folded edge.
My first attempt was to work a tiny zig zag with 80 wt. thread and a 60 needle between the folded edge and the tatting. Having cut the tatting a few times when it was attached to the back ruffles in this manner, I was reluctant to try that again. Mending those cuts was very tedious and not very attractive. But
still I tried, using extra care.
It took an eternity to join a few inches of tatting! So I resorted to doing it by hand. I actually enjoy handwork, but I dislike the amount of time it takes.  Still, it proved to be the most successful way to get the tatting attached.
Liberty bubble trimmed with baby tatting
ruffle edges and attachment
This is the third ruffle bottom garment I’ve made and a different method was used for each. Finally, I think I have decided my preference.
I’ve rejected the serged ruffle edge I used on the rhumba pants and the pattern from Martha Pullen’s Precious Daygowns-Round Yoke Collection as too bulky. A much finer finish, in my humble opinion, can be had with a roll and whip or Swiss roll. I used that pattern and technique on the ruffled pants that coordinate with another Puerto Rican diaper shirt as well as the ruffles on Sweet Baby Jane.
Attaching the ruffles was another trial and error process. There is a lot to recommend the technique of cutting the ruffle twice as wide as the finished width. It is then finished on both cut edges and then gathered up the center. The ruffles were simple tiny zig zagged down over the center gathers. This is quickly done and gives a nice full set of ruffles. I don’t think I would like this style if a trim were added to the ruffle edges.
The second method I tried was to roll, whip and gather the ruffle by machine then attach by simply zig zagging over the gathered edge with monofilament thread. That’s how the ruffles on the yellow Imperial, MP diaper cover was attached. Somehow, it seemed okay to use monofilament on polycotton and I was satisfied with that.
The lavender gingham ruffles on Sara Norris’s Sweet Baby Jane bubble were gathered with a serged narrow edge. I thought I could just fold the serged edge under. That proved to be messy and tedious. It was hard to distribute the gathers evenly and keep them in place while pressing under the serged edge. I basted them but still it was unsatisfactory.  Finally, they were determined to be good enough, but not good. It was time to move on to another garment.
On this OFB bubble, the Liberty print ruffles were rolled, whipped and gathered. I would like to have used the monofilament, but that seemed like serving a Moon Pie on fine china with sterling silverware. So I fell back on my reliable 80 wt. thread and zig zagged over the gathers as on the yellow pants. But the solid colored blue zig zag makes noticeable line along the busy print. If I were to do it over, I would use monofilament on a print.
More than you wanted to know, no doubt. But these are almost all my thoughts on ruffles. What is your preferred method?

shirt and bubble back
NOTE: I’ve tried reducing the size of the photos to reduce the time it takes to load this page. Each picture that has the www.janicefergusonsews.com watermark has been sized down. Do you think the reduced time justifies the reduced resolution?

10 responses to “Liberty Bubble and PR Diaper Shirt”