Madeira Applique’ Tutorial

Joanne Banko hosted me on her live YouTube show December 9 for a fun and informative tutorial on Madeira applique’. This is one of my favorite heirloom techniques.

May be an image of 1 person and text that says 'fet with Joanne Banko go sew! Time for Tea & Tutorials! LIVE show Friday December 9th, 2pm Eastern Standard Time Learn Madeira the art of Appliquel With sewing, embroidery, & embroidery, heirloom Ferguson expert, Janice www.lanioefersasorsews.com Join us! Sip some tea and learn some new sewing tips and tricks! xxxxxxxx xxxxxxxx'
You can watch the replay here https://www.youtube.com/watch?v=G7Dw119fJJg&t=455s

Joanne is a dear friend of mine, who was described by another sweet friend who has never met her in person as “a genuinely warm, nice person.”

Her Friday live “Tea and Tutorials” are always a treat with various guests. Each show offers a unique sewing talent and special technique. Tune in to Joanne’s YouTube channel for entertaining and fun learning.

Getting back to Madeira applique, the video shows many of my finished projects that feature this technique and then goes on to show how-to step by step. Here are some of the projects shown, but the real meat of the video is the instructional story boards.

This little baby pillowcase was not shown, as there were time constraints. But I love this project.

I would rather have used a softer blue for the Madeira hem but for tv, I knew a darker color would show up better. The fil tire’ hearts and the swag are designs by extremely talented designer and my good friend Suanne Sawko.

This pillowcase is another project that was not included in the video. It was a birthday gift for my daughter a few years ago.

Details are included in this earlier bloghttp://www.janicefergusonsews.com/blog/2009/10/05/madeira-monogram-pillowcases/

Madeira mono green

This little bishop dress was included in the video.

It shows a traditional Madeira hem as well as a Madeira treatment on the sleeve. The sleeve didn’t show up very well on the video as with that Ipad camera I am as clumsy as a gorilla with a tatting shuttle. So prease be forgiving. Here is a close up.

No description available.

That tiny rosebud at the peak of the Madeira is a free download here. It is so very useful. Just ask for it in the comment section and it will be sent to your email.

It’s time to get back to Christmas preparations. It love this joyous season. The house and tree are almost decorated (I know it’s late but I’ve been crazy busy), the staircase is lovely and my favorite holiday ornament is hanging on the front door wreath. It is an antique sleigh bell I purchased at the church bazaar 50 years ago.

With a houseful of family arriving from New Jersey, Nebraska and Lakeland, Florida, it will be a chaotic, wonderful time of love and laughter. Above all, it will be a time of celebration of the birth of our Savior Jesus Christ. More on Christmas sewing later. Happy last minute holiday stitching to you!

Pumpkin Patch of Goodies

Peekaboo Pumpkin Treat Bags

This is from a post at Brother’s blog Stitching Sewcial https://www.brother-usa.com/blogs/stitching-sewcial/a-pumpkin-patch-of-pumpkin-goodies. All instructions with detailed photos are located there. The links for the machine embroidered peekaboo pumpkins 4×4.pes and 5×7.pes are no longer active, so if you would like them, just email me at janicegferg0616@gmail.com and I will send them. I love this project and think you will too.

It’s a pumpkin patch of goodies and so much fun to make!  With your Brother Embroidery machine, you can quickly stitch enough to fill a basket of these cuties.   Delight visiting children or any young friends at church or community gatherings.  Mail a few to your grandchildren or deliver some to nursing home friends or children at a homeless shelter.  Because pumpkin season runs long, from fall to Thanksgiving, a wagon load would not be too many.  You will have a good time making and giving these away.  The possible variations are unlimited.  You will have a hard time stopping with one.  I could not!    Individual pumpkins are mixed in with the directions. WARNING:  These can be addictive.

Here are a few variations. 

orange felt, green stripe ribbon

There are so many interesting printed burlaps that would make cute pumpkins. I like to cut a wider distance from the stitching to create fringe.  Adding curly ribbon makes it more festive. like the way the burlap fringes.

polka dot burlap with curly ribbon

This would have looked nice with gold metallic thread.  I always get these ideas too late. Maybe I’ll make another one! 

ivory with gold stitching

The step-by-step directions for these cute little treat bags are posted here https://www.brother-usa.com/blogs/stitching-sewcial/a-pumpkin-patch-of-pumpkin-goodies The bags are suitable through Thanksgiving.

Happy Fall!

Required disclosure: I am a paid Brother Ambassador. Not required: I LOVE my Brother sewing machines!

Halloween Faux Quilt

Mickey and friends enjoy Halloween

This project was designed for Brother machines some time ago, but I am certain you clever readers with other machines can adapt the relatively simple directions and have fun with this. I apologize for the late posting so close to Halloween, but my home in central Florida was in the path of Hurricane Ian. This caused a significant delay. We were blessed to have suffered very minimal damage-a great deal of debris and a downed 60′ palm tree. This graceful palm had Confederate jasmine climbing to its very top before it fell in a convenient direction away from our pool. We continue to pray for those less fortunate whose losses were devastating.

For the fortunate ones, life goes on. Children helped to pick up the fallen branches and asked about their Halloween costumes. Did you know that Halloween is the most popular secular holiday?  Celebrate with this kid-pleasing Halloween wallhanging and learn a quick and easy technique.  This can be used with other themes and holidays.

With some burlap, Brother’s wholesome Disney Halloween machine embroidery collection from ibroidery.com and some seasonal fabric you will be on your way.   Discover and master a unique, easy and fun faux quilting technique.  Children will be delighted when they see Goofy’s skeleton glow in the dark.

Requirements

Fabric: 

*Halloween print—four 4” squares, eight 2 x 4” rectangles, eight 2” squares, 19 x 3 ½”  for sleeve 

  • burlap 19 1/2” square for front, 25” square for backing. This is extra large to account for the many ravels as the piece is handled.  Later it will be trimmed to size.

*orange scraps for yo-yo’s

Cotton batting 22” square

Ibroidery.com Disney Halloween designs: DMHLW01–Mickey with pumpkin, DMHLW02–Minnie with broom

DMHLW03—Goofy skeleton costume, DMHLW04—Best Ghoul friends, DMHLW05—Oh boy what fun

Notions: tearaway stabilizer, spray adhesive, chalk marker, glow-in-the-dark thread, embroidery threads, black cotton sewing thread for decorative stitching, bits of green ribbon for pumpkin stems  OPTIONAL: glow-in-the-dark thread, chalk marker, spray adhesive

TIP:  While any burlap can be used, a better quality makes it much easier to create the necessarily accurate grid.  Note the difference in the two qualities of burlap.

The burlap on the left has threads or strands of varying widths. The one on the right has strands of a more regular size.

PREPARATION

  1. Pull threads on burlap creating a 6” grid with  ¾” border.

2. Starch and press the Halloween print until very stiff and crisp.

3. Press four 4” squares as shown, with diagonally opposite corners folded to center.

4. Press four 2 x 4” rectangles with one corner folded up as shown.

5. Press four 4” x  2” rectangles with one corner folded down as shown.

6.  Press four 2” squares in half diagonally.

7.  Press four 2” squares flat.

  By combining the shapes into larger pieces, then stitching over where seams would have been, it gives the illusion of many pieces being joined quite perfectly to create this pattern. Folding many of the edges under, particularly the bias edges, gives a very neat appearance. The decorative stitching covers the raw edges and makes short work of what could be a very time consuming project.

8. Press under ½” on each short end of sleeve piece and stitch in place. Fold in half lengthwise, wrong sides together.  Set aside.

9. Baste Halloween pieces in place on burlap.  Use of the knee lift leaves both hands free for frequent pivoting.

10. Spray batting with adhesive.  Place burlap on top of batting. 

11. Select stitch # 108 in the utility menu.   Baste through all three layers.

TIP: The Muvit dual feed foot makes quick work of this process.  The walking foot is also effective.

ANOTHER TIP:  Use thread color to match Halloween fabric.  If basting threads become trapped in the embroidery, they will not show. 

AND ONE MORE—CAUTION:  Be alert when embroidery foot approaches the lengthy basting stitches.  It helps to remove nearby basting threads when embroidering.

12. Mark centers of  ”snowballs” for placement of embroidery designs.

TIP: A chalk device works best.  A small crosshair can be brushed away if the embroidery does not cover .the mark.

13. Hoop tearaway stabilizer in 4×4 frame.

14. Open “Oh Boy” design and edit to add basting frame.  This will secure the quilt top to the frame without leaving hoop burn (an imprint of the hoop on the burlap and batting).

Boy oh Boy baste frame key

NOTE:  Remember that the basting frame option does not appear until the Embroidery screen appears, after SET and EDIT screens. 

15. Position the center square over the frame.

16. Engage the needle placement laser feature.

17.  A red dot will appear in the middle of the frame.  Move the burlap so the red dot sits precisely on the crosshairs.

red dot centered

18. Hold the burlap in place securely with tweezers or your stylus.  Advance to the first stitch in the basting frame.  When you are certain that the burlap is still in its proper place continue with basting. 

use of tweezers

19. Embrooider “Oh Boy Fun.”

20. Remove stabilizer and remove burlap from frame.   Repeat this process for the remaining 4 snowballs. 

TIP: Stitch Goofy’s skeleton with glow-in-the-dark thread for extra fun.

Goofy by day
Goofy by night

Spooky!!! Children will love it!

TIP: When stitching with glow-in-the-dark-thread, use a #90 needle and reduce speed. 

21. Center embroidered burlap and batting on second piece of burlap, creating a true “quit sandwich.”  This backing is extra large to account for the inevitable ravels which result from handling.  Later it will be trimmed to its proper size.

22. Baste through all three layers.  Again, use the Muvit dual feed foot to baste with stitch #108 on the utility menu.

23. Keep Muvit foot attached. Select a decorative stitch with a  width of no less than 6. The stitch shown is #211 on The Dream Machine, Quattro and Duetta, W 7, L 3. 5.

#108 basting stitch
laser guide screen with decorative stitch

25.  Engage the laser guide, shown in the orange rectangle above.

laser guide in use

26. Work decorative stitching in whatever sequence you prefer, but this route is efficient.  NOTE:  This is shown on the back of the quilt top for clarity.  Stitching is actually done on the right side.

suggested stitch routes

NOTE:  The purple sleeve at the top is to be sewn in place AFTER all the decorative stitching is done except the white along the top.  Somehow, the photo without the sleeve was corrupted, so just imagine the sleeve is not yet there.

a.Green (grid which creates 6” squares)

b.Dark blue (trapezoid shapes at center of each side)

c.Red (center shape-I should have paid more attention in high school geometry.  There must be a name for this.)

d.Yellow (whatever)

e.Purple (corner triangles)

f .Blue (perimeter on three sides)

g.Purple (corner triangles)

h.Light blue (perimeter on three sides)

i.White—top edge stitched AFTER sleeve is sewn in place.

This stitch will enclose the raw edges of the pieces.  Its design prevents loose threads breaking free to create an untidy appearance.

It is best to start each run of decorative stitching at the beginning of the pattern. Save the stitch and its settings in memory.  After finishing a section of stitching, tie off thread tails.  Then select #211 again and it will come up with your saved settings.  Stitching will start at the beginning of the pattern.

27.Remove all basting threads.

28. Position sleeve with raw edge toward bottom of quilt piece.  Place ¼” below the top of the snowballs.  Baste in place. 

sleeve basted in place

29. Work decorative stitch along top edge of quilt on right side.  This will secure the top of the sleeve.  

30. Remove basting threads on sleeve and press down. Hand whip folded edge to burlap.

FINISHING

31. Remove burlap threads up to stitching line to create fringe.

32. Trim away any fringe that exceeds ½” beyond the center of the decorative stitching.

trim fringe

33. Trim batting to 1” beyond the fringe.  Measure from center of decorative stitching.

trim batting

34. Pull batting to create the ragged look shown. Use of tweezers works well.

make batting fringe

35. Remove burlap threads to create fringe.

36. Insert a 22 x 1” flat wooden piece into the sleeve.

37. Braid three threads (pull from full width of burlap) to create a 26” cord.  As the threads become frayed simply add another in its place and continue braiding.  After approximately ½”, simply cut away the frayed piece and continue with the new thread.

38.Tie braided cord to each end of the wood rod.

39. Make 6 orange yo-yo’s.  Instructions for easy creation of these faux pumpkins are included in the Finding Dory blog post.  

40. Tuck a piece of green ribbon in the center of each yo-yo and hand stitch in place.

41. Retrieve six 18” threads removed from the burlap. Tie to the wood rod.

42. Attach a yo-yo to each thread in staggering lengths. 

yo-yo pumpkins on right side
yo-yo pumpkins on left side

43. Hang this little quilt, call the children and turn out the lights.  Happy Halloween!

Required disclosure: I am a paid Brother Ambassador. Not required: I LOVE my Brother sewing machines!

Quickie Hostess Gift

Note: The name of the host couple has been blurred so you all don’t try to wrangle a dinner invitation. This was such a delicious meal! And I’m sorry if perhaps the gloriosa lilies are just too much, but the colors look so festive and Mexican-like to me. They are blooming so profusely in my garden and I wanted to show them off.

Quickie Hostess Gift

For our Bible Study group, we always have dinner, with the host and hostess providing the main course with others bringing the remainder of the meal. But for some unknown reason, dear Jackie graciously decided to offer a complete Mexican dinner to our entire group. No one else had to cook and that was certainly a treat.

Truth be told, a terrible storm took out my power for quite some time that afternoon, so I did not finish the embroidery before time to go. When I returned home, I was so impressed with the meal that I added the text to the design. It is Embroidery Library’s Mariachi Clothesline.

I’ve always felt that situations like this require a gift which does not leave the recipient feeling beholden.

When I gave the towel to Jackie at church she was so very pleased. Of course, she is the kind of lady who would have been tickled with a decorative pocket package of tissues. At the fellowship hour after the worship service, she was showing it off and all the non-sewers, which makes up most of the congregation, seemed so amazed at not just the Mariachi Clothesline embroidery, but the personalization. It certainly takes a just a little stitching to make some people happy. And it makes me happy to see them happy.

So the next time you need a quick gift for someone you don’t want to feel beholden, go embroider or stitch a dishtowel. That’s my advice. Happy sewing!

And read on…….

This earlier post explains my feelings and opinion about dishtowels very well.

“Happiness doesn’t result from what we get, but from what we give.”
Ben Carson

Ben, that’s just one reason for my happiness. However, it’s true that for any occasion– large, small or no occasion at all– I love giving gifts. But it can be tricky.

giftwrap
Goldilocks said, “This gift is too big!”

Too large or too expensive a gift like this jewel encrusted package or a trip to Paris for lunch would make a friend feel beholden and I don’t want that. (Let me be perfectly clear, I would not give a trip to Paris for lunch.Or a jewel encrusted package. So don’t ask.)

hanger2

Goldilocks said, “This gift is too small!”

Too small a gift, like a coat hanger, is just tacky. Getting it just right takes some thought.

1-DSC01118

Goldilocks said, “This gift is just right.”

The design is OESD/ Embroidery On-line’s Happy Birthday Frog. My design library includes the Bernina collection Fanciful Frogs. I have used those designs here and again and again.

As you can see, dishtowels are my go-to “little” gift. They can be personalized with machine embroidery (do you think my sorority sister Danilee ever got one of those bicycle license name plates or wall plaques?)

A novelty fabric turn tube hem or hand embroidery embellishment makes a towel special.

Yo-yo flowers with button centers, rick rack and a turn tube hem transform a plain white dishtowel to something more interesting.

Yo-yo flowers with button centers, rick rack and a turn tube hem transform a plain white dishtowel to something more interesting. This towel was a project I taught at Sewing at the Beach, Myrtle Beach. Would you like this design to be offered as a freebie?

Dishtowels are always the right size, the right price. Even if the color is wrong they still dry the dishes.

For the hostess of our fabulous family Thanksgiving dinner.

These were for the hostess of a fabulous family Thanksgiving dinner. The leaf spray is from Autumn Wreaths, Kreations by Kara. I added the pumpkin from some other set. They made a perfect hostess gift.

A thank you for the gracious owners of the beach condo my daughter rented.

This was a thank you for the gracious owners of the beach condo my daughter rented. These designs are from Dakota Collectibles Shell Collection and matched the wallpaper in the kitchen.

In groups they make a substantial birthday gift.

1-DOWquiltowels

This DOW set was embroidered for my sweet, enthusiastic quilting friend Catherine.

It helps a quilter schedule a perfect week.

The embroidery design set was done by Tracy Burkart of Needleart Studio. They seem to be unavailable now. It helps a quilter schedule a perfect week.

A recipe towel paired with a jar of jam was just the right size for each of my treasured PGM friends at our Christmas gift exchange.

recipe towels-jars1

I haven’t canned in years, but these jams from the Mast Store had more down-home appeal than Smuckers. The recipe designs are from Embroidery Library. They come as simple redwork.  I added the fruit.

The hostess of our Christmas party had just become a grandmother to...you guessed it...little Harry.

The hostess of our Christmas party had just become a grandmother to…you guessed it…little Harry.The design is from Dakota Collectibles Christmas Applique collection.

Coordinated with a turn tube hem, the dishtowels were bright and cheerful.

When a very dear but far away friend was experiencing some serious difficulties, these towels offered  daily inspiration and a reminder that I cared. Coordinated with a turn tube hem, the dishtowels were bright and cheerful. Designs are from Amazing Designs Inspirational Concepts. A dishtowel can give a very personal message for little more than the cost of a greeting card. It lasts longer and is useful.

true friends towel-1

The embroidery is a compilation of elements from various designs. The house, tree, and “road” were combined with text to express a heartfelt message.

For another group gift exchange, Christmas dishtowels filled the bill.

2-towels-tree-calm

The Christmas tree design is from Kreations by Kara, Christmas in Motion collection. “All is calm, all is bright” is in Amazing Designs Christmas IV collection which seems to be discontinued.

xmas towels

The “Tilted Tree,” “Jingle,” and Gingerbread House are all from Applique Corner.

Well, there are more dishtowels, but I seem to have beat this horse to death. I get all wrapped up in remembering the occasion and the recipients. Can you tell I love dishtowel gifts?

.

““““`

Thanksgiving 2021-It all came together!

table set, ready for dinner

What a joyous, satisfying Thanksgiving we had!  All the cooking and sewing and preparations proved to be worth it as it all came together and our family arrived.

We had some close calls and a lot of tension before that, though.  One week before Turkey Day, the thermostat in my stove died!  It would likely take a week to get a replacement part#$%&!!!!  Dear husband Bob decided we should just get a new stove, but in this era of widespread shortages, that was like a scavenger hunt!  He finally found one that fit our need and it was delivered Sunday morning.  Hallelujah!

While we were waiting on the stove, at 11 p.m.Friday night, we discovered a flood in the dining room coming coming from under the china cabinet!  YIKES!!! We spent the night rotating 4-6 beach towels soaking up the water, spinning them in the washer then drying them while others replaced them with another set of  beach towels.

God bless the wonderful plumber who showed up at 11 a.m.Saturday and fixed the kitchen plumbing which had a 1/4″ hole in the pipe!  All the while I was praying the kitchen stove would be delivered the next day as promised.

Before all that angst, there was so much excitement as we readied everything–new curtains were made for one guest room, new pillowcases were made and embroidered, flower beds were weeded, fresh flowers placed in the guest rooms and front hall.  The dogs and cats were well aware that something was going on.

Sebastian eagerly awaits guests’ arrival

Before everyone arrived, the dinner table was set. I made free standing lace “ornaments” or “dingle dangles.”  They were tied to the burlap napkin rings which coordinated with the burlap table runner.  The burlap rings were wrapped around linen hemstitched napkins.

Burlap napkin ring with free standing lace pumpkin from Embroidery Library’s Fall Favorites collection. I’m going to have to press that burlap runner into flat submission with heavy starch and my press!  UPDATE:All the starch in the world won’t make burlap lie flat.  The trick is to pull a burlap strand just 2 threads inside the fringe, like pulling a gathering  thread.  THEN starch and press the edge flat.

Continue reading

“Thankful for…” dishtowels


At Thanksgiving, with so many blessings,  I think it is especially meaningful and important to express your appreciation and love to the important people in your life.  Make a phone call, send a card or make a dishtowel for Turkey Day.

For those who are far away, a towel or a pair of towels can be mailed easily.  Those in town will be delighted to receive this token of gratitude.

For family

for friends


for neighbors

and for any others for whom you are thankful–your pastor, mailman, teachers, school bus drivers.  The list goes on.  You can be sure it will mean a great deal to them.

Simply prewash a cotton dishtowel then starch and press it.  Arrange the text over a design, confining it all to a 5×7 frame.  Using water soluble stabilizer saves time that would be spent picking out tearaway behind the text.   Then stitch away and express your thankfulness to the people you appreciate.

There are so many gorgeous designs from which to choose.  The one I’ve used on the towels shown is from Autumn Wreaths Collection by Kreations by Kari.

For more whimsical text designs, the very popular “subway art” is available on several sites. These were made so many years ago that I cannot recall where I got them.  But they were very well received, along with the more traditional design.

Even in this last minute rush before the cooking begins, I encourage you to stitch up a few of these expressions of love and appreciation.  It’s fun and you deserve a little relaxation before the kitchen marathon begins.

I appreciate you, Dear Readers.  I wish I could make each of you a dishtowel that says “Thankful for Blog Readers.”  Happy Thanksgiving!

Required disclosure:  I am a paid Brother Ambassador.  Not required: I LOVE my Brother sewing machines!

Thanksgiving Napkins

Burlap napkin ring with freestanding lace acorn from Embroidery Library’s Fall Favorites collection. I’m going to have to press that burlap runner into flat submission with heavy starch and my press!

Thanksgiving is such a joyful holiday.  Gathering with family and friends, counting our many blessings, retelling stories of earlier celebrations of plenty, remembering loved ones who joined us before, and enjoying delicious food.

It’s always a happy  time.  And it always reminds me of a scrap patchwork quilt, with diners coming from locations all over the map, ages from the elderly to the very young.  This year our table will seat guests from 86 to 18 years old, from Nebraska, Indiana, Florida and we hope from New Jersey.  Conversation will come from a pastor, school teacher, retired missionary, engineer, college student, and me, a babbling needleworker/passionate grandmother/blogger/gardener/etc.

This year we are looking forward to welcoming a crowd of out-of-town family for Thanksgiving week and to our harvest table.  They hail from Nebraska, Indiana, Florida, and perhaps (we do hope!) New Jersey!

So many preparations are being made for this big holiday.  New curtains for 7 windows in one guest room have been sewn as well as new pillowcases, and more home dec projects. A sewing room clean-up has even begun, but that is a years’ long process!

When Embroidery Library posted a photo of a napkin with a freestanding lace acorn resting on a dinner napkin, the image spoke to me.  It was just what I wanted for my Thanksgiving table.  The collection includes a turkey, chrysanthemum, and a maple leaf in addition to the acorn, another leaf and pumpkin which I chose. After my selection of these, 3 of each were made for my 9 napkins.

Burlap napkin ring with freestanding lace pumpkin from Embroidery Library’s Fall Favorites collection. That waffling burlap runner WILL be flat very soon, if it takes a full can of starch!

It is recommended that the same thread be used in the bobbin and needle.  It takes some time to wind matching bobbins, but the finished look is worth it.  DMC 50/2 cotton machine embroidery thread was used for a slightly lighter look. This generates a LOT of lint, so it required very frequent cleaning of my Brother Dream Machine. FYI, 2 ornaments fit in a 5×7 frame.

If you have never done freestanding lace before, Embroidery Library has an excellent free tutorial.  I embroidered on two layers of Brother water soluble stabilizer which worked perfectly. Excess was cut away and the stabilizer washed away easily and completely.

Burlap napkin ring with freestanding leaf pumpkin from Embroidery Library’s Fall Favorites collection. That waffling burlap runner WILL be flat very soon, if it takes a full can of starch!

After folding my napkins, I determined that a 1.5 x 11″ wrap of burlap sufficed.  With three strands of burlap, one vertical stitch was taken through the overlapped ends of the burlap with a tapestry needle.   It was then threaded through the ring at the top of each ornament and tied into a bow.

Looking back at one of my earlier Thanksgiving posts, I came across these images which I think you might enjoy.  Norman Rockwell’s traditional holiday feast reflects my personal preference for the mood and setting for this day of gratefulness.  The other shows a more contemporary observance.

Whichever suits you, I hope on November 25 you will have reasons to celebrate the many blessings we enjoy.

Traditional Thanksgiving

Contemporary Thanksgiving

Required disclosure:  I am a paid Ambassador for Brother USA.  Not required: I genuinely love my Brother sewing machines.


Quickie Bishop for Beatrice

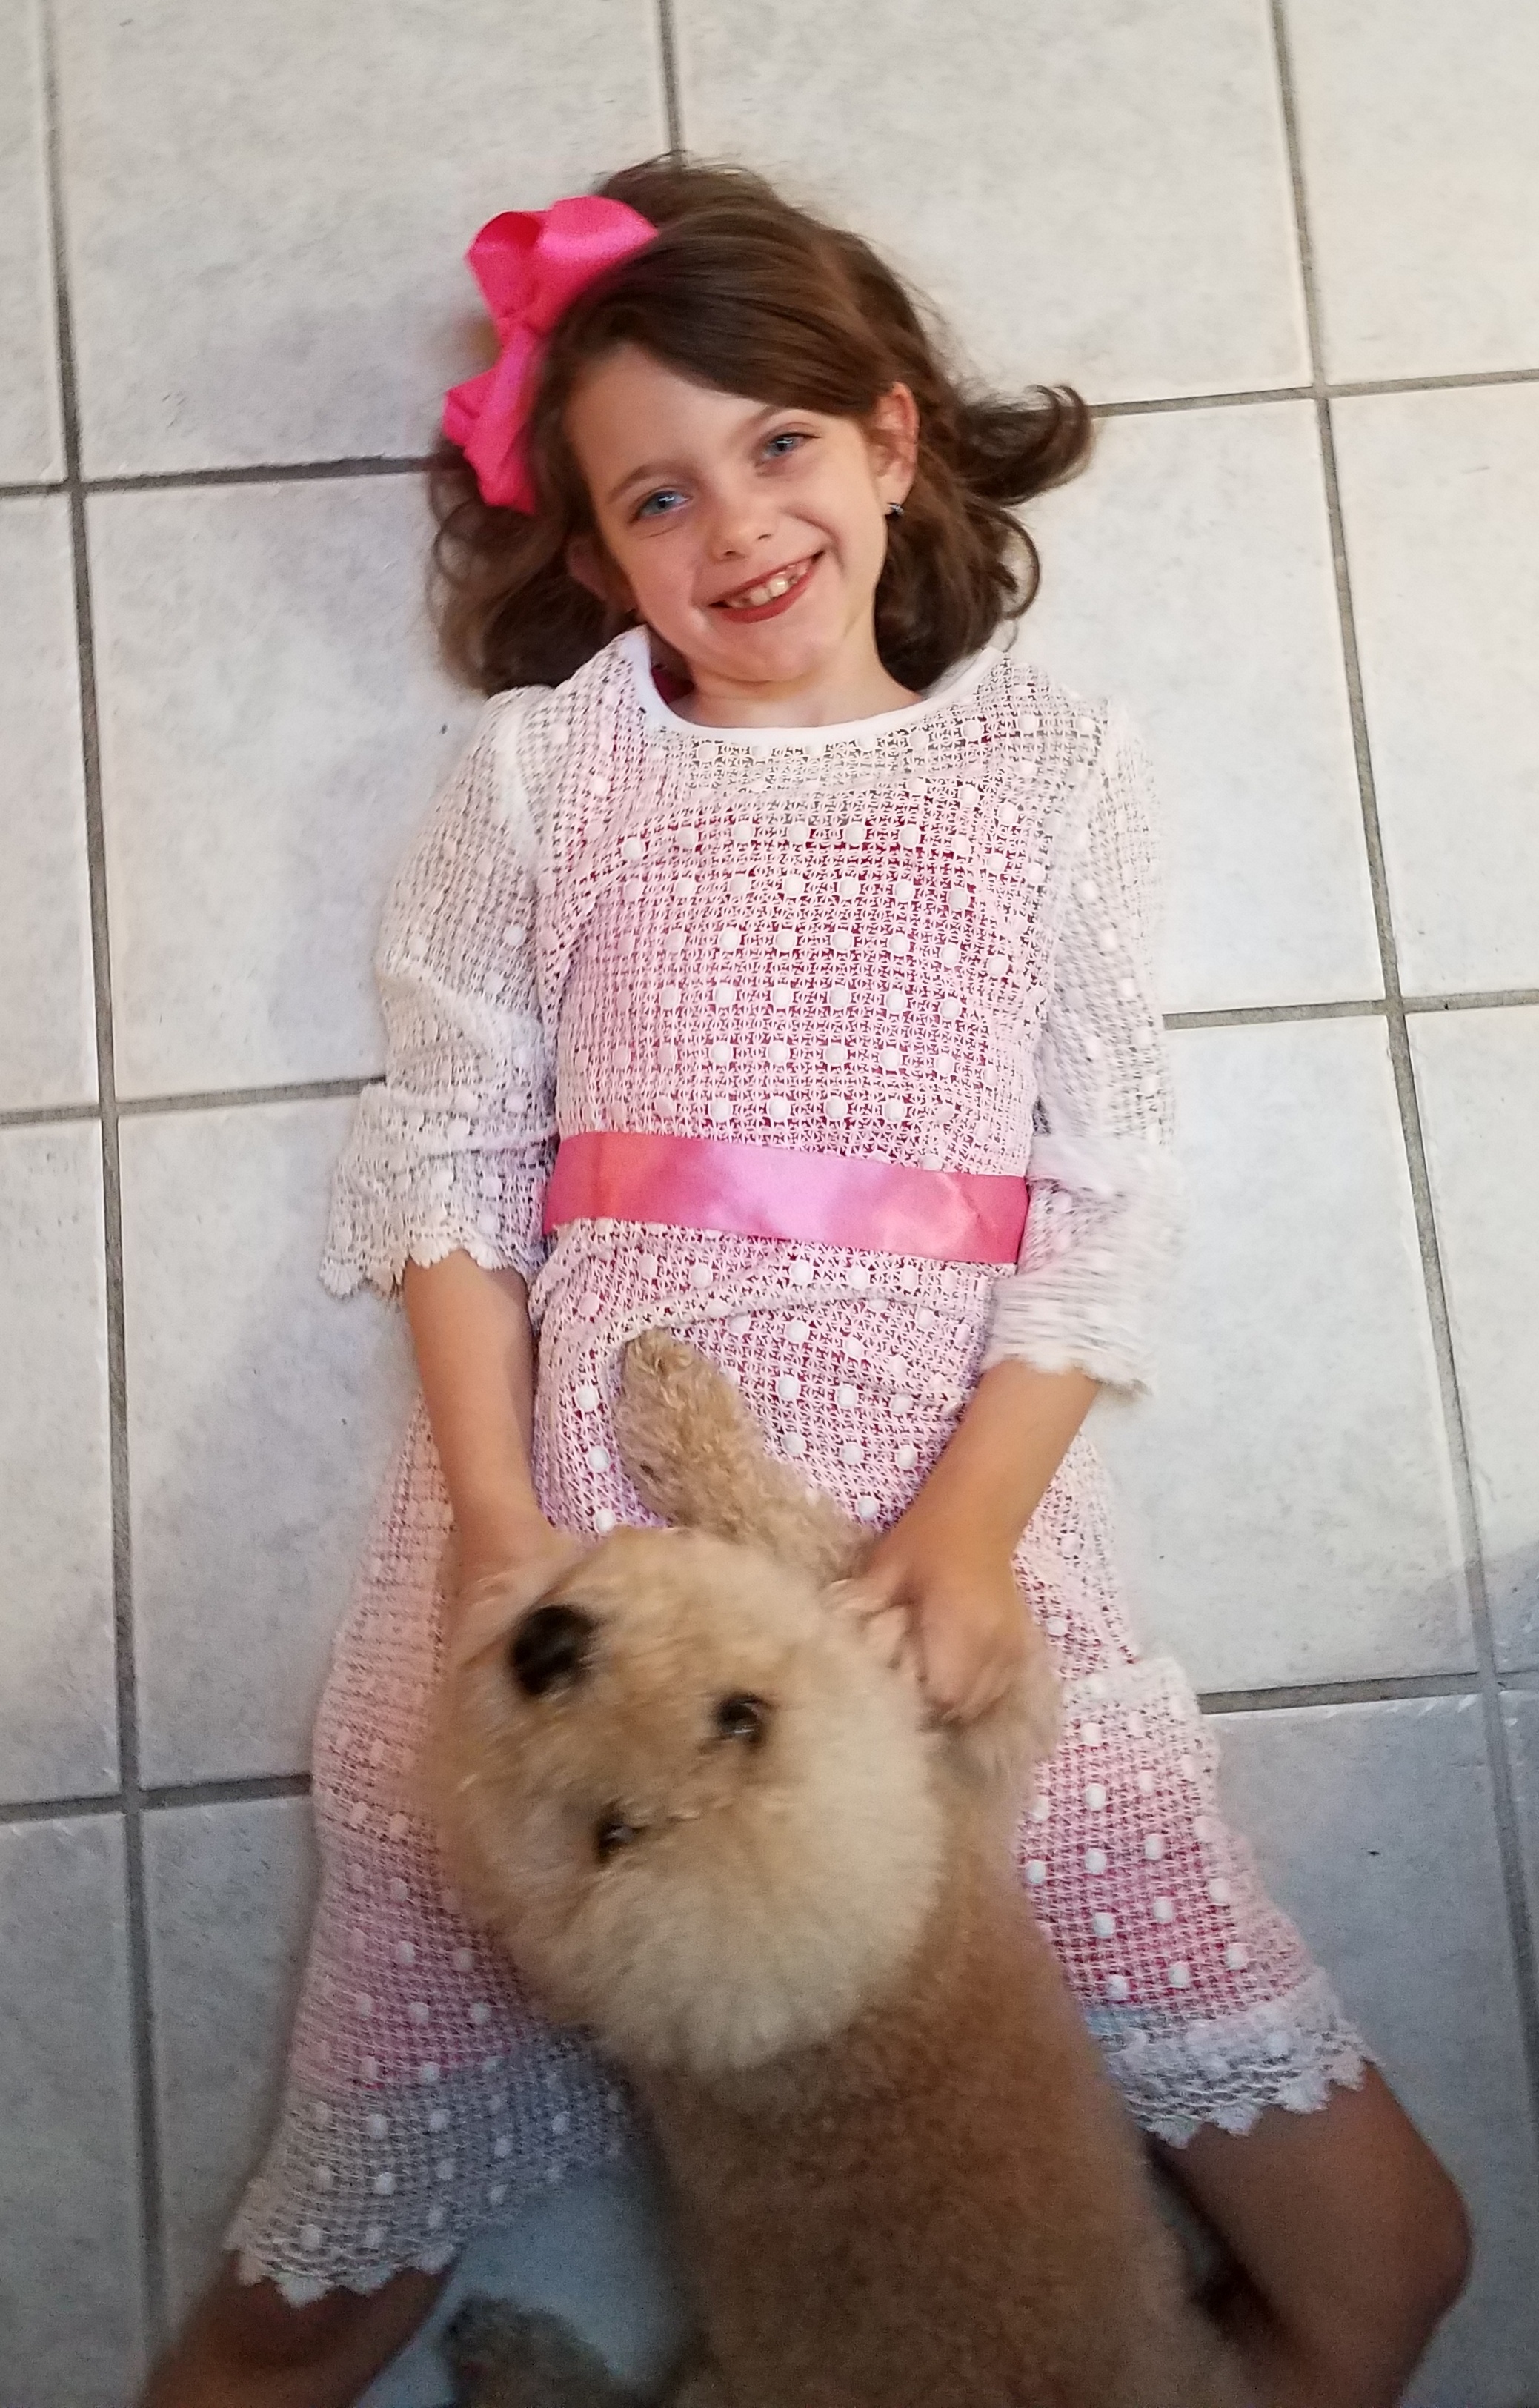
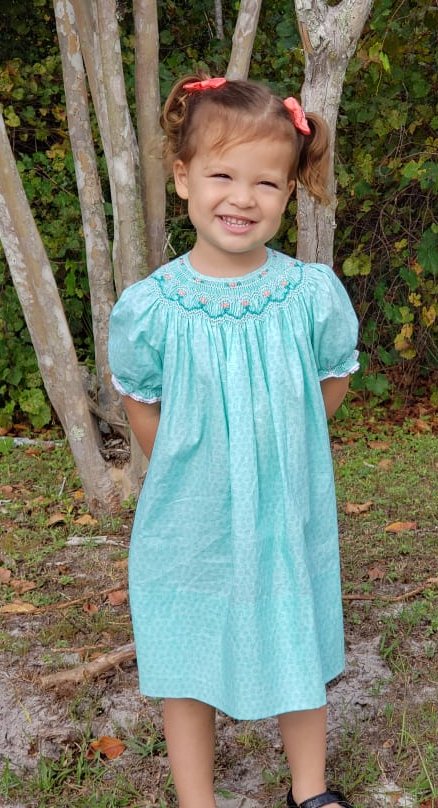
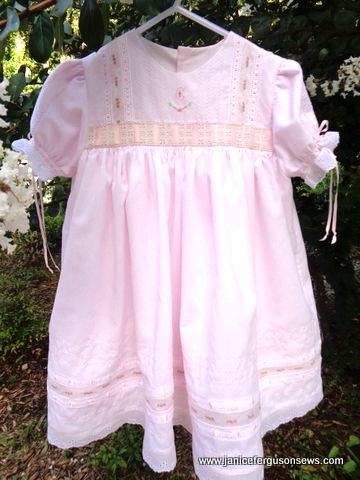
Beatrice wearing her aqua broadcloth ready-to-smock bishop.  The smocking design is Allison Leigh by Ellen McCarn.

This is my precious church granddaughter, Beatrice, wearing a bishop dress I completed for her in a relatively short time.  FYI, she is truly a granddaughter in my heart, but when I don’t identify her as my “church granddaughter,” I have to field questions as to which of my  almost middle-age children have had another child.

Ready-to-smock garments are readily available from a number of sources.  Most of my purchases have been from a few members of the Smocking Destash facebook group.  They do a fabulous job of pleating and constructing the garments using quality fabrics.  This garment was complete, from neck binding, to buttons and buttonholes to the hem.  Others are often in various stages of completion.

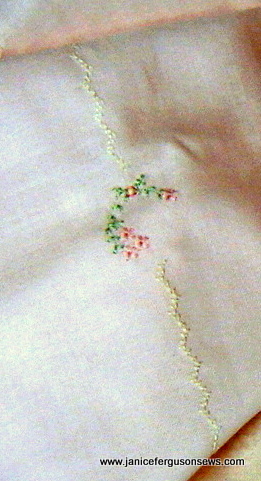
White lace trimmed the sleeves but I had something else in mind so the lace was removed and replaced with this.  Unusual lace and trims have always caught my eye, and this one certainly did.

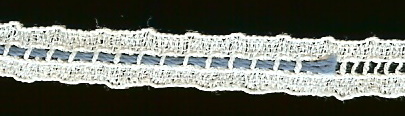
This lace is one of the most useful, versatile pieces I have. Just 1/4″ wide, the edges are straight enough to be used as an insertion or edging. Floss woven through the entredeux-like holes makes it a tiny beading.

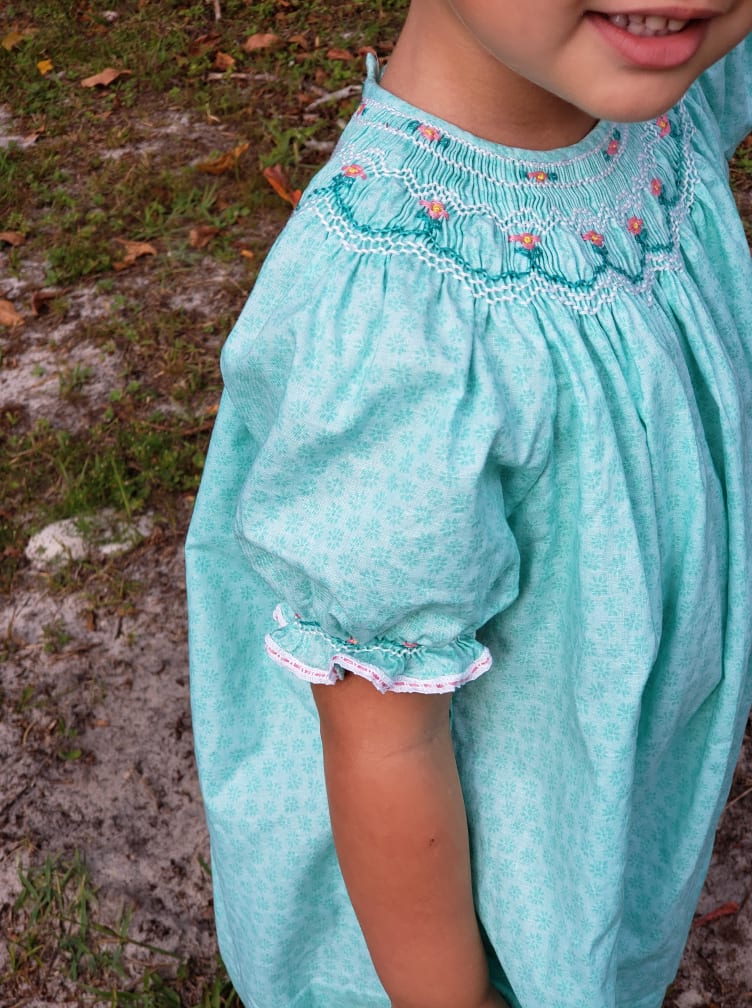
The sleeve was pleated with only 3 rows. So using a Swiss trim with entredeux seemed too wide, overpowering the narrow smocking.  This 1/4″ trim still allowed for the addition of color to match  the smocking.  Additionally, I had it on hand.

I was pleased to get this dress ready for Beatrice pretty quickly. Several other ready-to-smock garments lie in wait in my drawer of upcoming projects.  Now I just need a drawer full of time for all the projects I want to do!
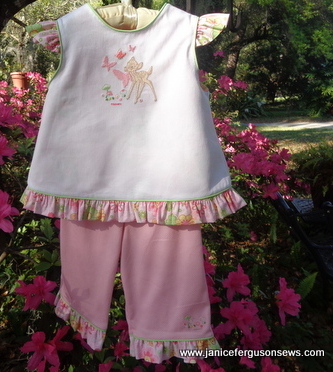
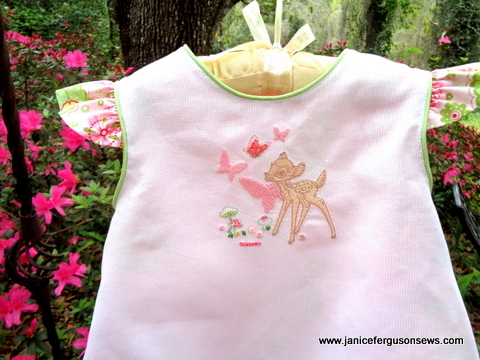
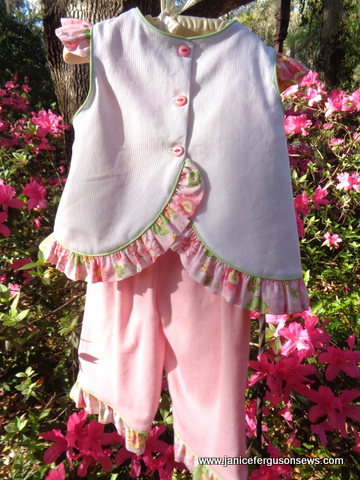
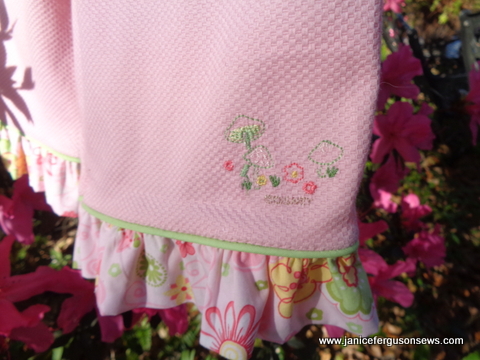


Free Brother MCS Design & Pink Baby Blanket

Swiss flannel daygown, bonnet and blanket for baby's homecoming

Swiss flannel daygown, bonnet and blanket for baby’s homecoming

NOTE:  The free design can only be used on Brother machines with the My Custom Stitch feature.  You must download the design and then import it to your machine via memory stick or floppy drive.  It cannot be opened on a computer or accessed any way other than through a Brother model which offers this feature.

It has been busy, busy, busy around here.  I’ve embroidered and framed more scripture verses for church, sewn a denim gored skirt for 9 yo Laurel from a fabulous pattern,  embroidered my son’s hiking back pack, altered his “thunderware” (YIKES!) and done a variety of other “utility” sewing projects.

This photo has been edited/darkened to better show detail.

This photo has been edited/darkened to better show detail.

While  trying to get some blogging done, I came across the forgotten post below in my draft folder.  Since two of my earlier posts on Brother’s  My Custom Stitch  feature,  Heart Swag Baby Shawl  and  T-Bonnet ,  there have been several inquiries asking about the zig zag feather stitch I created.  So once again, I am offering it to readers.  It can be saved to a memory stick or floppy disk or whatever device you use to transfer information to your sewing machine.  It is not a .pes hooped embroidery design.  This is done on the sewing side of the machine.

Swiss flannel bonnet, blanket and daygown for baby's homecoming

close up of zig zag feather stitch, worked with 30 wt. cotton thread

This  soft pink set was made for granddaughter Vivian Rose’s homecoming in January.  But she was a smaller newborn than our other three grandchildren so the size I chose was too big for her.  Now, 8 months later, the gown has been worn and outgrown.

This shows the feather stitch with greater contrast to better show detail.

This shows the feather stitch with greater contrast to better show detail.

Read on about this useful stitch and post your request for it in a comment.~~~~~~~~~~~~~~~~ Continue reading

Beach Portrait Dress

Continue reading