Tag Archives: machine embroidery

Fil Tire’ and Fancywork

FTOvnrz
fil tire’ oval surrounded by pinwheel roses and greenery ~~situated above serpentine entredeux woven with threads used for leaves…5.12″ x 7.9″

The Fil Tire’ and Fancywork machine embroidery collections created by Suzanne Sawko and me have been mentioned in several posts.

There are three sets, Elements, Combinations and Frames and Phrases. The stitched samples make the post very image intensive, so each collection will be posted separately. They will appear in succession,as quickly as I can scan sew outs and write the descriptions.

A few of the free designs offered here have been from one of the three sets.I am sorry this is more tedious than the one click purchase option on other upscale sites. This is more like yard sale bargain prices, changing inventory, and limited quantities. You might be surprised at some of the unique items I have in my stash/hoard/collection!

These designs are from the Fil Tire’ and Fancywork Combinations Collection.The cost is $25 if delivered electronically or $30 + postage if delivered on a cd.

3.85" x 2.07"
3.85″ x 2.07″ Another useful design for monograms is this design
called monogram swag.The flowers look very much like hand embroidery.

For sale: Fil Tire’ and Fancywork Combinations machine embroidery collection. $25 downloaded or $30 + postage on CD. Designs require hoop sizes from 4 x 4 to 6 x 10″. This is the second of three Fil Tire’ and Fancywork collections.

FThrtswagflr
6.63″ x 2.02″ ~~very sweet on a baby blanket with a monogram or name above the swag.

See a Swiss flannel blanket with this design.

NOTE: These sew-outs were stitched to card stock and kept in a notebook. This caused  the puckers in the fabric.The designs stitch out perfectly flat.

frongarchflr
3.94″ x 3.94″~~nice under monograms or names

This collection was designed and digitized by my close friend Suzanne Sawko and edited by me.

6.75" x 1.92" Baby pillowcases are so pretty with this design.
6.75″ x 1.92″ Baby pillowcases are so pretty with this design.

Suzanne is an innovative digitizer with a great sense of design.

FTbasketrz
2.68″ x 2.69″~~~fil tire’ basket

See this design on a tabletopper.

She was the first to digitize fil tire’ and, in my opinion, no one has ever duplicated the crisp, light, hand stitched look of her machine embroidered version of this classic hand stitching technique.

2.59" x 0.63"~~I've used this on either side of a button front yoked daygown.
2.59″ x 0.63″~~I’ve used this on either side of a button front yoked daygown.

There are 3 collections, Elements, Combinations and Frames and Phrases. Elements has individual designs that can be combined as you choose. Many of those “elements” are included in the Combinations designs. The other two collections will be offered and displayed in another post.

cluster
3.94″ x 3.94″~~Replicated from a 1930’s boudoir pillow.

There are also designs that look very much like hand embroidery. Some were copies from antique embroideries, like this one which was featured on a ’30’s boudoir pillow. There is a single coordinating  flower in the collection.

When she first told me many years ago that she was digitzing fil tire’, I might have been skeptical had I not known her. Suzanne had already digitized so many hand look stitches like chain stitch for redwork, machine embroidered French knots, lazy daisy, pinwheel rose and more that I expected she would do it and do it well.

1.69″ x 1.34″

See this design on a little quilt, “If apples were pears….”

There are 35 different designs, but 54 design files. Many identical designs are offered in two versions, like the two below. The first features web roses (shown unfinished–see the 5 legged cross at the very center of the fil tire’ and along the sides) which need some hand work, explained in the information file.

8.54" x 5.54" This would be pretty on a round collar or yoke. It requires some handwork on the web roses shown as stars.
8.54″ x 5.54″ This would be pretty on a round collar or yoke.The collection includes another version of this design which includes web roses, requiring some handwork.
ent3flrT

Other design are offered with slight variations, such as a row of entredeux with three pinwheel roses at right. It can be stitched vertically with what might be ribbons or, if stitched in green, tendrils. This same entredeux design with pinwheel roses is also offered horizontally.

1.2″ x 0.48″ The dainty, wide V design is sweet on collars or as brackets around a tiny monogram. See this design on zig zag bonnet.

3.26" x 1.55"
3.26″ x 1.55″ If rotated, the corner below also works for a monogram or name. It was also used on the sides of a Swiss flannel baby shawl. A handkerchief corner is another place for this small design.

cornrflr
3.94 x 3.94″ As is, it looks sweet on a handkerchief corner or on either side of a yoke. This design was used on a set of child’s tea party linens.

3.94″ x 3.94″ I use this little floral spray frequently on baby blankets, to break up a line of feather stitching around the perimeter.

serpflr
.54″ x 6.9″ floral serpentine This can be stitched continuously with a border hoop. One of my favorites in this collection is the floral serpentine. It can be connected to a continuous line around a skirt or down a blouse front.

1.56″ x 1.33″ fil tire’ oval See this on a doll dress bodice.For those of you patient enough to read through all this and still eager to sample a design, please leave your request as a comment. I will e-mail the fil tire’ oval, one of the most frequently used designs in the collection, to you.

Madeira Applique’ Tutorial

Joanne Banko hosted me on her live YouTube show December 9 for a fun and informative tutorial on Madeira applique’. This is one of my favorite heirloom techniques.

May be an image of 1 person and text that says 'fet with Joanne Banko go sew! Time for Tea & Tutorials! LIVE show Friday December 9th, 2pm Eastern Standard Time Learn Madeira the art of Appliquel With sewing, embroidery, & embroidery, heirloom Ferguson expert, Janice www.lanioefersasorsews.com Join us! Sip some tea and learn some new sewing tips and tricks! xxxxxxxx xxxxxxxx'
You can watch the replay here https://www.youtube.com/watch?v=G7Dw119fJJg&t=455s

Joanne is a dear friend of mine, who was described by another sweet friend who has never met her in person as “a genuinely warm, nice person.”

Her Friday live “Tea and Tutorials” are always a treat with various guests. Each show offers a unique sewing talent and special technique. Tune in to Joanne’s YouTube channel for entertaining and fun learning.

Getting back to Madeira applique, the video shows many of my finished projects that feature this technique and then goes on to show how-to step by step. Here are some of the projects shown, but the real meat of the video is the instructional story boards.

This little baby pillowcase was not shown, as there were time constraints. But I love this project.

I would rather have used a softer blue for the Madeira hem but for tv, I knew a darker color would show up better. The fil tire’ hearts and the swag are designs by extremely talented designer and my good friend Suanne Sawko.

This pillowcase is another project that was not included in the video. It was a birthday gift for my daughter a few years ago.

Details are included in this earlier bloghttp://www.janicefergusonsews.com/blog/2009/10/05/madeira-monogram-pillowcases/

Madeira mono green

This little bishop dress was included in the video.

It shows a traditional Madeira hem as well as a Madeira treatment on the sleeve. The sleeve didn’t show up very well on the video as with that Ipad camera I am as clumsy as a gorilla with a tatting shuttle. So prease be forgiving. Here is a close up.

No description available.

That tiny rosebud at the peak of the Madeira is a free download here. It is so very useful. Just ask for it in the comment section and it will be sent to your email.

It’s time to get back to Christmas preparations. It love this joyous season. The house and tree are almost decorated (I know it’s late but I’ve been crazy busy), the staircase is lovely and my favorite holiday ornament is hanging on the front door wreath. It is an antique sleigh bell I purchased at the church bazaar 50 years ago.

With a houseful of family arriving from New Jersey, Nebraska and Lakeland, Florida, it will be a chaotic, wonderful time of love and laughter. Above all, it will be a time of celebration of the birth of our Savior Jesus Christ. More on Christmas sewing later. Happy last minute holiday stitching to you!

Pumpkin Patch of Goodies

Peekaboo Pumpkin Treat Bags

This is from a post at Brother’s blog Stitching Sewcial https://www.brother-usa.com/blogs/stitching-sewcial/a-pumpkin-patch-of-pumpkin-goodies. All instructions with detailed photos are located there. The links for the machine embroidered peekaboo pumpkins 4×4.pes and 5×7.pes are no longer active, so if you would like them, just email me at janicegferg0616@gmail.com and I will send them. I love this project and think you will too.

It’s a pumpkin patch of goodies and so much fun to make!  With your Brother Embroidery machine, you can quickly stitch enough to fill a basket of these cuties.   Delight visiting children or any young friends at church or community gatherings.  Mail a few to your grandchildren or deliver some to nursing home friends or children at a homeless shelter.  Because pumpkin season runs long, from fall to Thanksgiving, a wagon load would not be too many.  You will have a good time making and giving these away.  The possible variations are unlimited.  You will have a hard time stopping with one.  I could not!    Individual pumpkins are mixed in with the directions. WARNING:  These can be addictive.

Here are a few variations. 

orange felt, green stripe ribbon

There are so many interesting printed burlaps that would make cute pumpkins. I like to cut a wider distance from the stitching to create fringe.  Adding curly ribbon makes it more festive. like the way the burlap fringes.

polka dot burlap with curly ribbon

This would have looked nice with gold metallic thread.  I always get these ideas too late. Maybe I’ll make another one! 

ivory with gold stitching

The step-by-step directions for these cute little treat bags are posted here https://www.brother-usa.com/blogs/stitching-sewcial/a-pumpkin-patch-of-pumpkin-goodies The bags are suitable through Thanksgiving.

Happy Fall!

Required disclosure: I am a paid Brother Ambassador. Not required: I LOVE my Brother sewing machines!

Quickie Hostess Gift

Note: The name of the host couple has been blurred so you all don’t try to wrangle a dinner invitation. This was such a delicious meal! And I’m sorry if perhaps the gloriosa lilies are just too much, but the colors look so festive and Mexican-like to me. They are blooming so profusely in my garden and I wanted to show them off.

Quickie Hostess Gift

For our Bible Study group, we always have dinner, with the host and hostess providing the main course with others bringing the remainder of the meal. But for some unknown reason, dear Jackie graciously decided to offer a complete Mexican dinner to our entire group. No one else had to cook and that was certainly a treat.

Truth be told, a terrible storm took out my power for quite some time that afternoon, so I did not finish the embroidery before time to go. When I returned home, I was so impressed with the meal that I added the text to the design. It is Embroidery Library’s Mariachi Clothesline.

I’ve always felt that situations like this require a gift which does not leave the recipient feeling beholden.

When I gave the towel to Jackie at church she was so very pleased. Of course, she is the kind of lady who would have been tickled with a decorative pocket package of tissues. At the fellowship hour after the worship service, she was showing it off and all the non-sewers, which makes up most of the congregation, seemed so amazed at not just the Mariachi Clothesline embroidery, but the personalization. It certainly takes a just a little stitching to make some people happy. And it makes me happy to see them happy.

So the next time you need a quick gift for someone you don’t want to feel beholden, go embroider or stitch a dishtowel. That’s my advice. Happy sewing!

And read on…….

This earlier post explains my feelings and opinion about dishtowels very well.

“Happiness doesn’t result from what we get, but from what we give.”
Ben Carson

Ben, that’s just one reason for my happiness. However, it’s true that for any occasion– large, small or no occasion at all– I love giving gifts. But it can be tricky.

giftwrap
Goldilocks said, “This gift is too big!”

Too large or too expensive a gift like this jewel encrusted package or a trip to Paris for lunch would make a friend feel beholden and I don’t want that. (Let me be perfectly clear, I would not give a trip to Paris for lunch.Or a jewel encrusted package. So don’t ask.)

hanger2

Goldilocks said, “This gift is too small!”

Too small a gift, like a coat hanger, is just tacky. Getting it just right takes some thought.

1-DSC01118

Goldilocks said, “This gift is just right.”

The design is OESD/ Embroidery On-line’s Happy Birthday Frog. My design library includes the Bernina collection Fanciful Frogs. I have used those designs here and again and again.

As you can see, dishtowels are my go-to “little” gift. They can be personalized with machine embroidery (do you think my sorority sister Danilee ever got one of those bicycle license name plates or wall plaques?)

A novelty fabric turn tube hem or hand embroidery embellishment makes a towel special.

Yo-yo flowers with button centers, rick rack and a turn tube hem transform a plain white dishtowel to something more interesting.

Yo-yo flowers with button centers, rick rack and a turn tube hem transform a plain white dishtowel to something more interesting. This towel was a project I taught at Sewing at the Beach, Myrtle Beach. Would you like this design to be offered as a freebie?

Dishtowels are always the right size, the right price. Even if the color is wrong they still dry the dishes.

For the hostess of our fabulous family Thanksgiving dinner.

These were for the hostess of a fabulous family Thanksgiving dinner. The leaf spray is from Autumn Wreaths, Kreations by Kara. I added the pumpkin from some other set. They made a perfect hostess gift.

A thank you for the gracious owners of the beach condo my daughter rented.

This was a thank you for the gracious owners of the beach condo my daughter rented. These designs are from Dakota Collectibles Shell Collection and matched the wallpaper in the kitchen.

In groups they make a substantial birthday gift.

1-DOWquiltowels

This DOW set was embroidered for my sweet, enthusiastic quilting friend Catherine.

It helps a quilter schedule a perfect week.

The embroidery design set was done by Tracy Burkart of Needleart Studio. They seem to be unavailable now. It helps a quilter schedule a perfect week.

A recipe towel paired with a jar of jam was just the right size for each of my treasured PGM friends at our Christmas gift exchange.

recipe towels-jars1

I haven’t canned in years, but these jams from the Mast Store had more down-home appeal than Smuckers. The recipe designs are from Embroidery Library. They come as simple redwork.  I added the fruit.

The hostess of our Christmas party had just become a grandmother to...you guessed it...little Harry.

The hostess of our Christmas party had just become a grandmother to…you guessed it…little Harry.The design is from Dakota Collectibles Christmas Applique collection.

Coordinated with a turn tube hem, the dishtowels were bright and cheerful.

When a very dear but far away friend was experiencing some serious difficulties, these towels offered  daily inspiration and a reminder that I cared. Coordinated with a turn tube hem, the dishtowels were bright and cheerful. Designs are from Amazing Designs Inspirational Concepts. A dishtowel can give a very personal message for little more than the cost of a greeting card. It lasts longer and is useful.

true friends towel-1

The embroidery is a compilation of elements from various designs. The house, tree, and “road” were combined with text to express a heartfelt message.

For another group gift exchange, Christmas dishtowels filled the bill.

2-towels-tree-calm

The Christmas tree design is from Kreations by Kara, Christmas in Motion collection. “All is calm, all is bright” is in Amazing Designs Christmas IV collection which seems to be discontinued.

xmas towels

The “Tilted Tree,” “Jingle,” and Gingerbread House are all from Applique Corner.

Well, there are more dishtowels, but I seem to have beat this horse to death. I get all wrapped up in remembering the occasion and the recipients. Can you tell I love dishtowel gifts?

.

““““`

3rd Birthday Dress for Beatrice

This beloved, long-awaited baby girl will be 3 years old in a few days!  In celebration of the occasion I have made her a birthday confection of batiste, lace, embroidery, feather stitches, ribbon and entredeux. As her official church Nana, I embraced this privilege.

This child is pure joy for her family and our entire church congregation.  We prayed so fervently for her safe delivery into the loving arms of her adoptive parents.  With her sparkling brown eyes and bouncing curls, she is all girl while at the same  rough and tumble.

Beatrice romps with her big dog and both of mine (weighing 100+ lbs).  She is friendly with the three family goats

and fearless with huge horses when she visits the stables. shhh..but just between you and me, she is a little frightened by teeny tree frogs! Continue reading

Valentine Gifts-Quick and Easy

NOTE: 2 FREE designs!  Heart balloons at Embroidery Library and Lace Heart applique’ at GG Designs.  Links below.

Hooping the towel on the left through the check border was very difficult. Consequently, the towel on the right was hooped above the thicker hem. Much easier.

With Valentine’s Day just around the corner, you might think it’s too late to make gifts.  But these quick and easy projects can be stitched in time, though you may have to ship them priority mail.  Just take a look.

I’ve always been a big fan of tea towels–no need to worry about the size or even getting the color right.  No matter what, anyone can dry dishes with your gift towel and frankly, the towel is less expensive than most greeting cards.  And no one needs to feel beholden.  I like that.

When I saw this high-flying free design at Embroidery Library, available in 4 sizes, I was on it.  I pulled out my prewashed stash of towels from All About Blanks and set to work for my friends, near and far.  I was very pleased with the results.  Embroidery was done on my Brother Dream Machine 2.

Another quick gift is this little pocketbook I made for my purse-loving 2.5 yo church granddaughter.

The sweet heart applique’ is another free design, in 6 sizes from GG designs, The monogram B is from Brother PE-Design.  The heart was embroidered on my Brother Dream Machine.

Of course, tradition dictates that neither purse nor wallet nor any money carrying vessel shall be gifted without some token currency.  So Beatrice’s little purse was loaded with a little change for her Winnie the Pooh bank, some candy to share with her parents, a small handkerchief for which she sees no use now and a lollipop which she popped in her mouth immediately.

The very simple purse is included in this adorable pattern, though I’m sure there are others just as quick to make.

I’m not the only one who thinks tea towels make great gifts.  This painted towel was lovingly made by our younger grandson, the handsome boy pictured on the mugs we enjoy for drinking our coffee.  One of his other dedicated grandmothers, “NanNan,” always works with him and his younger sister to craft Christmas gifts for family members.  We treasure this one.

Tea towel Valentine gift made by our grandson a few years ago.

I’m sure any Valentine gifts you make, quick and easy or time consuming, will be appreciated for the love that you put into it.

Happy Valentine’s Day to you, Dear Readers!


Required disclaimer: I am a paid Brother Brand Ambassador.  Not required: I love my Brother machines!


Fun Bug Bag

Summer is not yet over, and for some of us, it seems it never will end! As entertaining the children becomes more and more challenging, sometimes just getting them out of the house for a while is a worthy goal.

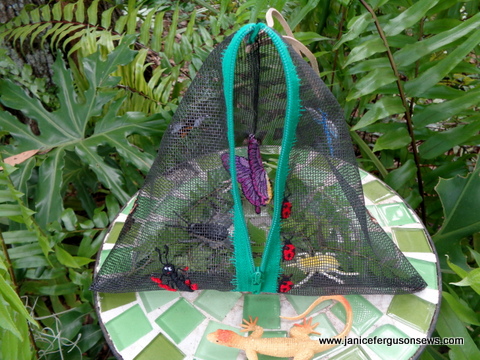
Whip up this quick and easy bug bag and they will be kept busy prowling the bushes and grass. Make it plain or make it fancy. Honestly, it takes longer to read the instructions than to make the basic bag.Whether the prey be creepy crawlies or fireflies, the adventure is a child’s version of a jungle safari. Work this into a lesson into entomology and identify some of these yard beasties and it becomes an educational adventure.

This fiberglass screen wire teepee bag (the name suggested by its shape) is a perfect accessory and holding pen. Use insect designs from design library to embellish the outside. Your Brother embroidery machine and most others will handle the screen wire effortlessly. The stand-alone butterfly swaying inside the bag will intrigue the children and send them racing out the door into nature.

Let’s make a bug bag!

Requirements:

    • sewing/embroidery machine
    • open toe foot, basic sewing foot
    • 4—4 or 5—7 frame to embroider more than one design in the same frame
    • Fiberglass screen wire: 18 x 26″ for bag embroidery and another large piece for stitch rehearsal of each potential design.
    • Utility scissors for cutting screen wire and zipper
    • Notions: zipper at least 18″ or with plastic teeth. Longer is fine. It will be cut to size during construction; 8-10″ cord or ribbon; monofilament, sewing and embroidery thread, seam sealant
    • Extra heavy water-soluble stabilizer (wss)
    • Download both left and right files below and piece together.

layout template left and layout template right (request below in comments and they will be emailed to you)Preparation

1. Print pattern/design templates. It is broken into two parts because my scanner bed is too small for the entire template. Print both the left and right templates and tape them together.
2. Print template of each design you plan to use. If deemed appropriate, resize to be proportional to the bag.
3. Cut 18 x 26″ screen wire. This large size makes hooping easier.
4. Tape completed template to white surface or pin to padded surface.

Note: It may be necessary to trace over the lines with a wide black marking pen for better visibility.

5. Center screen wire over template and tape or pin corners to hold in place.
6. Trace section placement lines onto screen wire with child’s school chalk. These lines show each section of the finished bag for suitable embroidery placement.

Note 1: To make the necessary marks, neither a sliver of soap, chalk marker or washout marker could be seen on the screen wire. Only white chalk, like that used on school black or green boards worked. Hmmm…were you ever in a classroom with a chalkboard? If so, you must be a grandmother like me.
Note 2: The screen wire will slip if not well secured when placed over the template. The red slashes show where it slipped and the line had to be redrawn after pinning it more securely to a padded surface.

7. Place templates of selected embroidery designs in chosen location within the section.

Note: It is helpful to take a picture with your phone so you can refer to it as you embroider.

8. Wind bobbin in each thread color used in the designs.

Embroidery

9. Select one or two designs to embroider on one large side and load into machine.
10. Hoop screen wire and heavy-duty water-soluble stabilizer (wss). Puckering occurred when the screen wire was simply basted to the wss.

NOTE: If you are blessed with a Brother embroidery machine with a camera capability, detailed instructions are posted at Brother’s blog, Stitching Sewcial here. Otherwise, proceed as you will.

13. After embroidery, do not remove wss.14. Continue hooping and embroidering each section. The wss is still in place on the back. Do NOT embroider the ladybugs now.

Note: To create the illusion of the ladybugs trailing up the green zipper they must be embroidered after the zipper insertion.

Construction

Insert the zipper in this unorthodox manner, stitched flat on the top side of the screen wire. This is done so the ladybugs could be embroidered along the zipper edge.

15. Attach open toe foot. The zipper is placed on top of the screen wire.
16. Open the zipper, place the top of the tape at the top of the bag’s marked cutting, right side up with the teeth at the edge of the left marked bag side.

17. Straight stitch 1/8-1/4″ from zipper teeth, with open toe foot positioned along the edge of the teeth. Needle position is in far right.
18. Open the zipper as far as possible. Repeat on the opposite side. WSS is still in place.
19. Stitch “grass” for ladybug’s home. On my Dream Machine that was stitch #7-12, width 6.5, length 4.0. Or select a similar stitch.

    • Return to Embroidery

      20. Open ladybugs design. Hoop with zipper near center of frame. Position design. Embroider.

21. Hoop 2 layers of wss in 4X4 frame. Embroider butterfly. This one was resized up to 2.56 x 2.55″. Be sure to use matching thread in the bobbin.

22. Remove as much wss as possible then soak in tepid water until the edges are clean. What remains between the layers will give the free flying butterfly stability. Pat with paper towels to help it dry.
When almost dry, shape it with wings spread as if to fly. The antennae are just loose threads. Applying a bit of seam sealant gives them some body.

Return to Construction

23. Cut screen wire to 8″-16″, along marked chalk lines but do not cut zipper. Best to remeasure for exact sizing. Leave zipper open to its greatest length.
24. Remove as much wss as possible. Trim screen wire and wss from teeth edges to first line of stitching.

25. Immerse bag in tepid water to dissolve wss.
26. Lie flat on a towel and roll the towel around it, like a burrito. Squeeze out excess moisture and hang to dry. If you are in a rush, a blow dryer speeds up the process of drying the zipper tape.

27. Stitch a folded 8-10″ cord or grosgrain ribbon to the top edge within the ¼” seam allowance. The loop should hang down with raw edges extended a little beyond the seam allowance. This creates a loop handle.

28. Close zipper a few inches above the bottom raw edge. Fold the bag inside out with the closed zipper in the center of the seam line. Stitch with ¼” seam allowance right over zipper.

29. Cut excess zipper-finally! Use utility scissors.

30. Fold top in half with zipper at one side. Begin stitching at zipper just above the first tooth. Back stitch for reinforcement. Angle up to ¼” seam line. The open toe foot gives best visibility for those first stitches.

31. Fold top in half with zipper at one side. Begin stitching at zipper just above the first tooth. Back stitch for reinforcement. Angle up to ¼” seam line. The open toe foot gives best visibility for those first stitches.

Does this make you want to hunt bugs or to sew a bug bag?

Pooh’s Book Pillow

Hello-0-0-0! If there are any readers left out there, I’m still here! Neither the virus nor lethargy has kept me quiet, just the hurry-up of life, even while in lockdown!

This is a fun little project that was done for precious little Beatrice, #1 fan of Winnie the Pooh.

The book pillow was also done for Brother’s Stitching Sewcial blog to celebrate Pooh’s birthday, hence the included book. Finding that little paperback required determination and skills worthy of Sherlock Holmes, but I was driven once I knew such a publication existed, though long out of print.

Book pillows have surged in popularity and not just for children. Who wouldn’t want to curl up with a good book and a soft pillow? With the recent stay at home call, this is a soothing antidote to what might be seen as isolation.

Why not make one today, for a child, for a friend, for a shut in, for yourself, for anyone! The instructions are for the Winnie the Pooh pillow shown, but any fabric, any embroidery design may be substituted.

NOTE: This pillow was made on my Brother Dream Machine. Some instructions are specific to that. Greater details can be found on Brother’s blog Stitching Sewcial here. Continue reading

Vivi’s Cruise Dress

Almost 7 yo Vivian Rose is tiny. A size 5 Children’s Corner Louise would have fit her ever so much better. She poses in Central Park on Royal Caribbean’s Harmony of the Seas cruise ship.

Life has been a whirlwind for us these past few weeks. Of course, Hurricane Dorian was expected for a very long time and preparations were non-stop. With 3 acres of patio furniture, potted plants, a standing basketball hoop, pool, and other miscellany, it seems there is always more you can do to prepare for a Cat 5 hurricane.

My fabulous husband, Bob, up on first story roof to put up storm shutters on second story windows. Already the skies were gray.

Additionally, I spent more hours in front of the television than I have in the past year. The weather and each of Dorian’s tiny turns to the east and then the west were monitored vigilantly. The weather had never seemed so important.

But living 30 miles inland from the coast, we were spared. Our damage amounted to two downed palm fronds and a few clumps of Spanish moss. But days were spent waiting and watching Dorian’s painfully slow progress as it viciously battered the Bahamas and inched up the Florida coast. We thanked God for His mercy, prayed for the poor Bahamians who were suffering bitterly, and prayed for those still in the storms path.

We had a cruise to the Bahamas scheduled for Sept. 2 and that was cancelled, of course. By the time the storm passed, we were rebooked on a cruise which departed from Port Canaveral Sept. 5, just 30 hours after we received confirmation.

The purpose and highlight of the cruise was spending time with our two younger grandchildren, 10 yo Alastair, 6 yo Vivian Rose, and their parents. We had a fabulous time.

The “cruise” dress I made in such a rush for Vivian Rose was done well before the hurricane was due to make landfall. Inspired by a gorgeous dress made by famous smocking plate designer Terry Collins, I ordered the fabric the very day she posted her dress on-line. The pattern is Children’s Corner Louise.

This is a terrific pattern, a blank canvas for a variety of embellishments. Or it is lovely as shown as a jumper or sundress. The bodice is fully lined.

While making this, I faced many of the problems familiar to those of you whose grandchildren do not live nearby.Though Vivi soon will be 7, she is very tiny. Yet her mother declared that she wears a size 6 and that’s what I should make. So I did.

Obviously it it too large in every respect except the length. You can see the gaping armholes in the first picture.

Continue reading

Free Happy Face Pencil Toppers

My turn to present the Children’s Message at church came this week just in time for back-to-school.

The children range in age from 4-10 so the message needed to be catchy to get their attention and brief enough to keep that attention.  Additionally, there must be a meaningful message.

This bag and fabric was a gift to me from the Ghana mission team in thanks for the garments our sewing group made. The bright colors certainly caught the children’s attention.

With a large, colorful  tote bag next to me,  I mentioned that they had all begun a new school year.  Then I asked what they learn at school.  The answers were just as expected–math, reading, manners and to be kind (that was nice to hear).

They were curious about the bag but I said they would see what was in it later.  It was a surprise.  Darling tow-headed Reid, 4 yo,  had snuggled up to me before the service began and sneaked a look in the bag.  He shouted smugly, “I know what the surprise is!!!!” Continue reading